Update Client
- This guide covers the steps for editing both Retail and Business clients from the Clients List page.
🛑 Note: Pages accessed via the 👁️ (eye) icon are presented in read-only mode. All tab content is visible but cannot be edited.
ℹ️ Tip: A label such as "There is a waiting approval" beside the page title signals a pending change request for the client. Selecting this label navigates directly to the corresponding approval or change detail page for review.
🔐 Permissions Notice: Users without direct update rights — such as non-tenant_api roles — will have their modifications routed to the Client Approve page, where the tenant_management team reviews and either approves or rejects the proposed changes.
Retail Update
If you clicked the 🖉 (pen) icon on the previous page, this is the page you are redirected to. Here, you can update the client’s information. First, select the type of change you want to make from the dropdown at the top left (e.g., Change Name). Once selected, the related section will become editable. After making your changes, click the Save Details button at the bottom to save them.
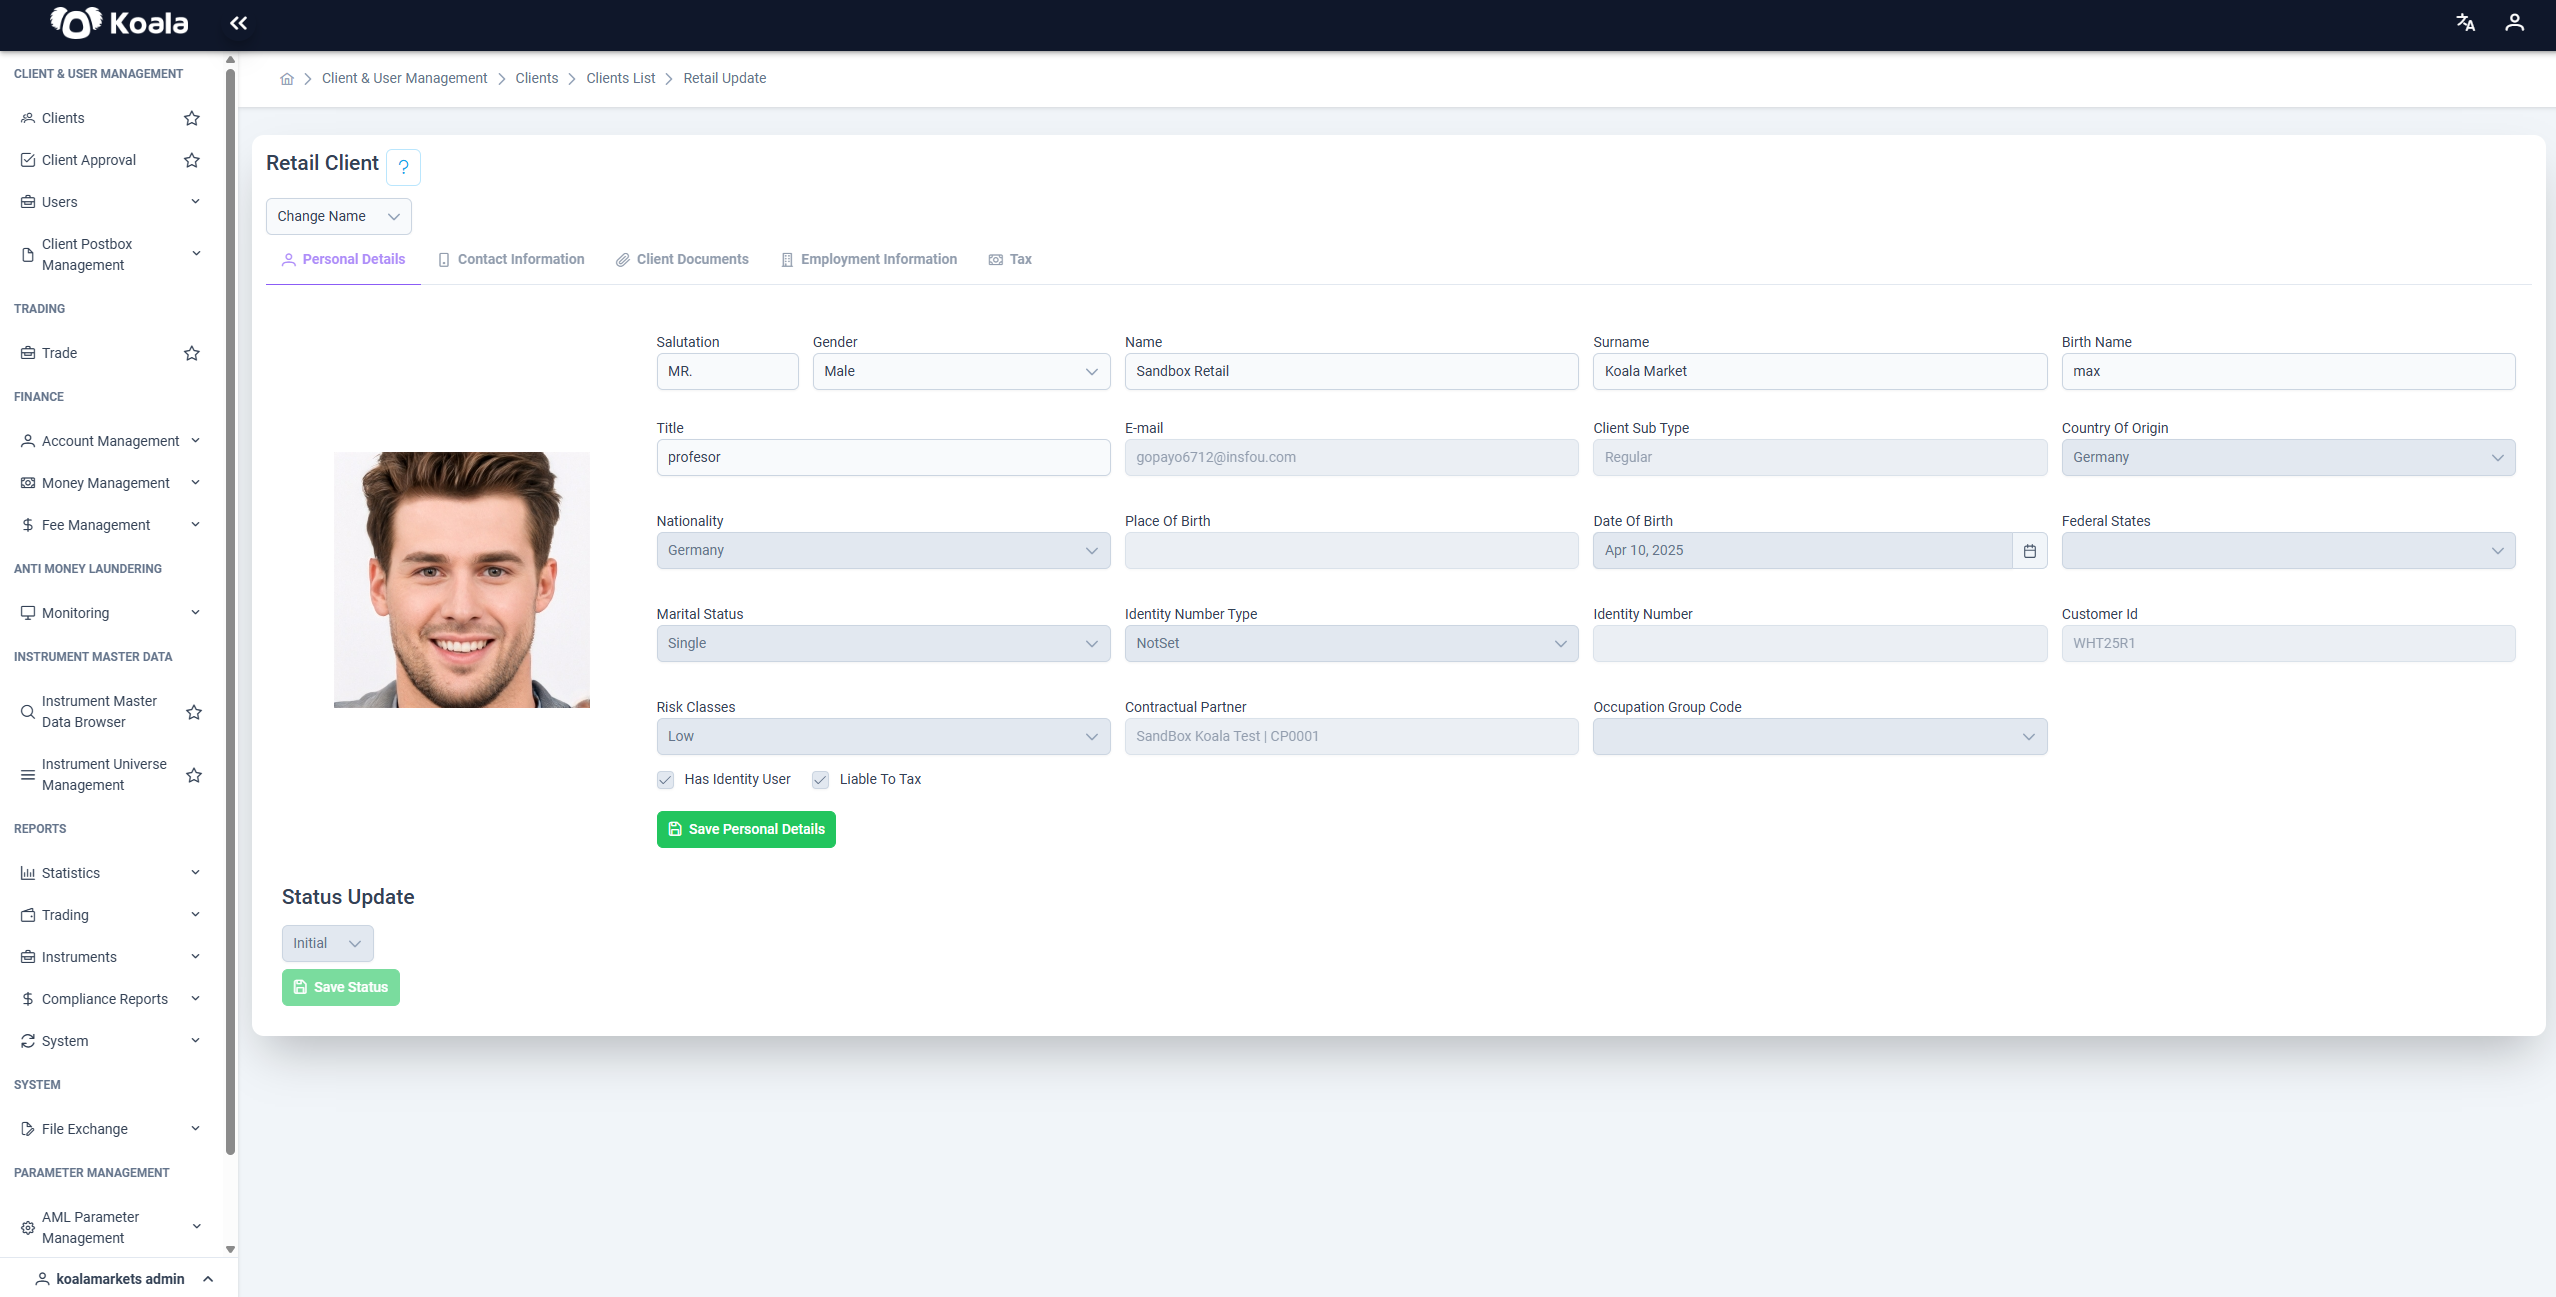
📇 Contact Information
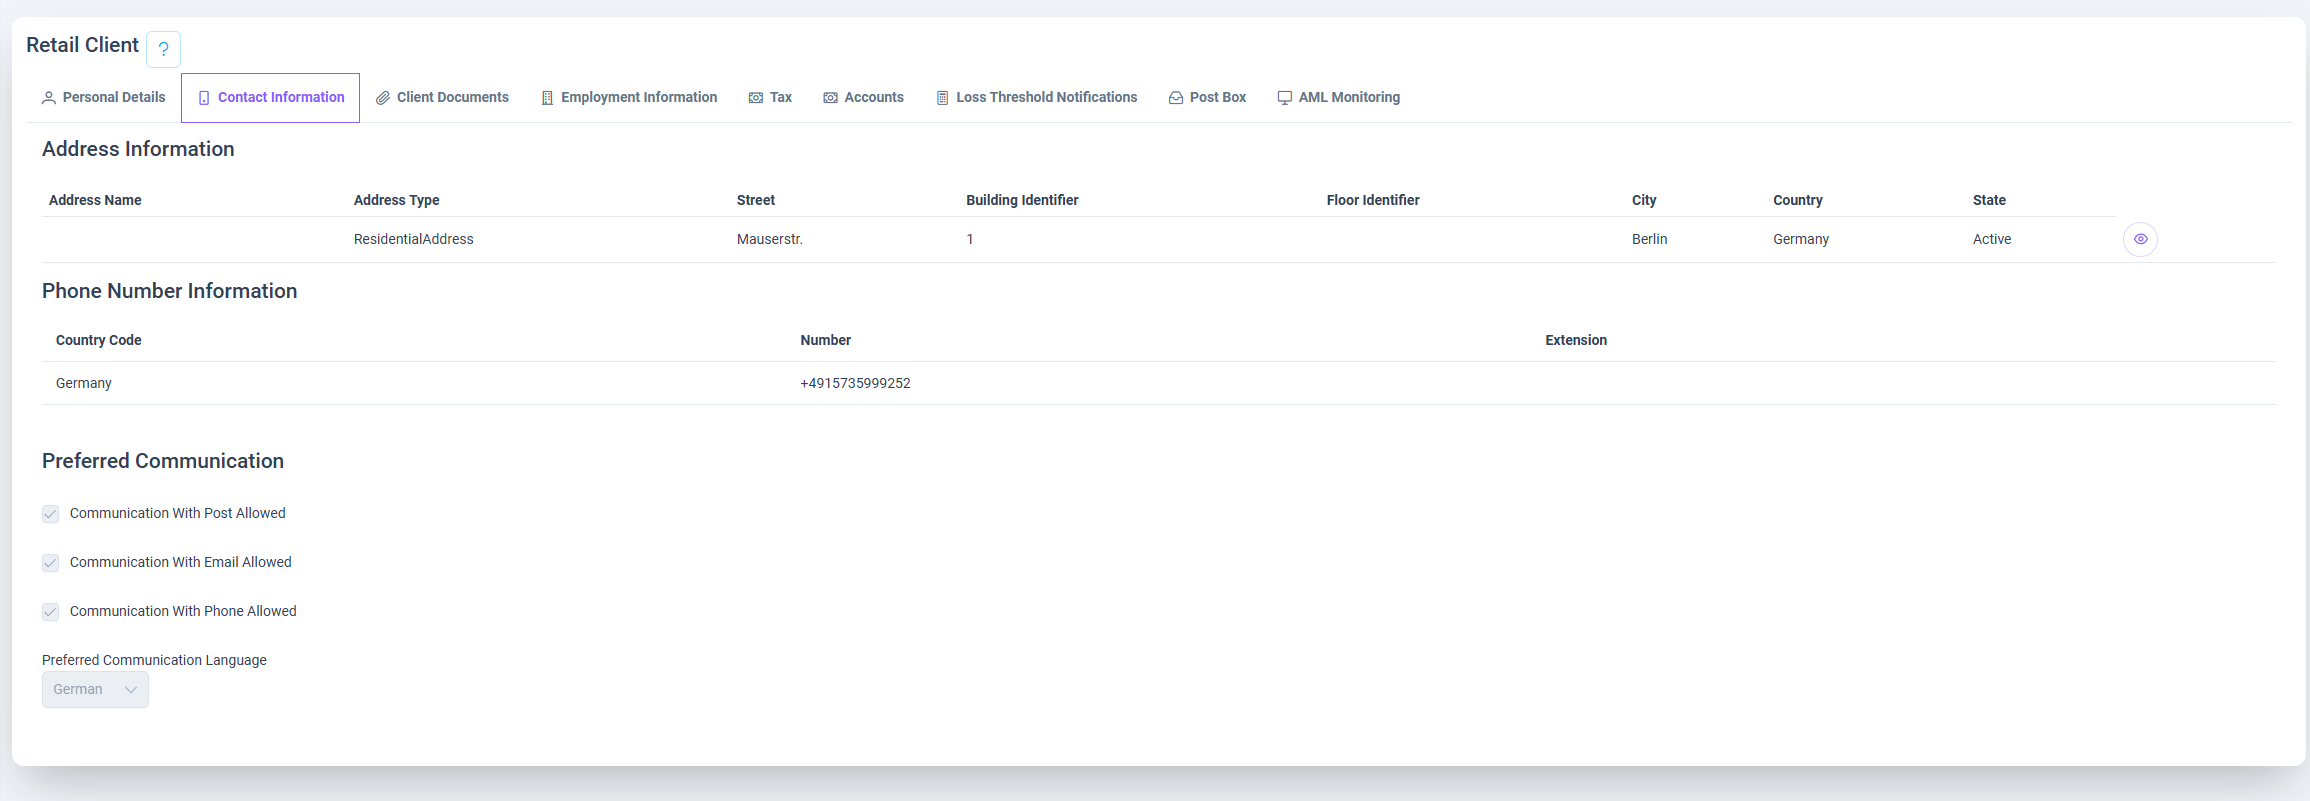
The Retail Contact Information section allows you to manage the communication details of a Retail Client. It consists of the following three key subsections:
Address Information: Contains the official retail address details such as street, city, country, and postal code. This information is used for regulatory and mailing purposes.
Phone Number Information: Stores the contact numbers of the retail, typically including landline and mobile numbers, which can be used for operational or emergency communication.
Preferred Communication: Specifies the client's preferred method of contact (e.g., email, phone). This helps ensure that important notifications are delivered through the most appropriate channel.
This section is essential for maintaining up-to-date contact data to support smooth communication between the platform and the client.
🏠 Address Information
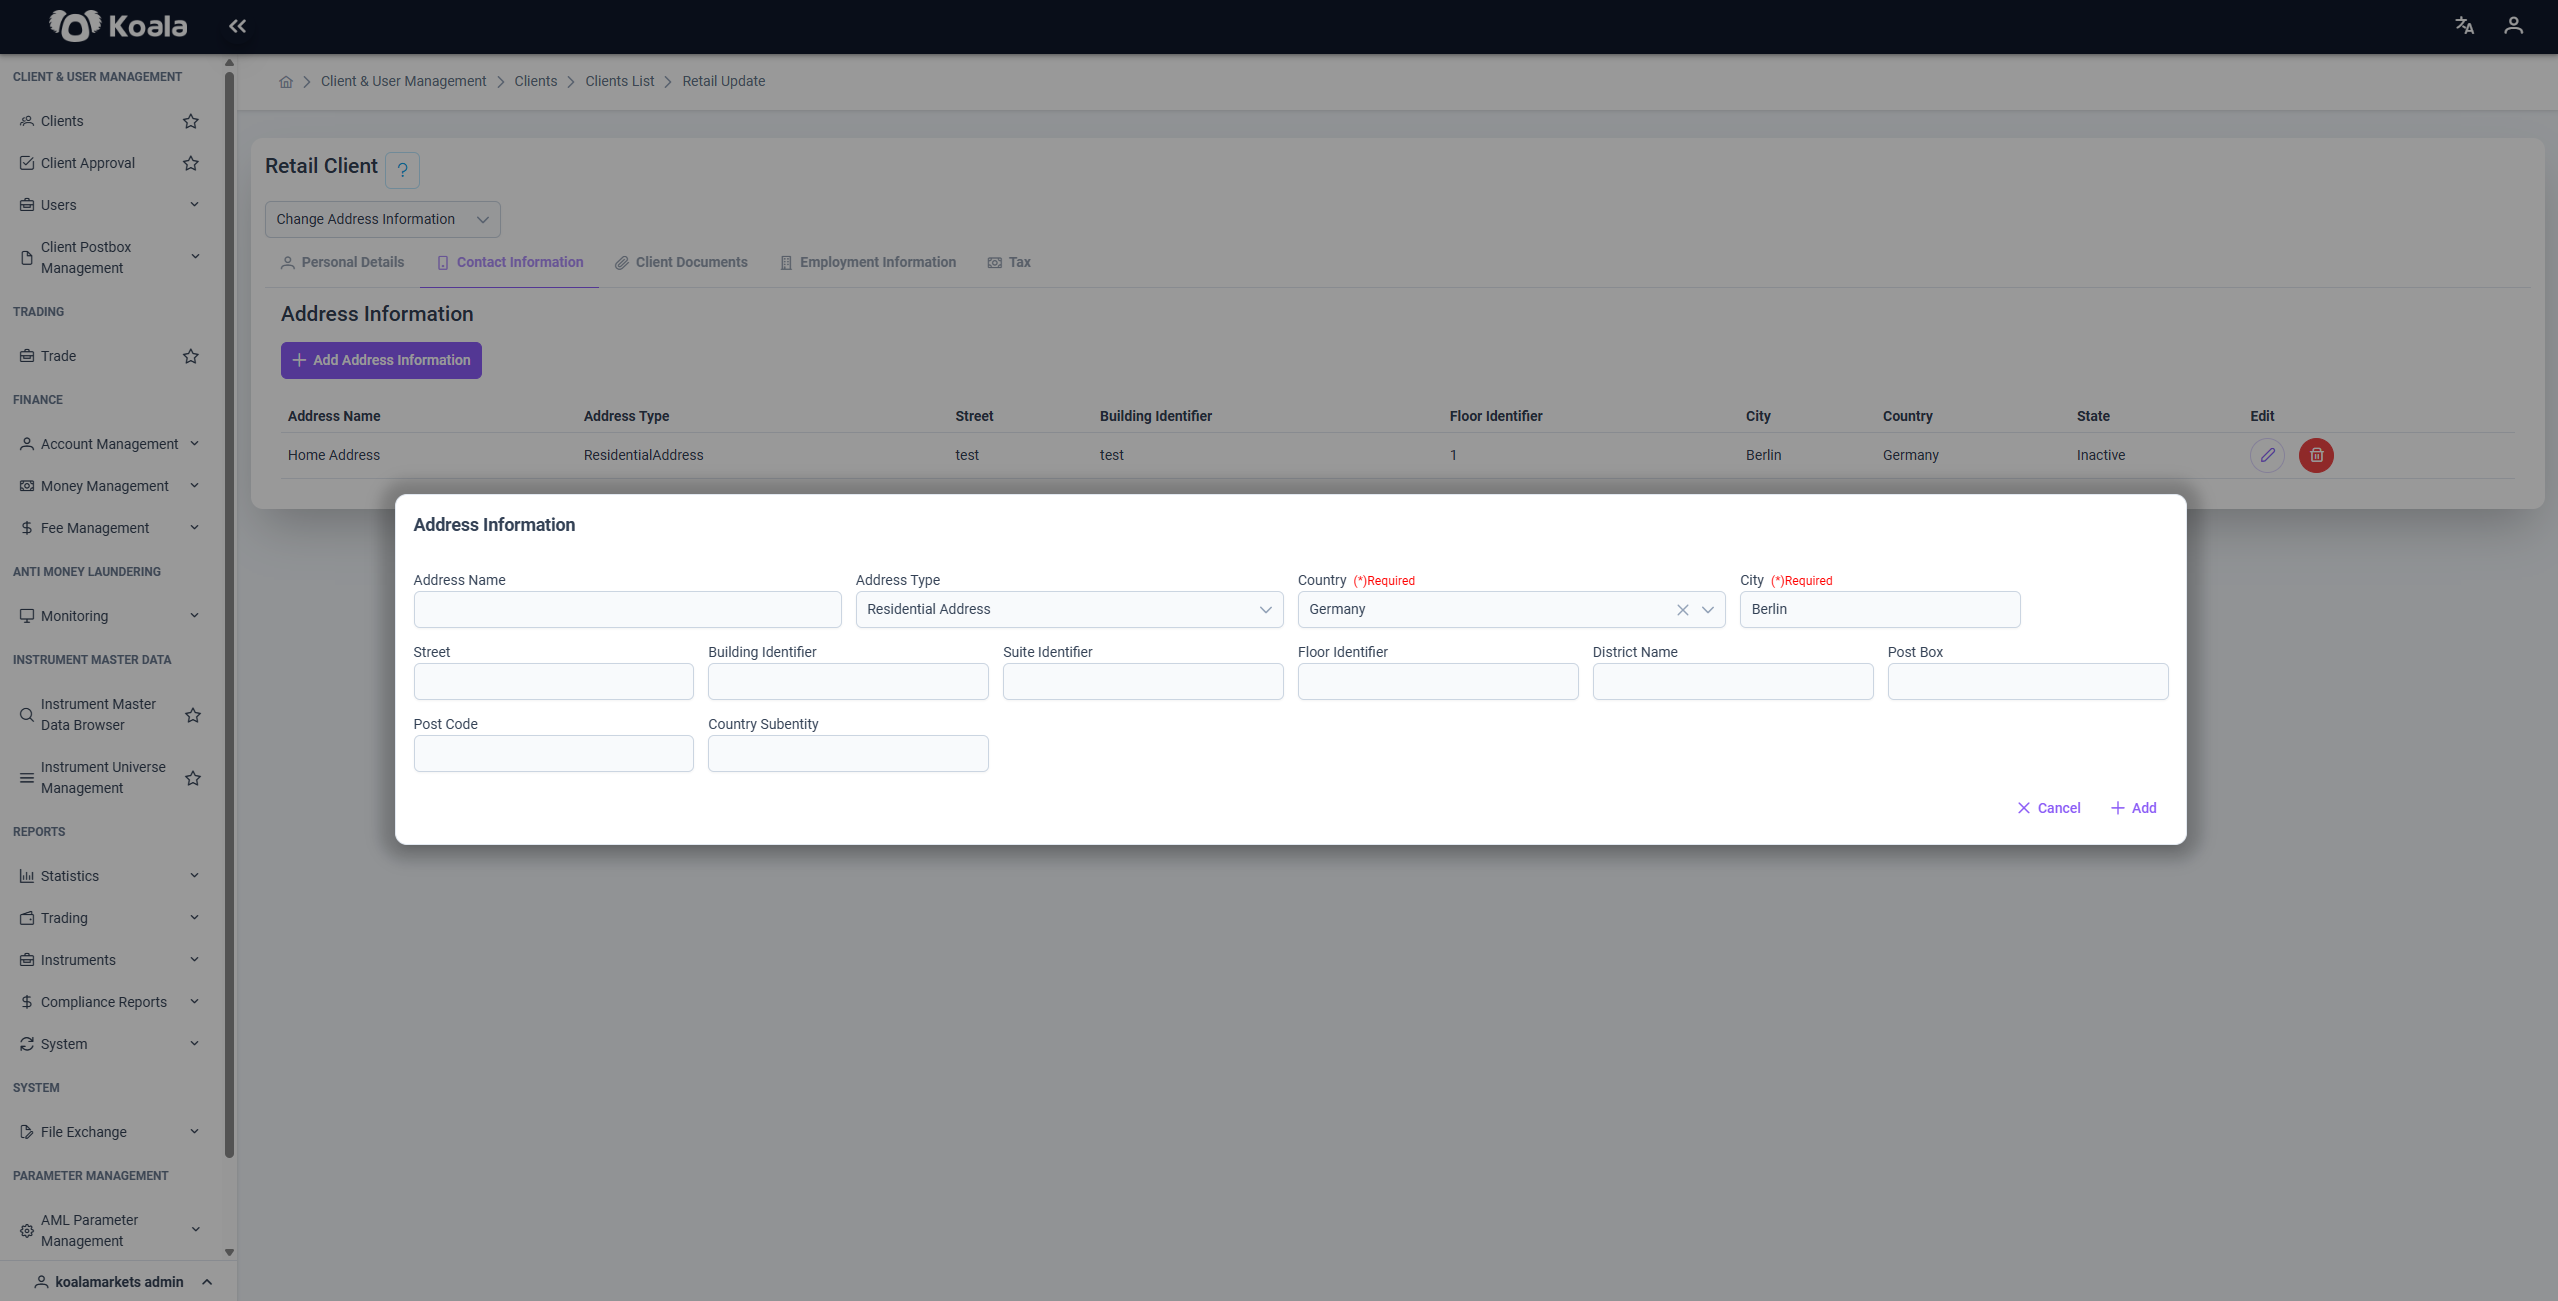
If you want to change the address, add a new address to the client, or remove the existing one, you can select Address from the dropdown. You’ll be redirected to the appropriate tab to proceed with your changes.
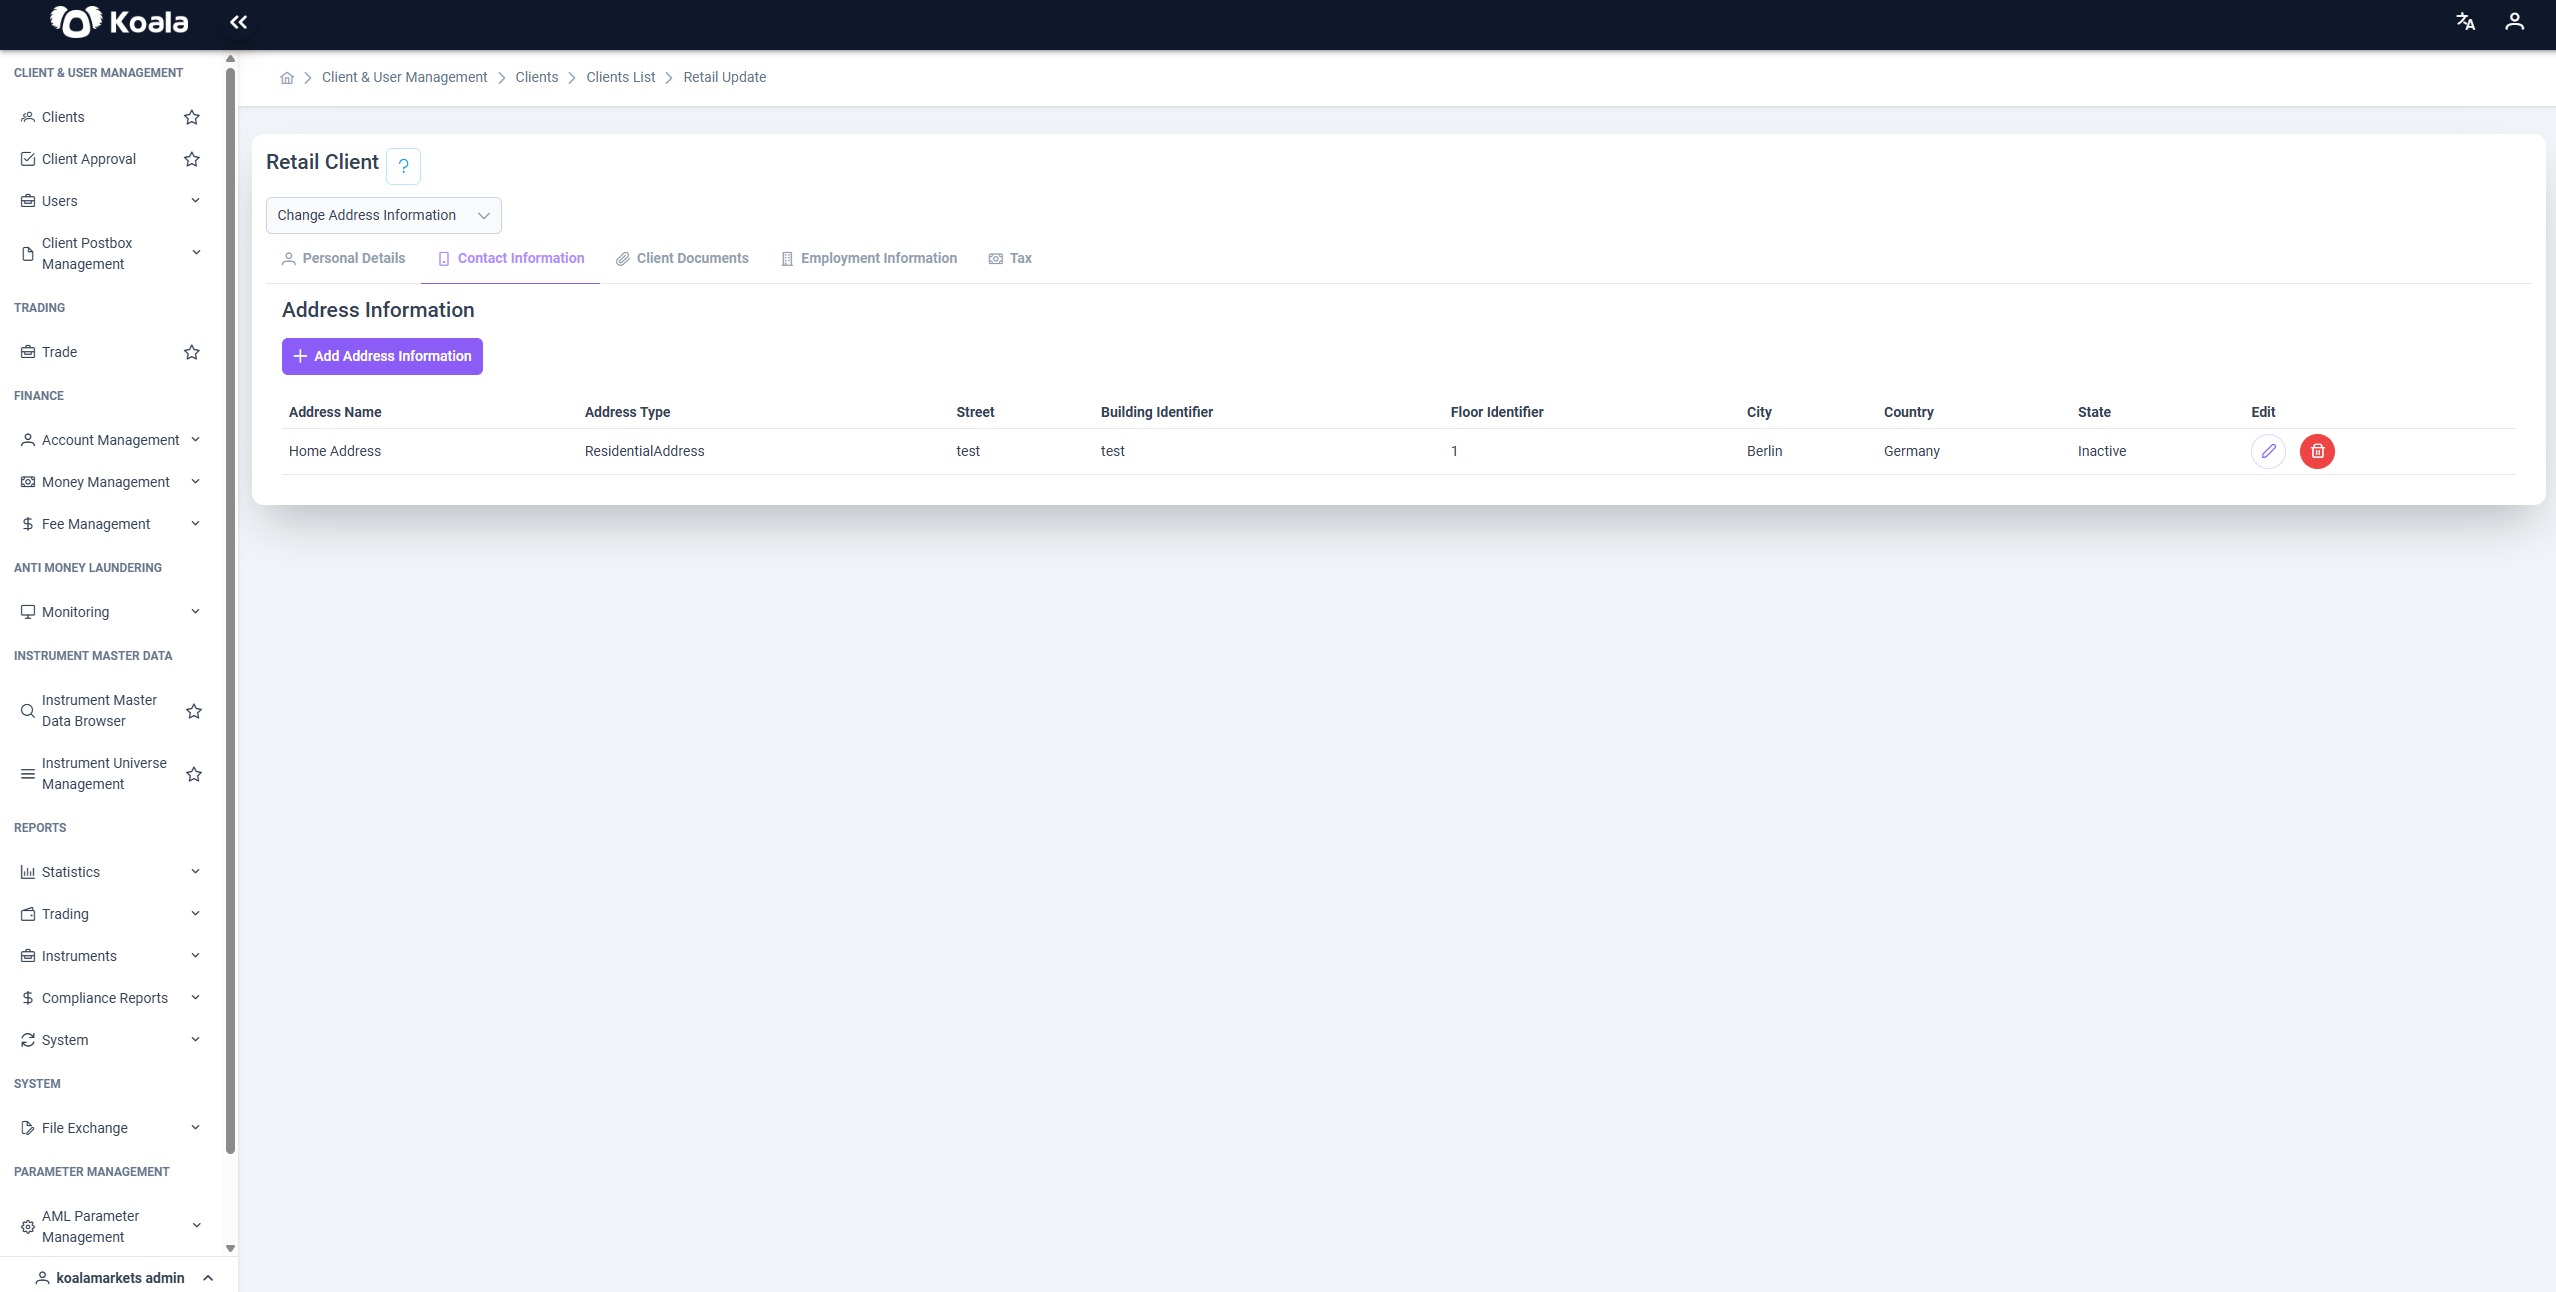
If you click the Add Address Information button, a screen will appear allowing you to create a new address. After filling in the required information, you can add the new address by clicking the Add button.
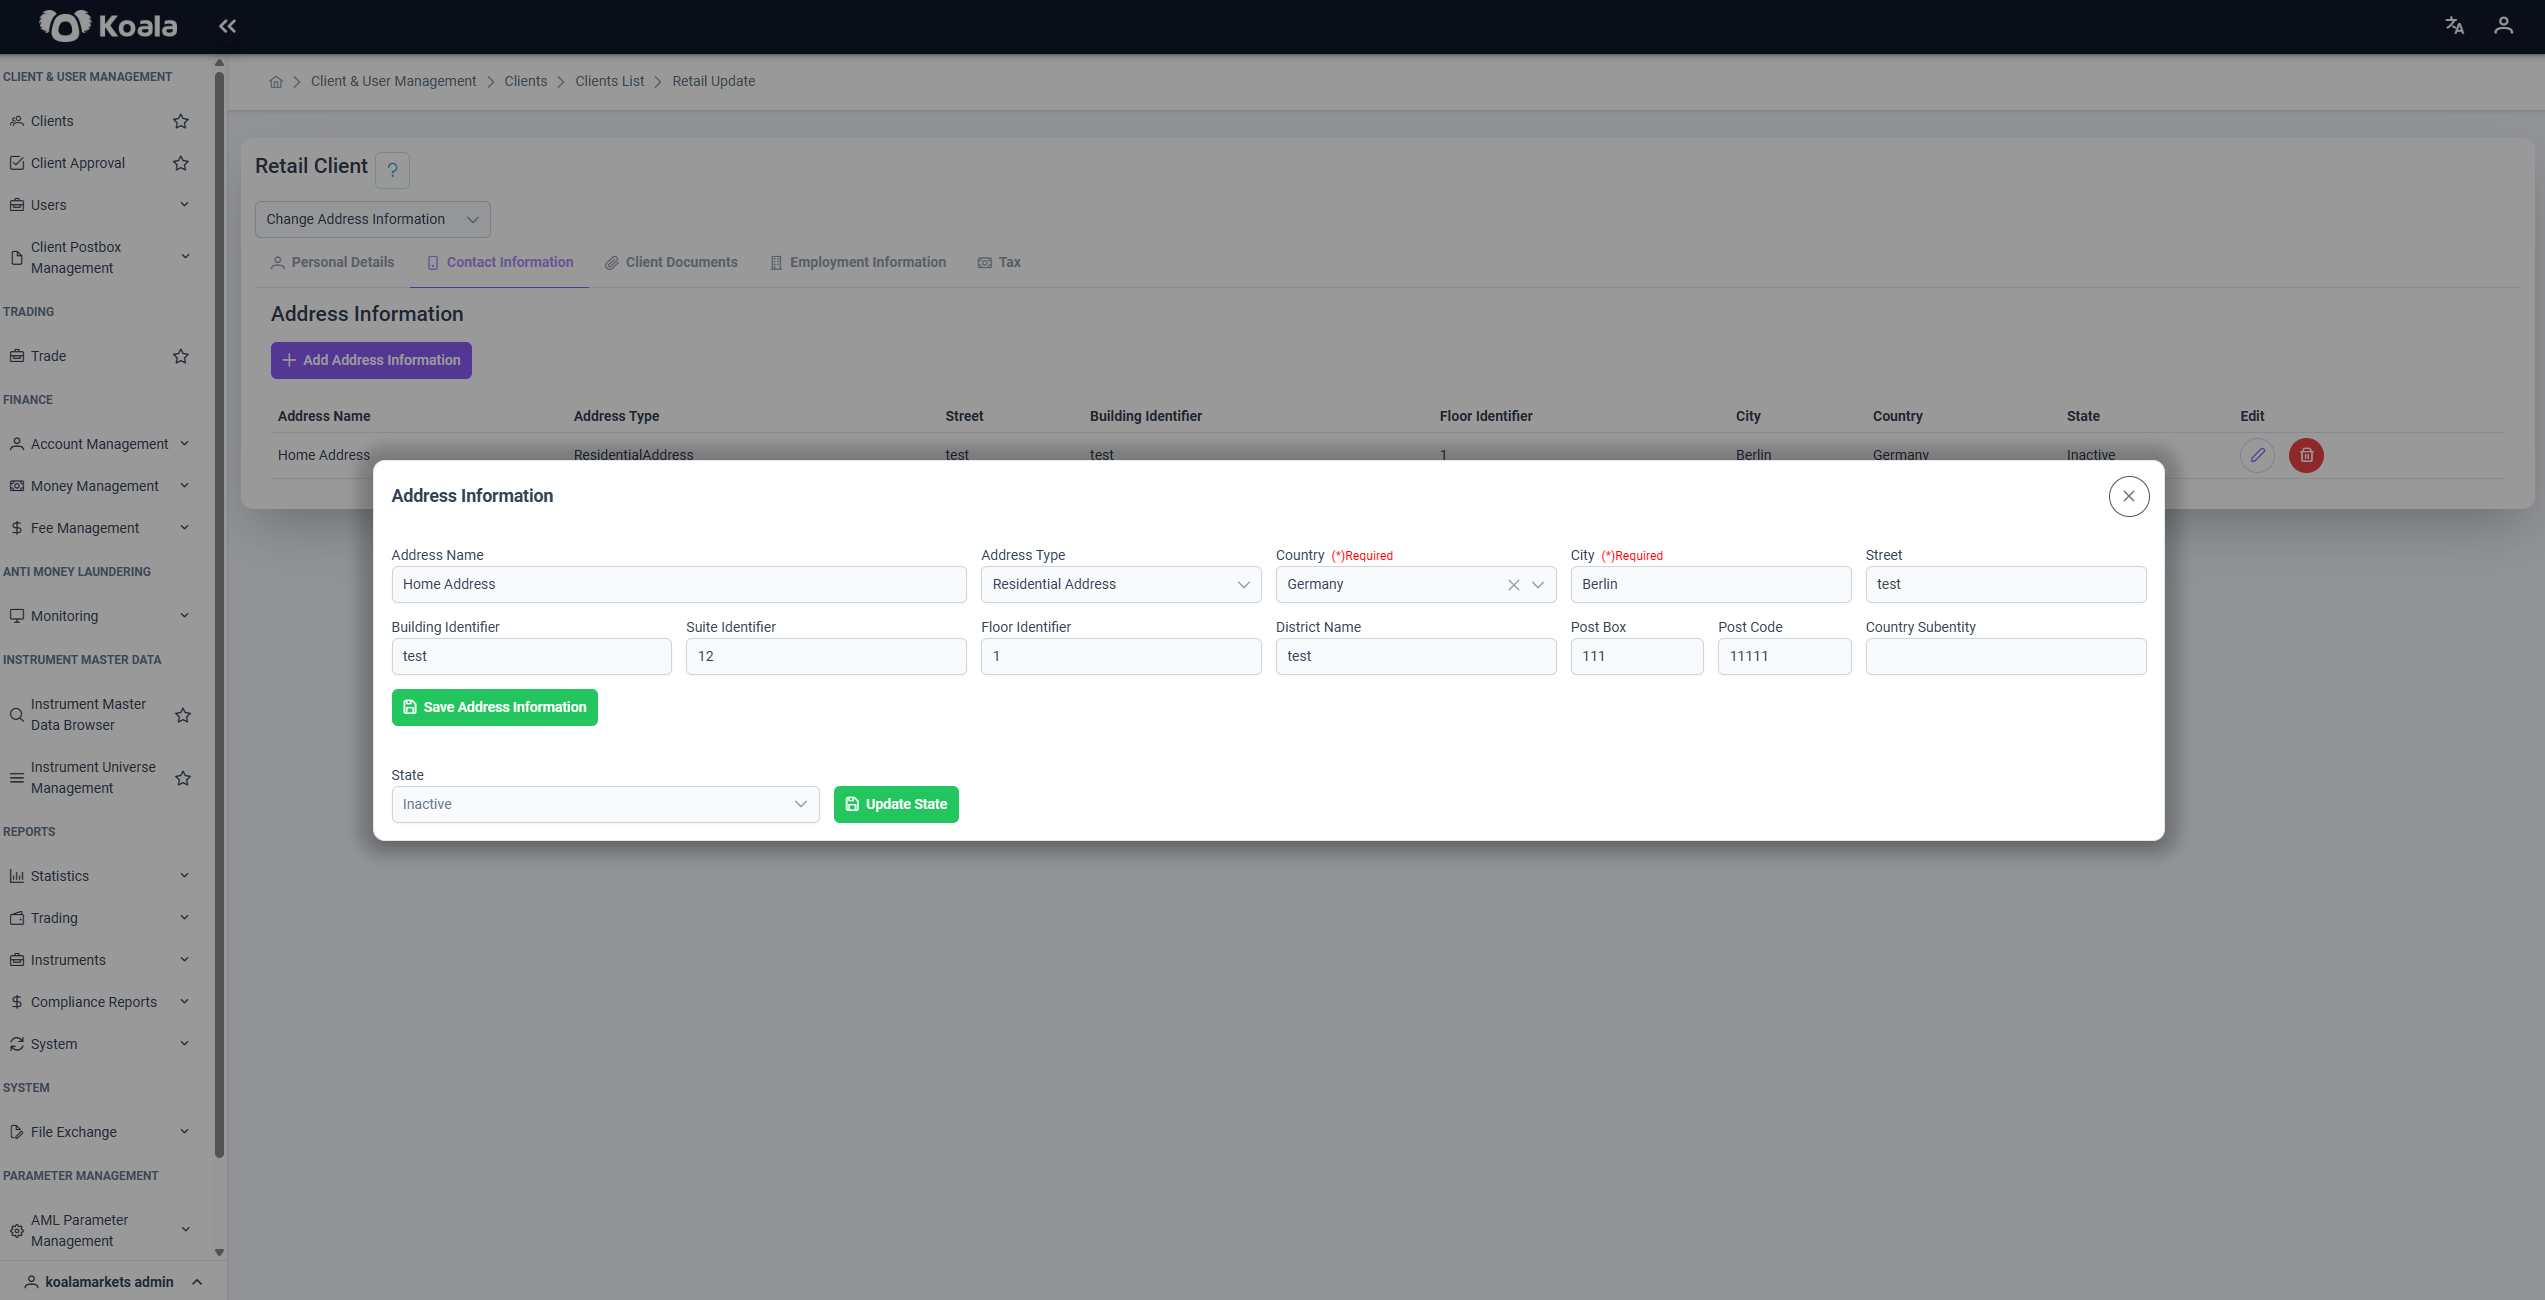
To update an address, simply click the 🖉 (pen) icon. Then, similar to adding an address, a screen will appear where you can fill in the necessary fields and update the address. Additionally, you can also change the status of your address to Active or Inactive.
📞 Phone Number Information
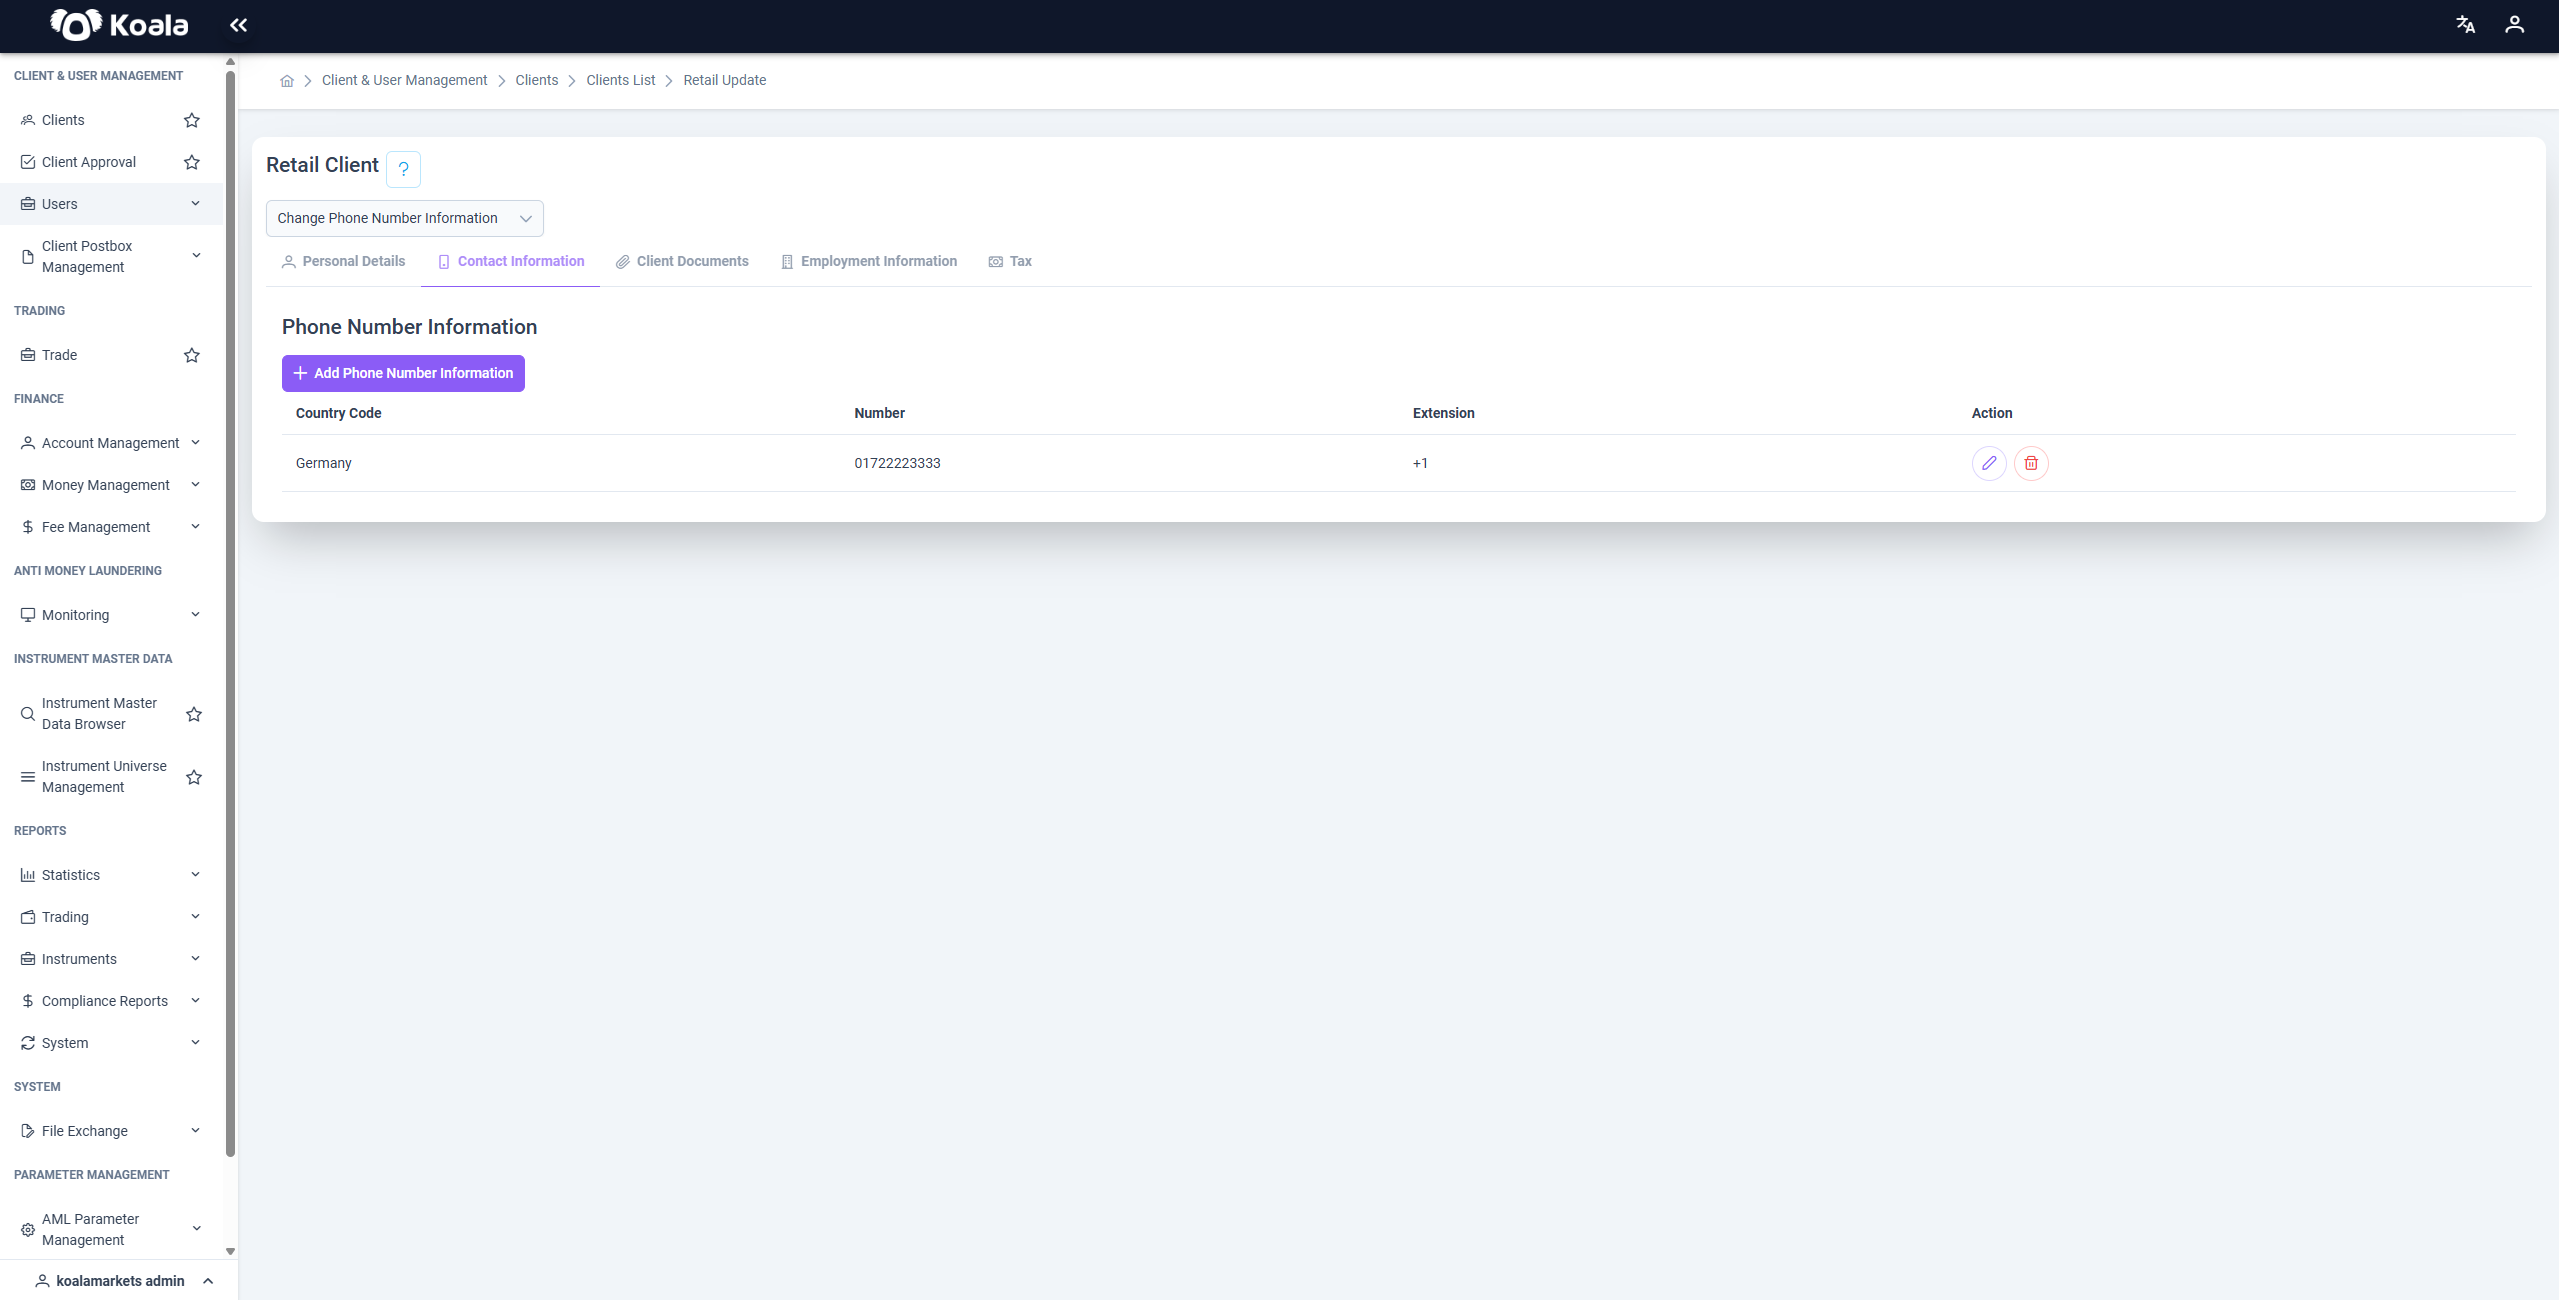
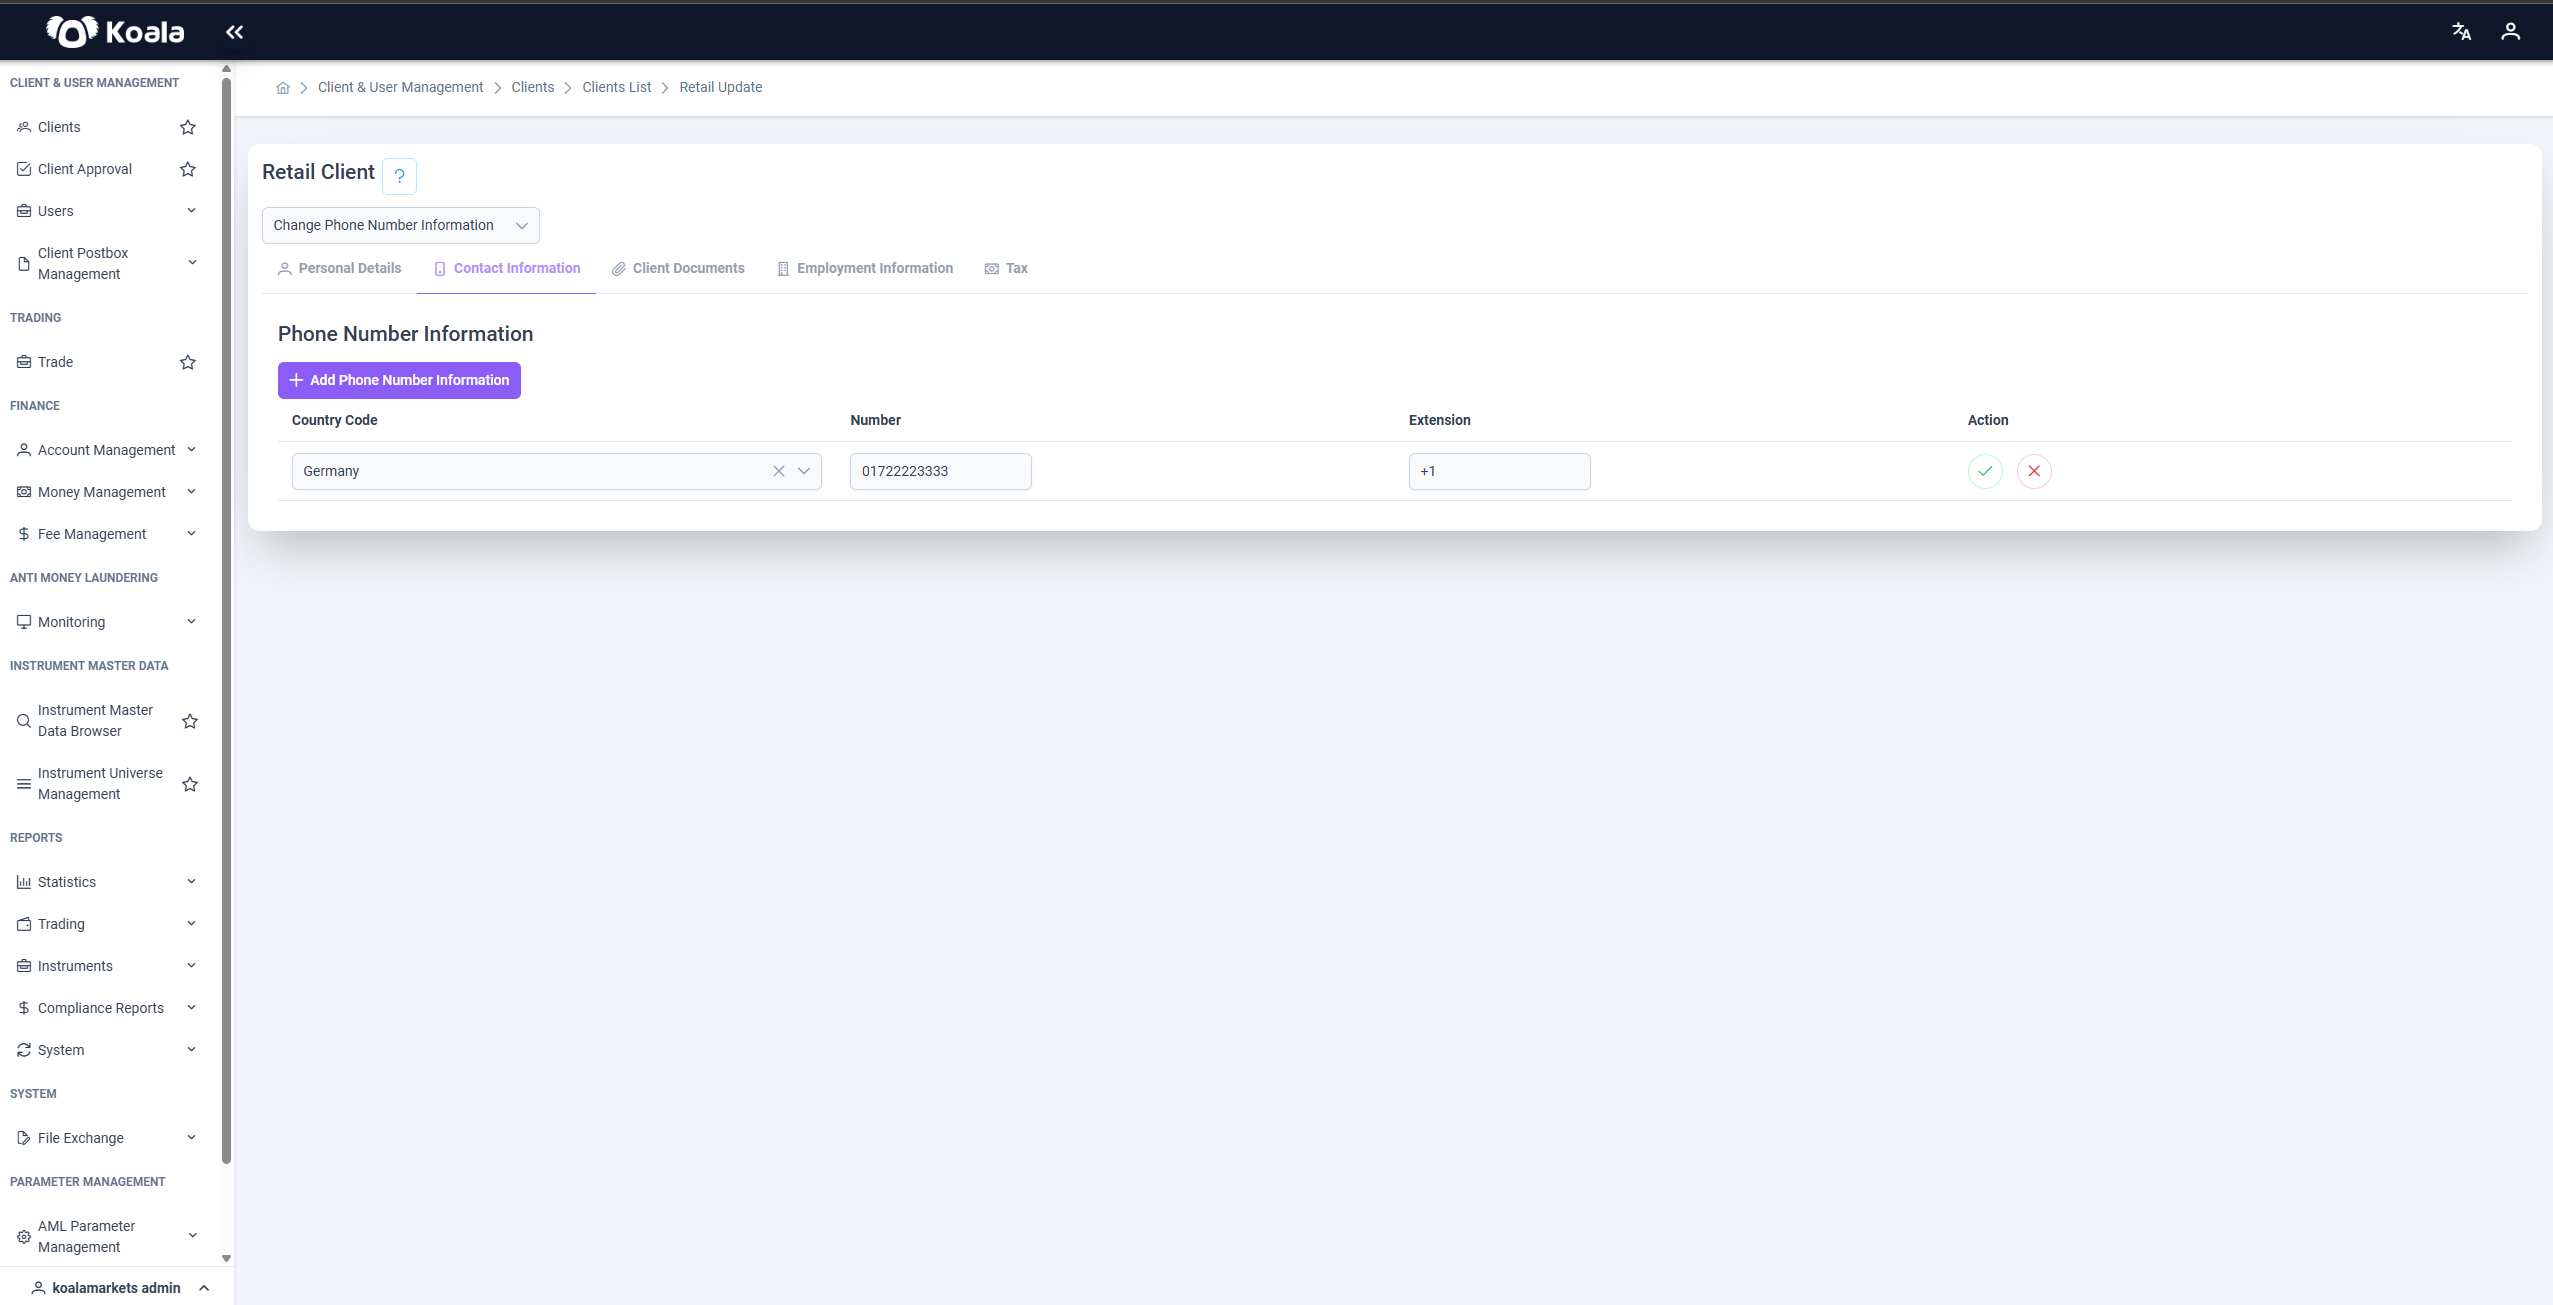
If you want to change the phone number, add a new phone number to the client, or remove the existing one, you can select Phone Number from the dropdown. You’ll be redirected to the appropriate tab to proceed with your changes.
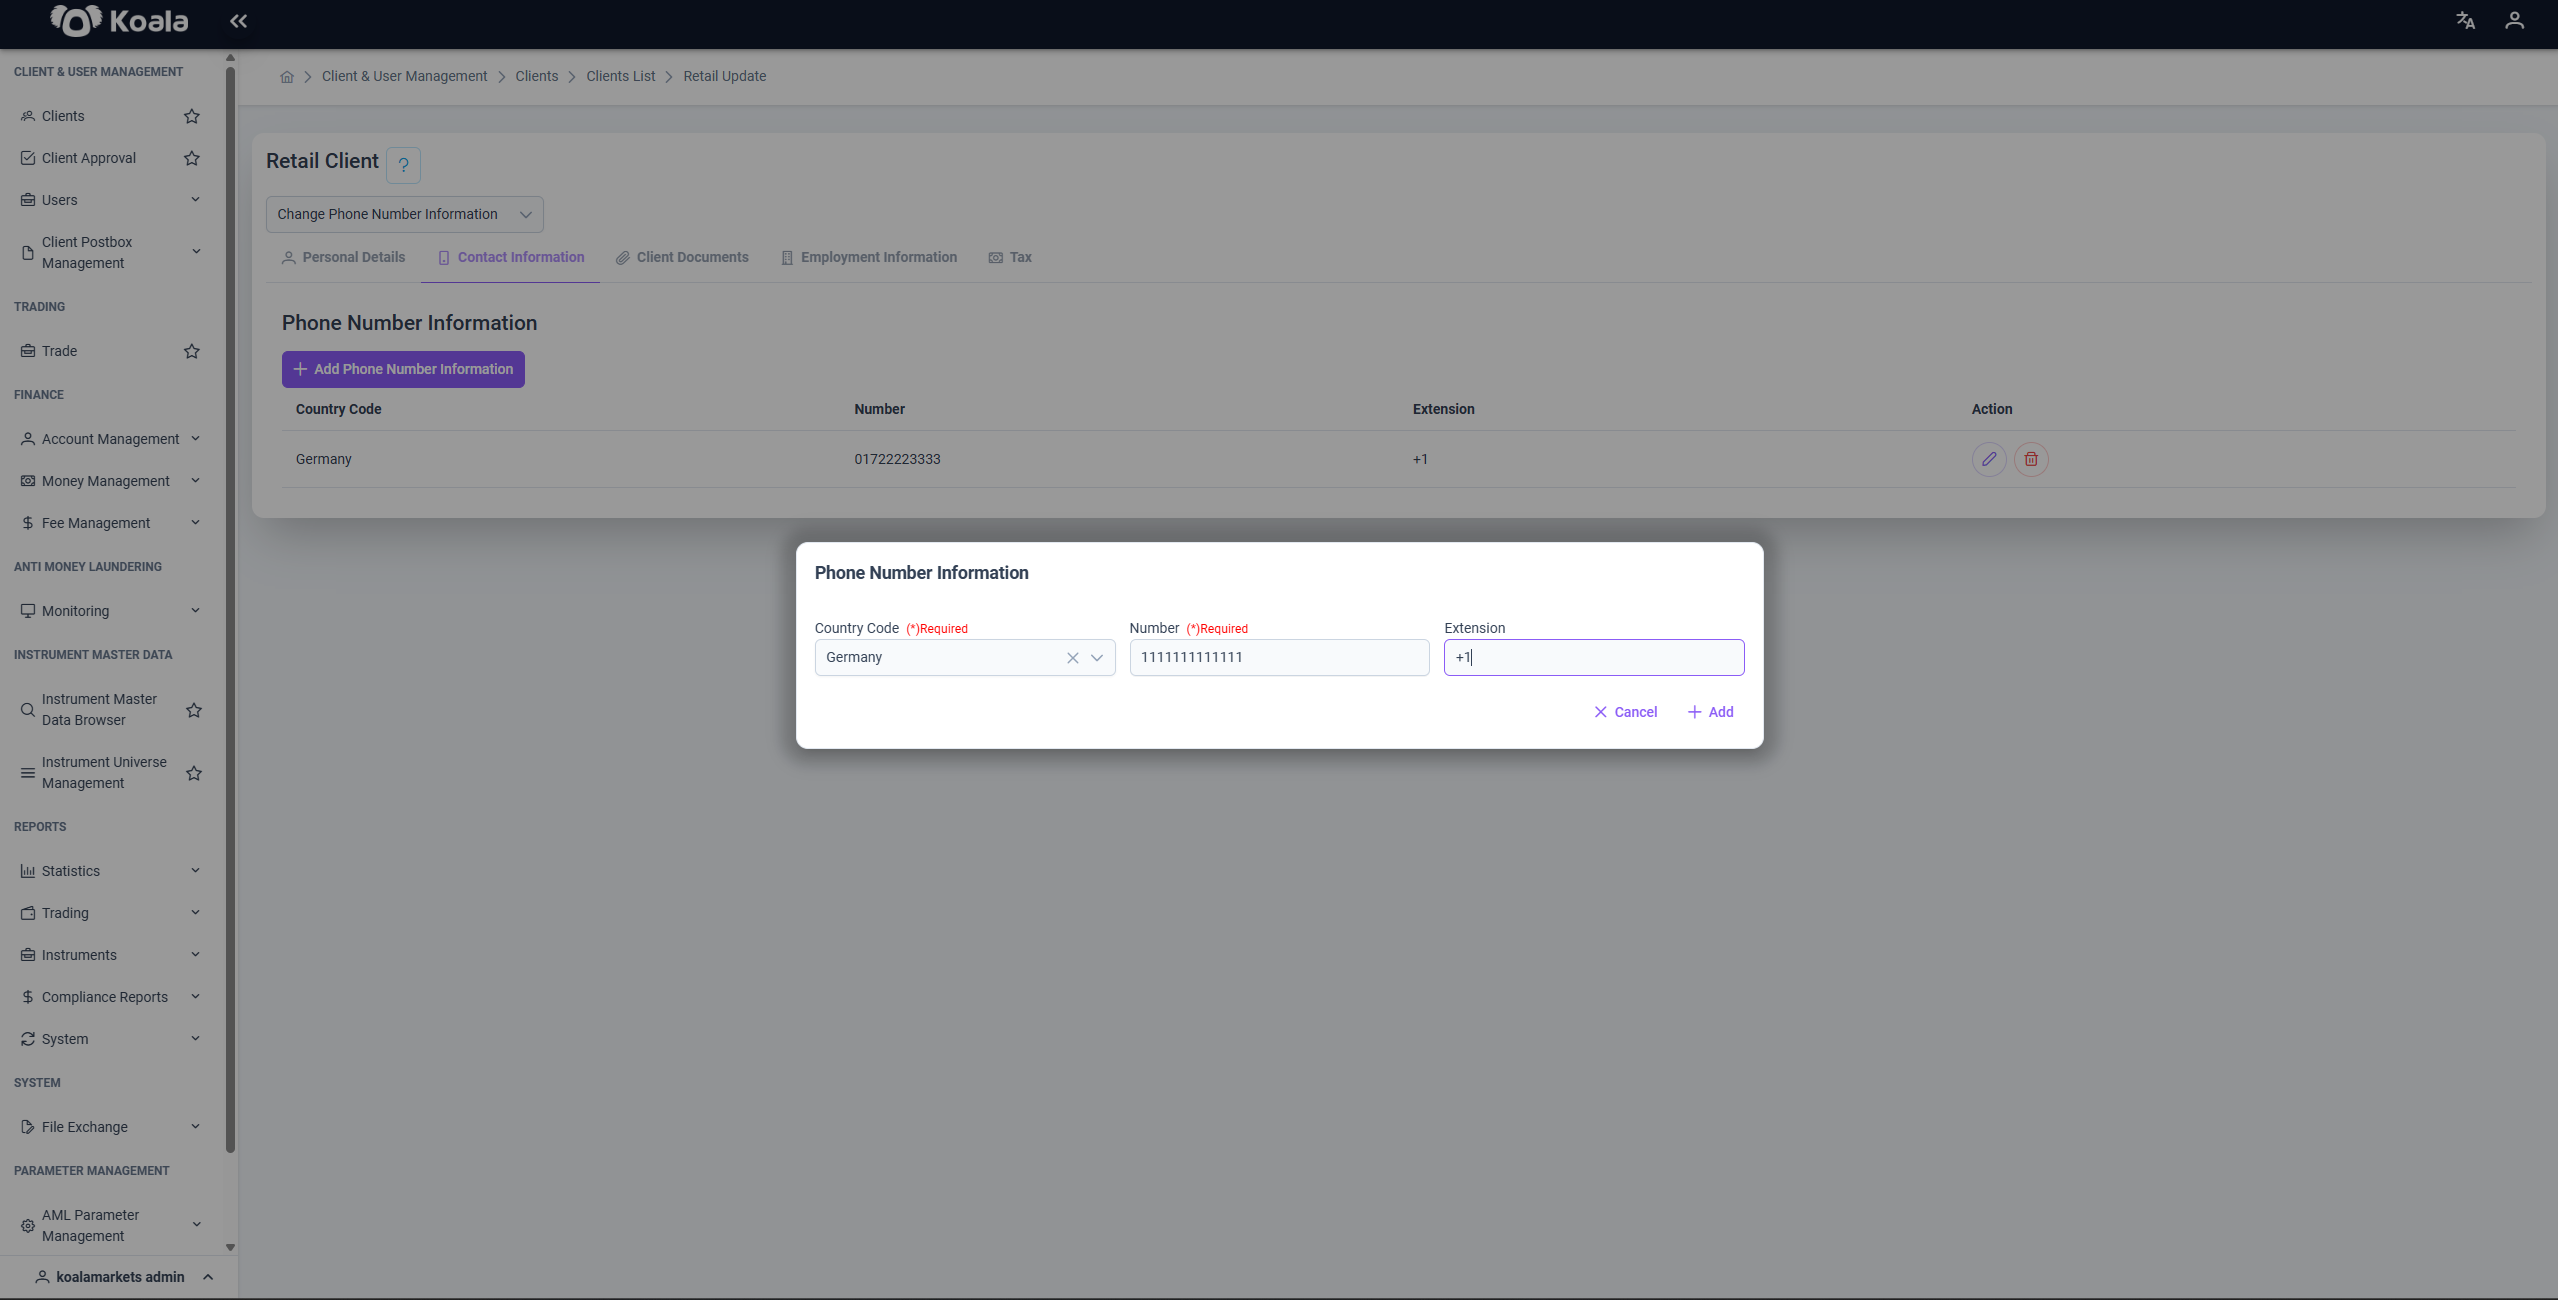
If you click the Add Phone Number button, a screen will appear allowing you to create a phone number. After filling in the required information, you can add the new phone number by clicking the Add button.
To update the phone number, simply click the 🖉 (pen) icon. Then you can update it by filling in the required fields directly on the table.
📩 Preferred Communication
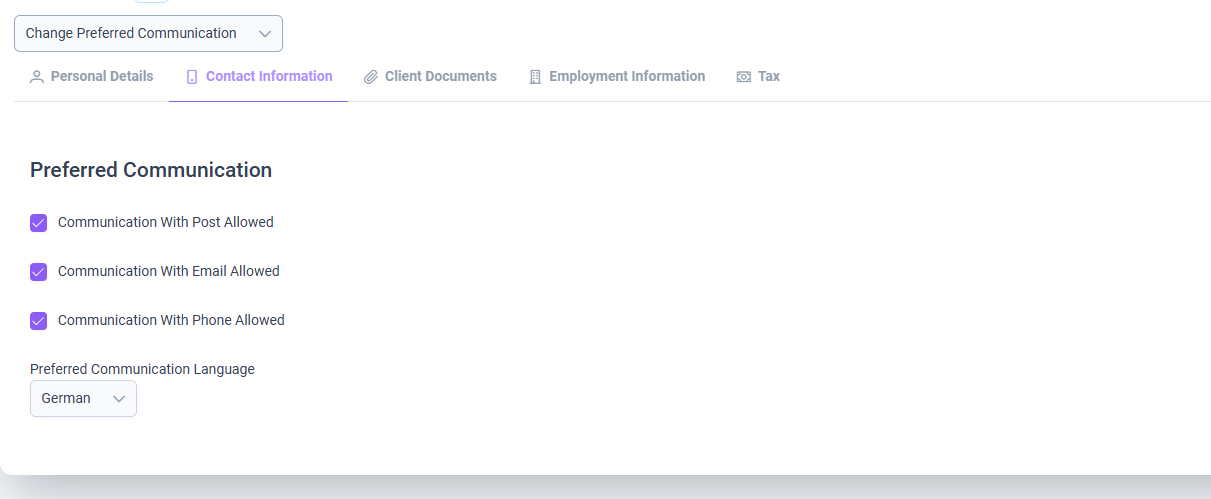
If you want to update the client's preferred communication method — such as switching between email, phone, or postal — you can select Preferred Communication from the dropdown. You’ll be redirected to the corresponding section where you can make the necessary adjustments.
📄 Client Documents
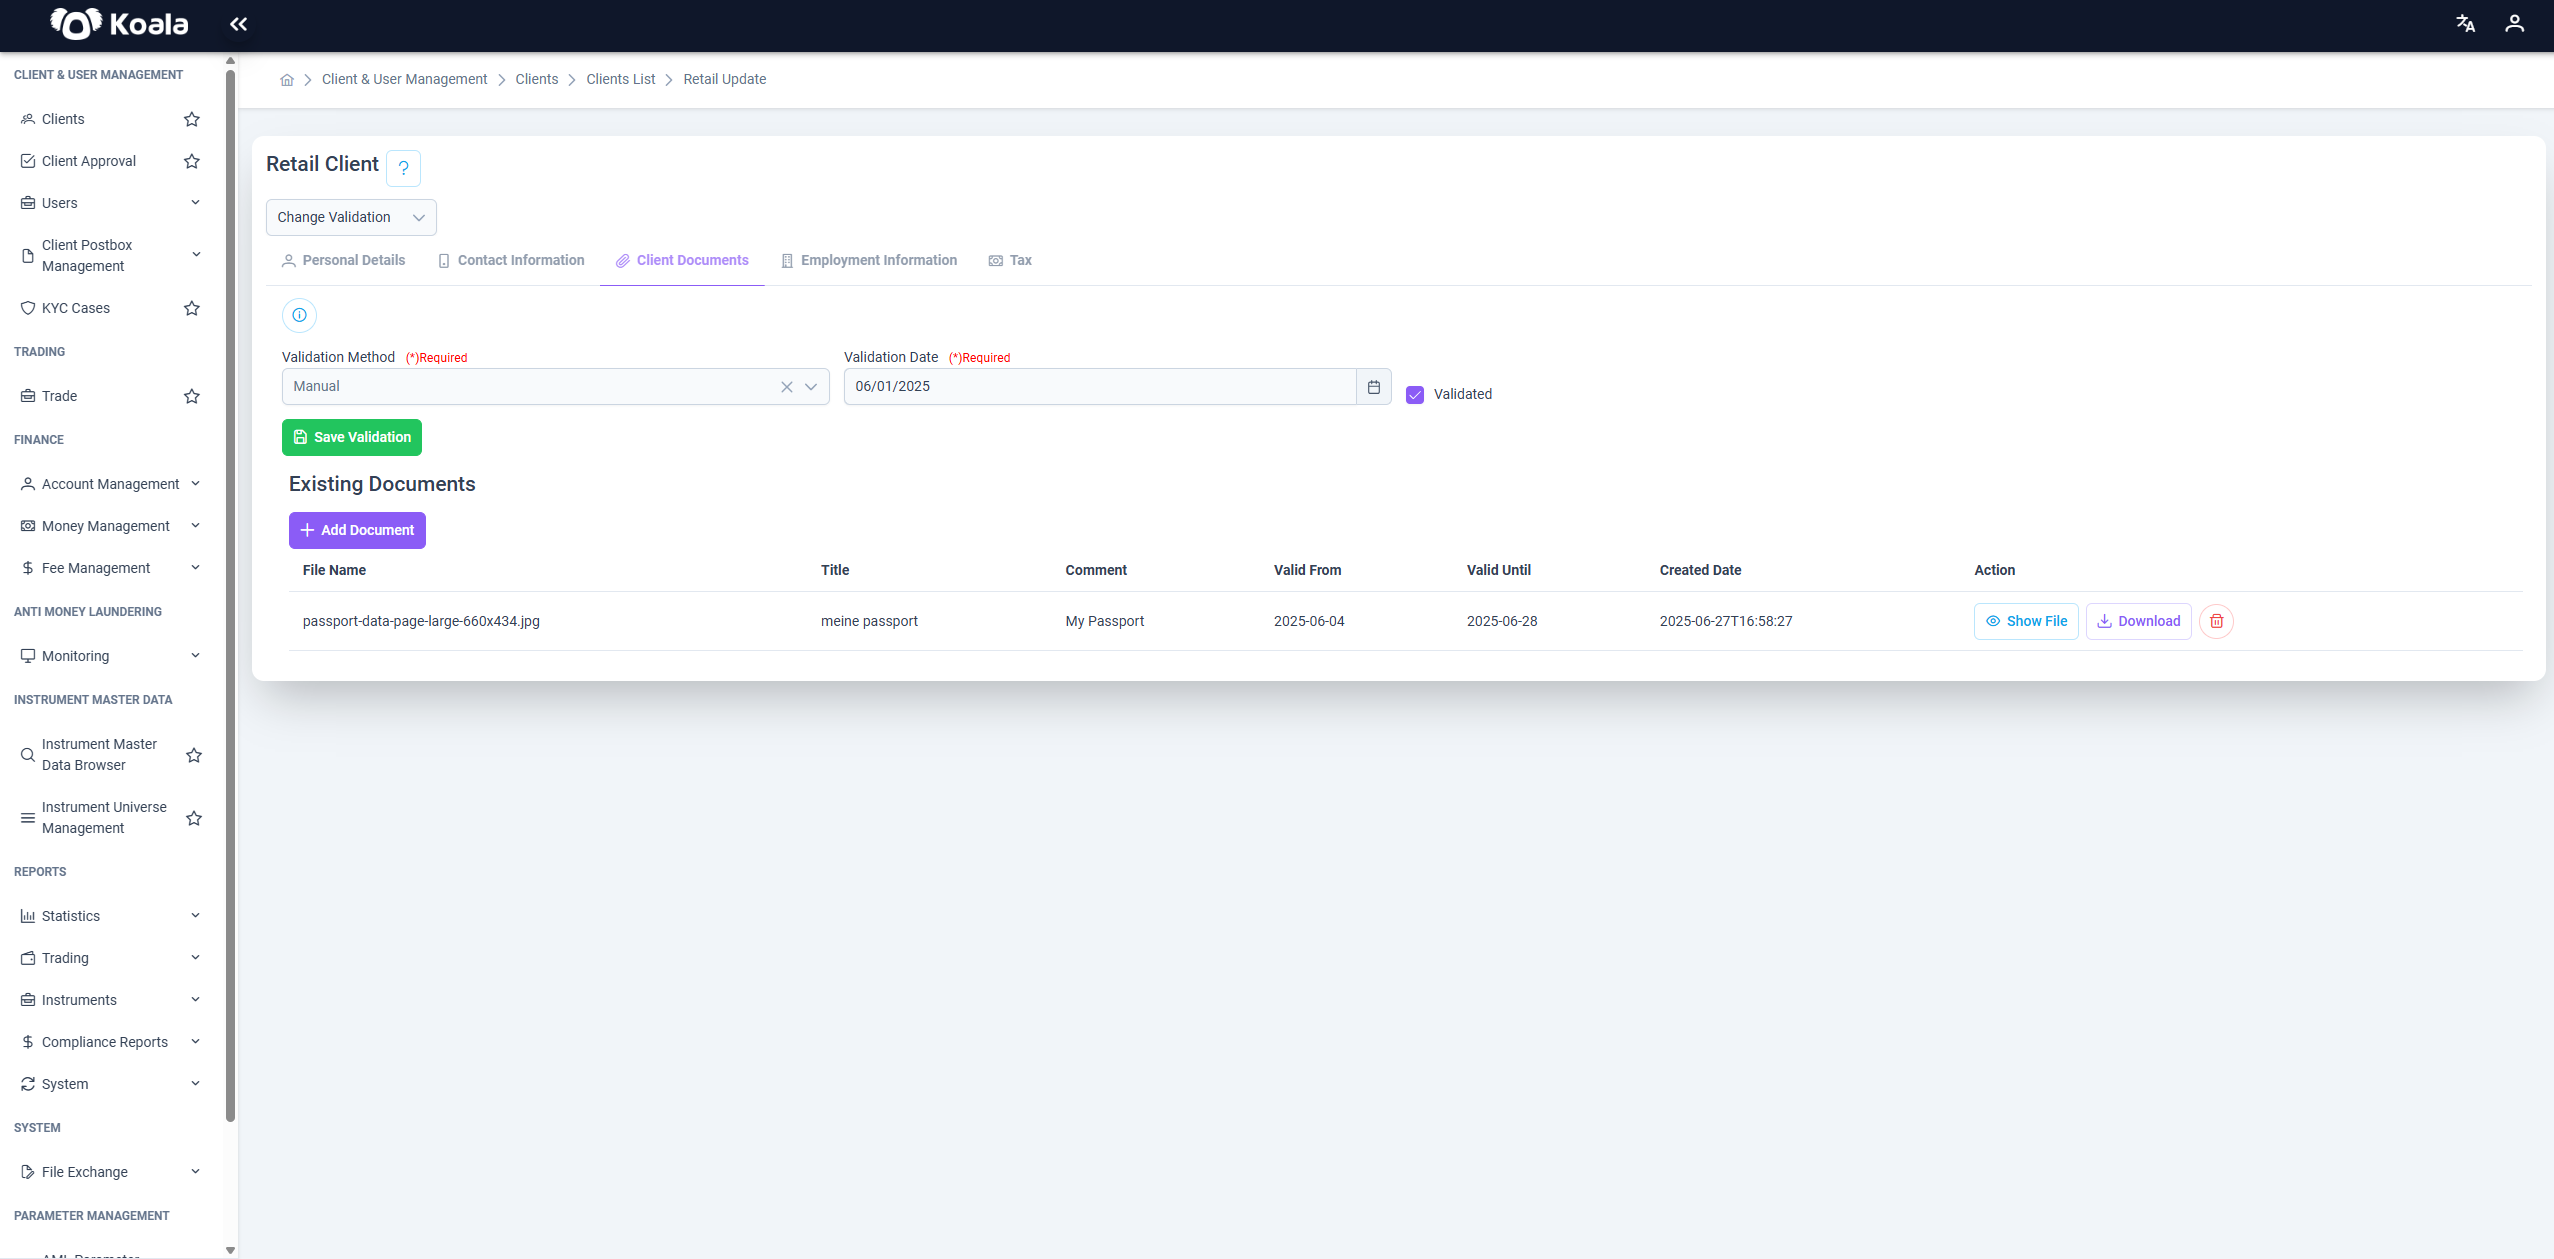
This page is a panel within the Koala platform used for the document validation process of a Retail client. The purpose is to upload identification or similar documents related to the client and validate them, registering this validation within the system. These actions are typically part of the KYC (Know Your Customer) process.
This screen is used to document and record the identity of a client in the system.
It is not possible to complete the validation process by only entering a validation method and date. At least one document must be uploaded in order to proceed.
Documents are saved in the system with a specified validity period, and the validation becomes valid only after these steps are completed.
👷 Employment Information
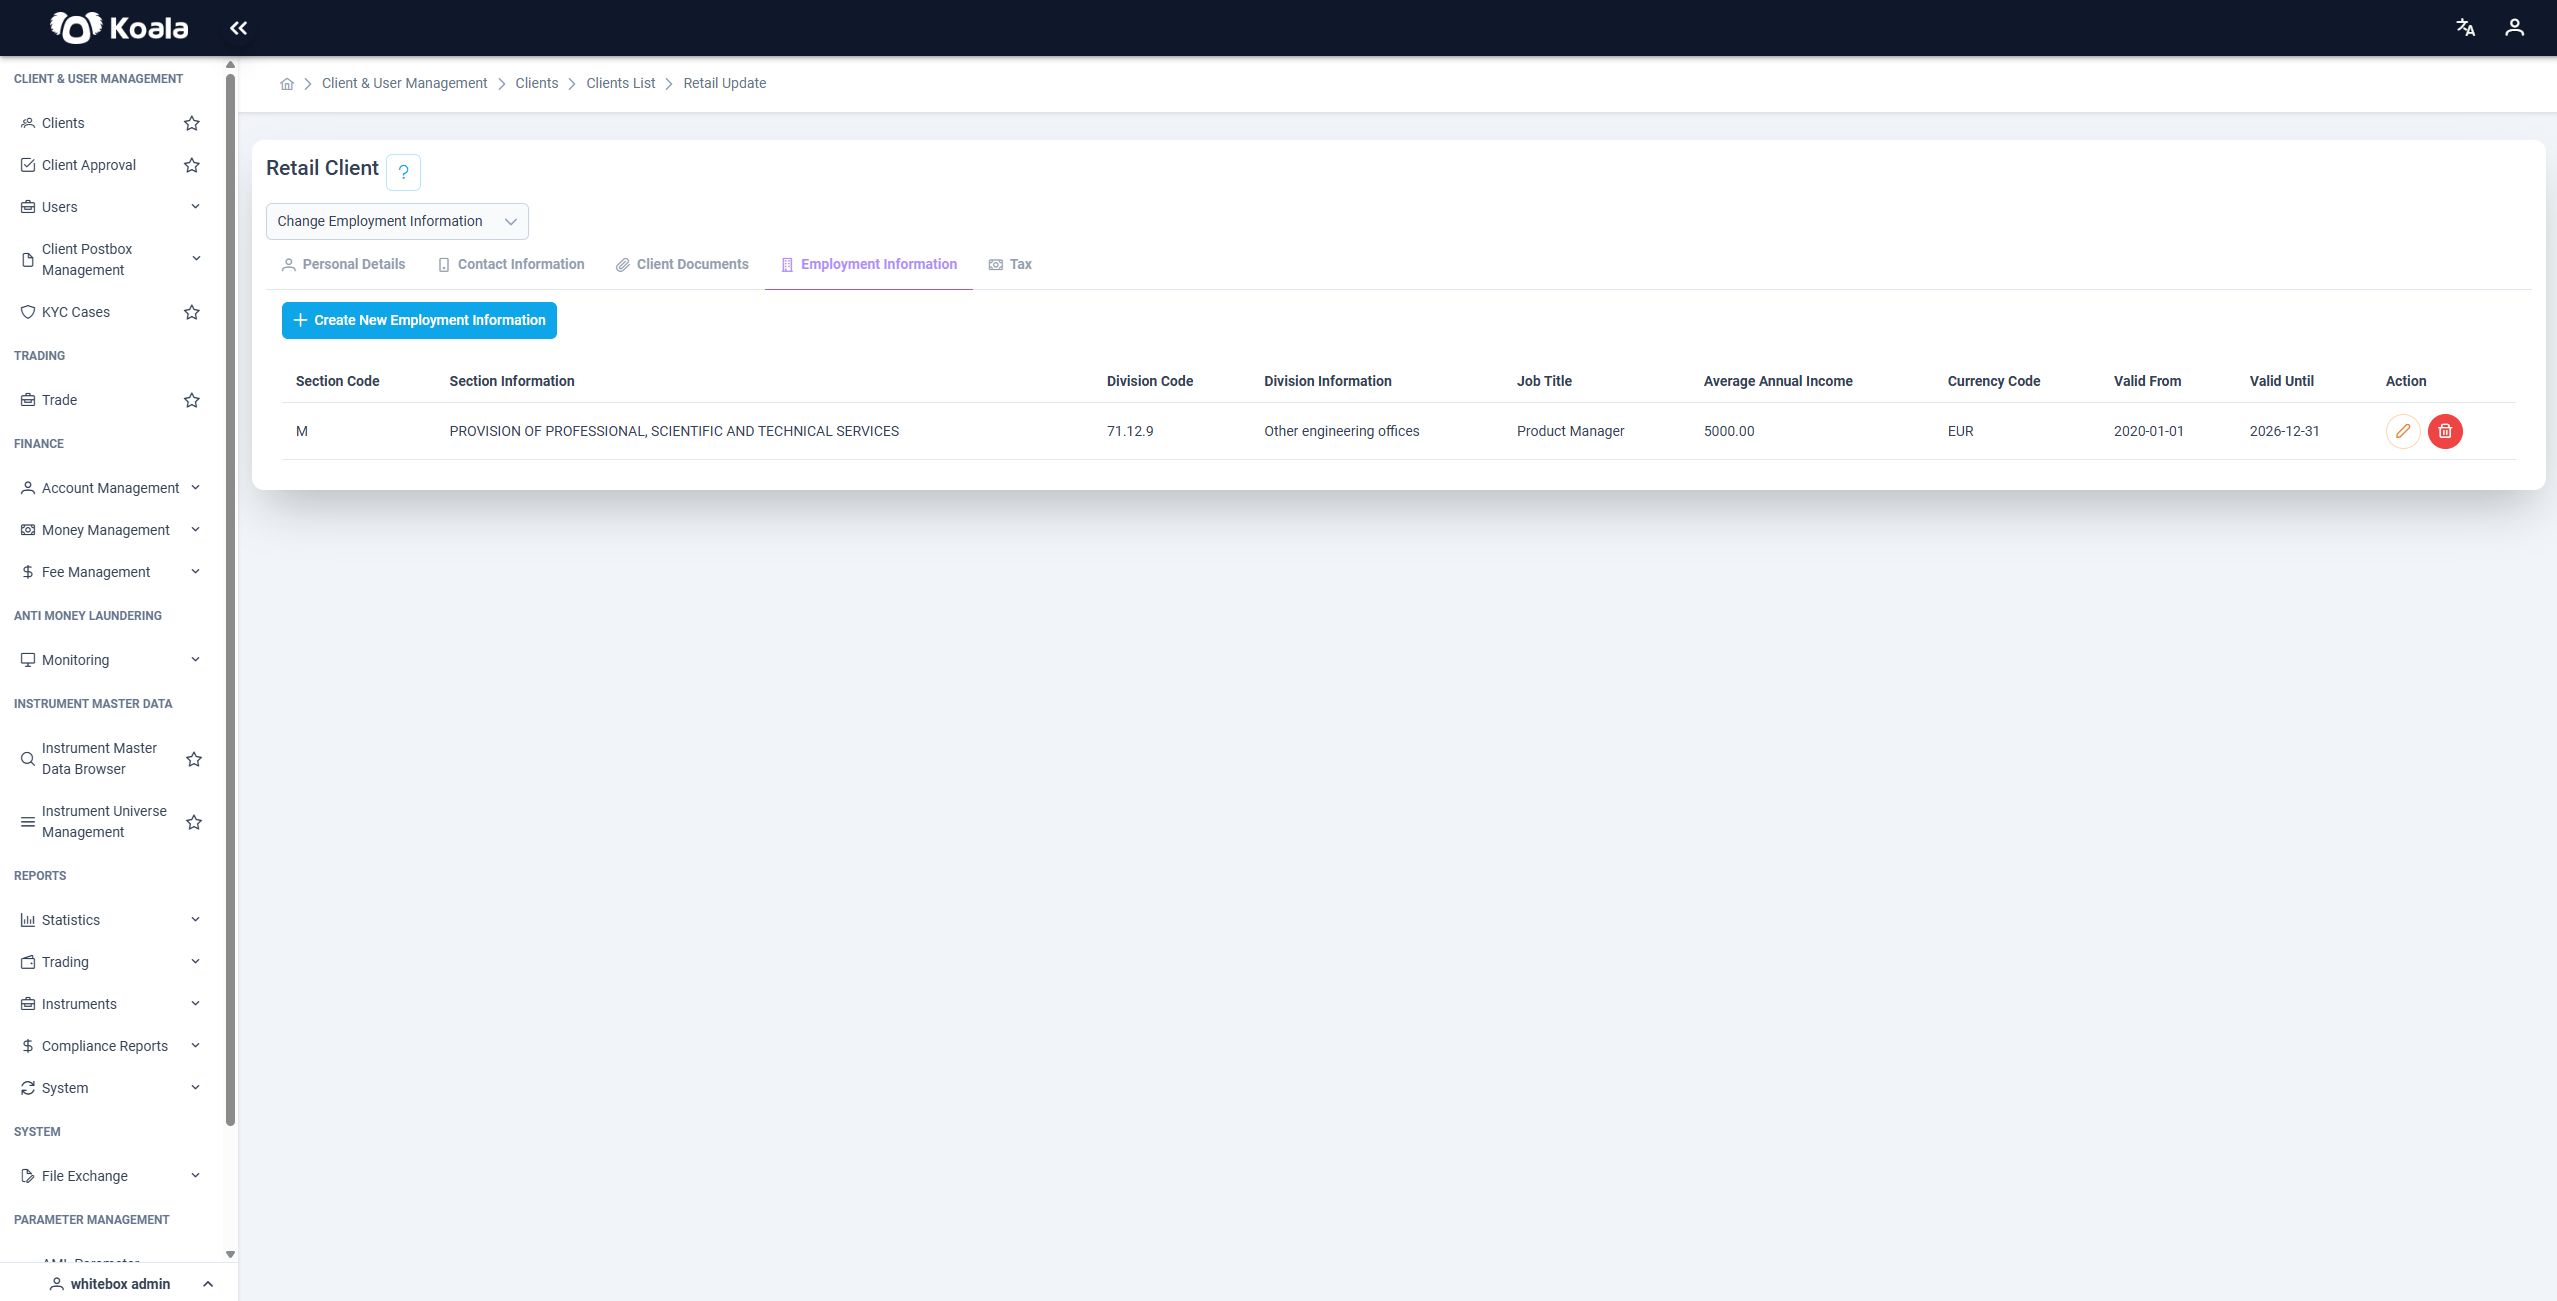
This screen is part of the Koala platform and is used to manage the employment information of a Retail client. As part of the KYC (Know Your Customer) process, the client’s occupational and income details are collected here to help assess their financial profile and risk level.
The page displays key information such as the client’s sector and division of employment, job title, average annual income, currency, and the validity period of this information. To add a new record, users can click the "Create New Employment Information" button. Existing records can be edited or deleted using the corresponding action buttons.
In summary, this screen is used to document, manage, and update a client’s professional background and income data, which are essential for compliance, financial assessment, and regulatory reporting.
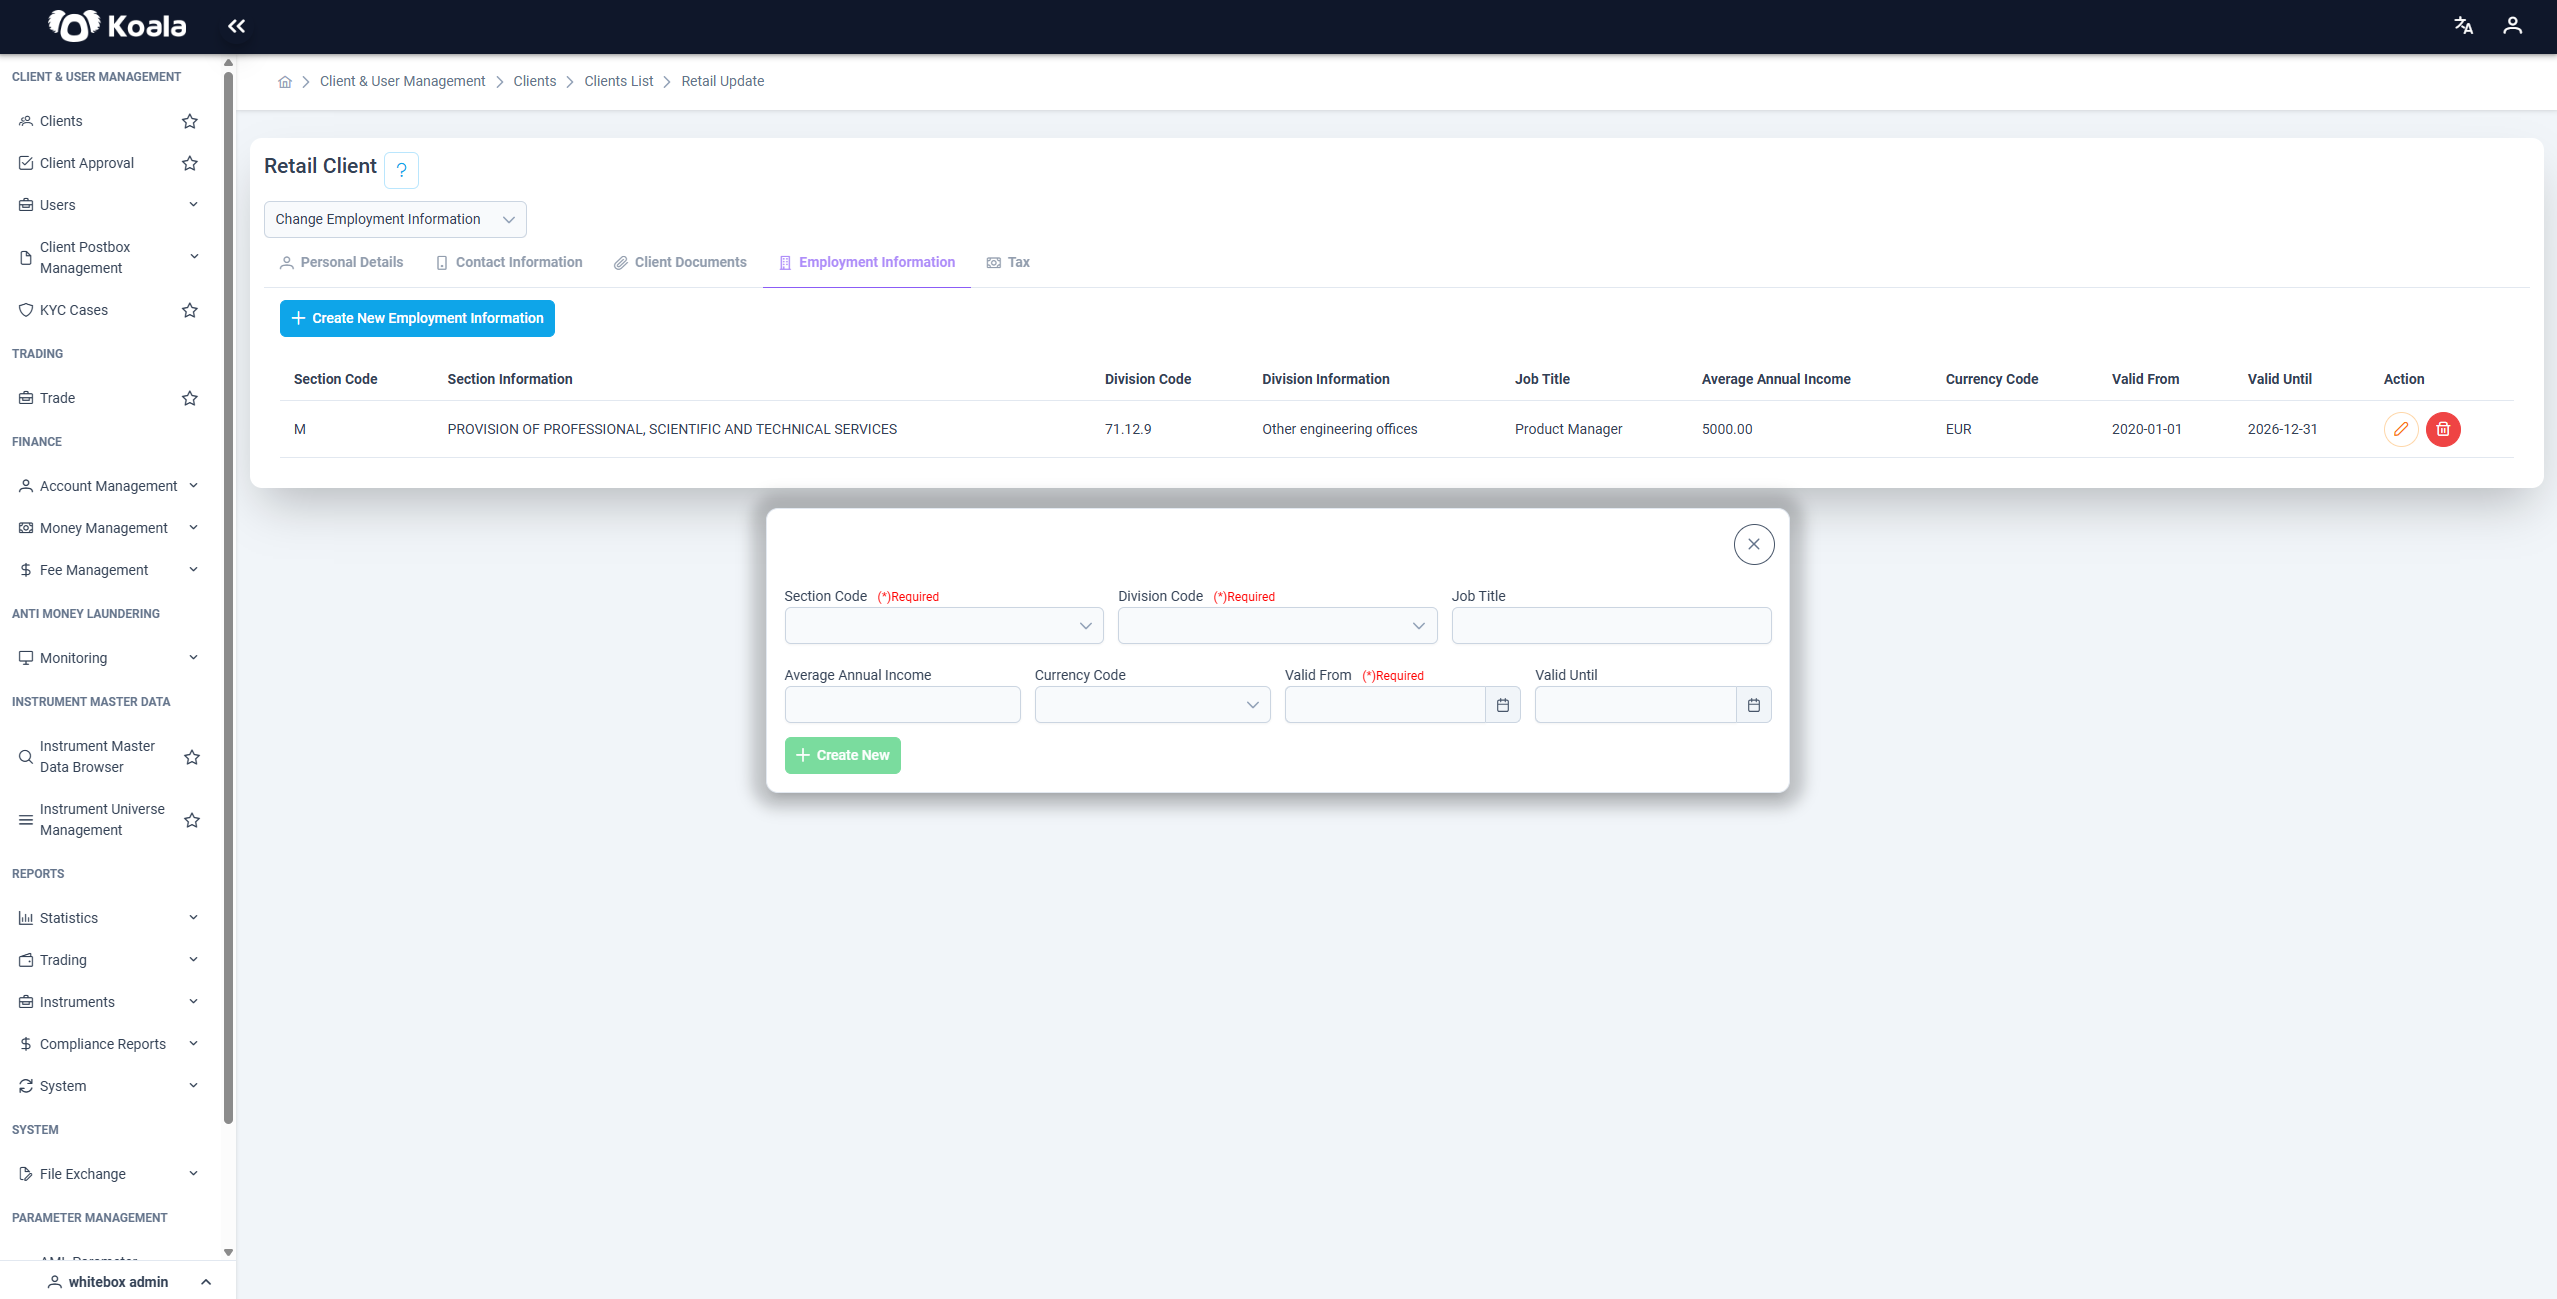
Employment Create
This is the Create Employment Information pop-up screen within the Employment Information tab of a Retail Client in the Koala platform. It allows the user to add new employment details for an individual client as part of KYC and financial profiling processes.
The screen is used to input a client’s occupational and income data, such as their job role, industry classification, annual earnings, and the validity period of this employment information. These details help assess the client's financial background and are often required for compliance and risk evaluation purposes.
After filling in the required fields, the user can click the "Create New" button to submit the form. The newly created record will then appear in the main employment information table, where it can later be edited or deleted.
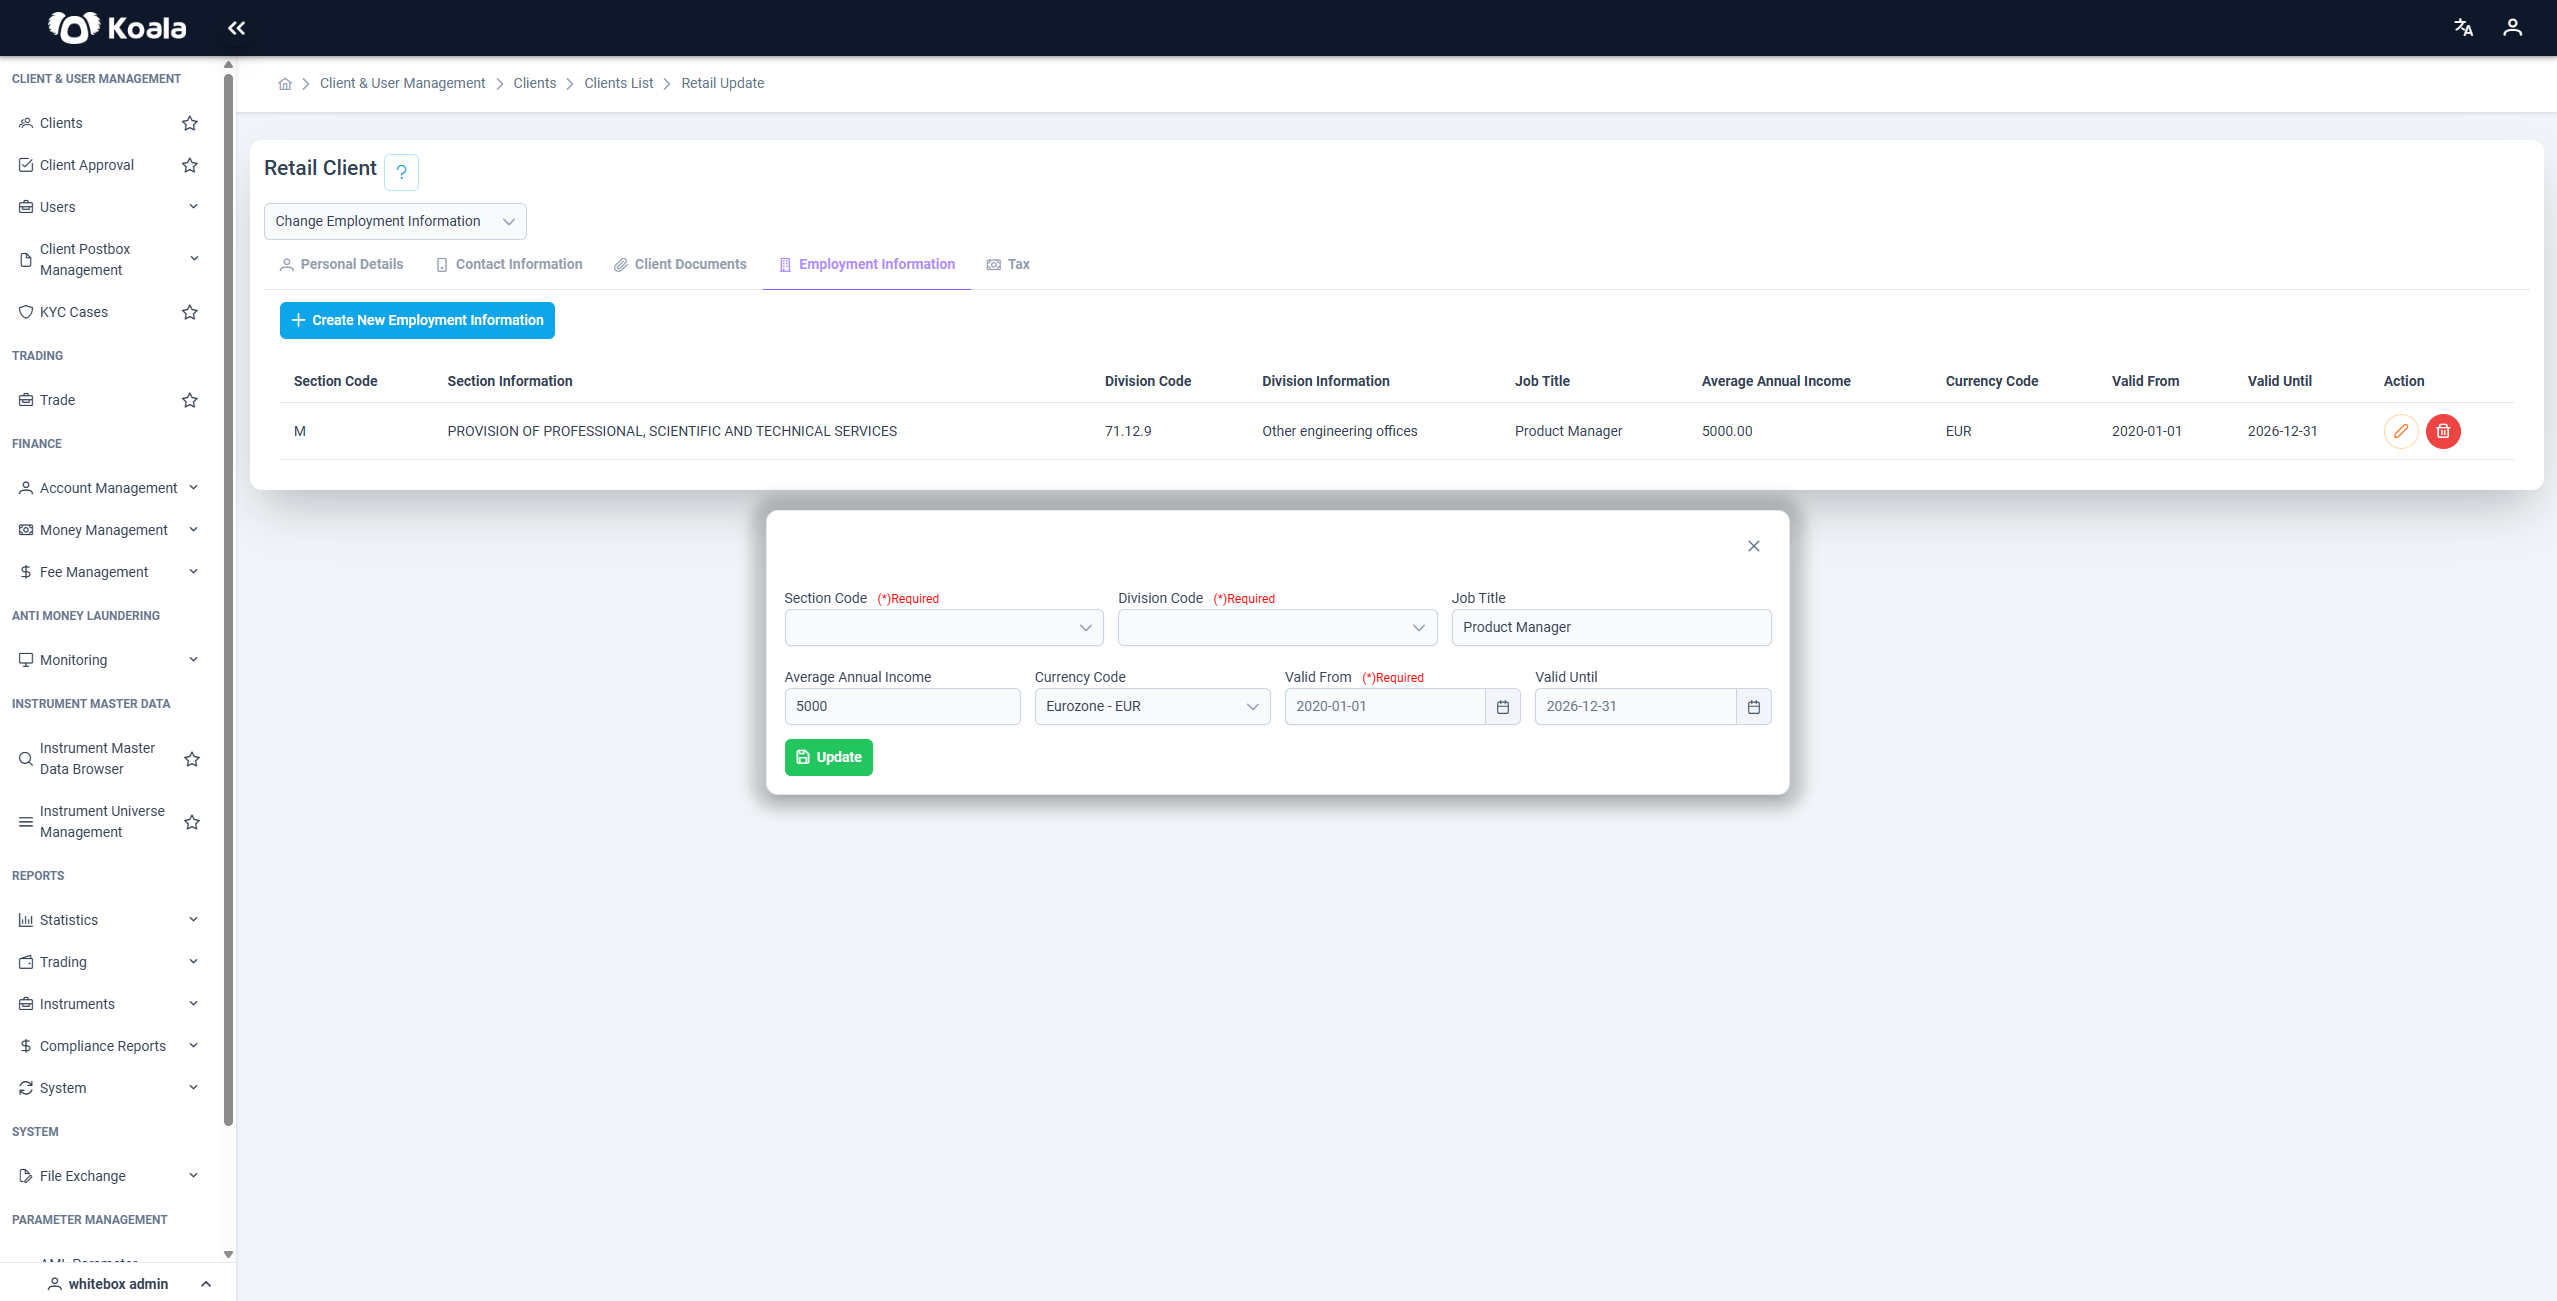
Employment Update
This screen is also used for updating employment information of a Retail Client in the Koala platform. It is visually and functionally identical to the creation screen, with the only difference being the button label, which reads “Update” instead of “Create New”.
This pop-up allows users to edit and update existing employment records for a client. It's commonly used to correct or revise details such as job title, income, or validity periods as the client's employment situation changes over time.
After editing the necessary fields, clicking the "Update" button will save the changes and reflect them in the main employment information table. This ensures the client’s records stay accurate and up to date.
This screen serves as the edit form for client employment data. While identical to the creation form in layout and validation, its purpose is to modify existing entries instead of adding new ones. Maintaining current and correct information here is essential for KYC compliance and accurate client profiling.
🧾 Tax
The Tax tab within the Retail Client screen provides a detailed view of an individual client's tax-related information. This section is designed to record and manage various aspects of the client’s tax status and is organized into multiple sub-tabs. This structure ensures that all tax-related information for the client is recorded and managed in a complete, organized, and country-specific manner. The user-friendly interface allows for easy access to tax data.
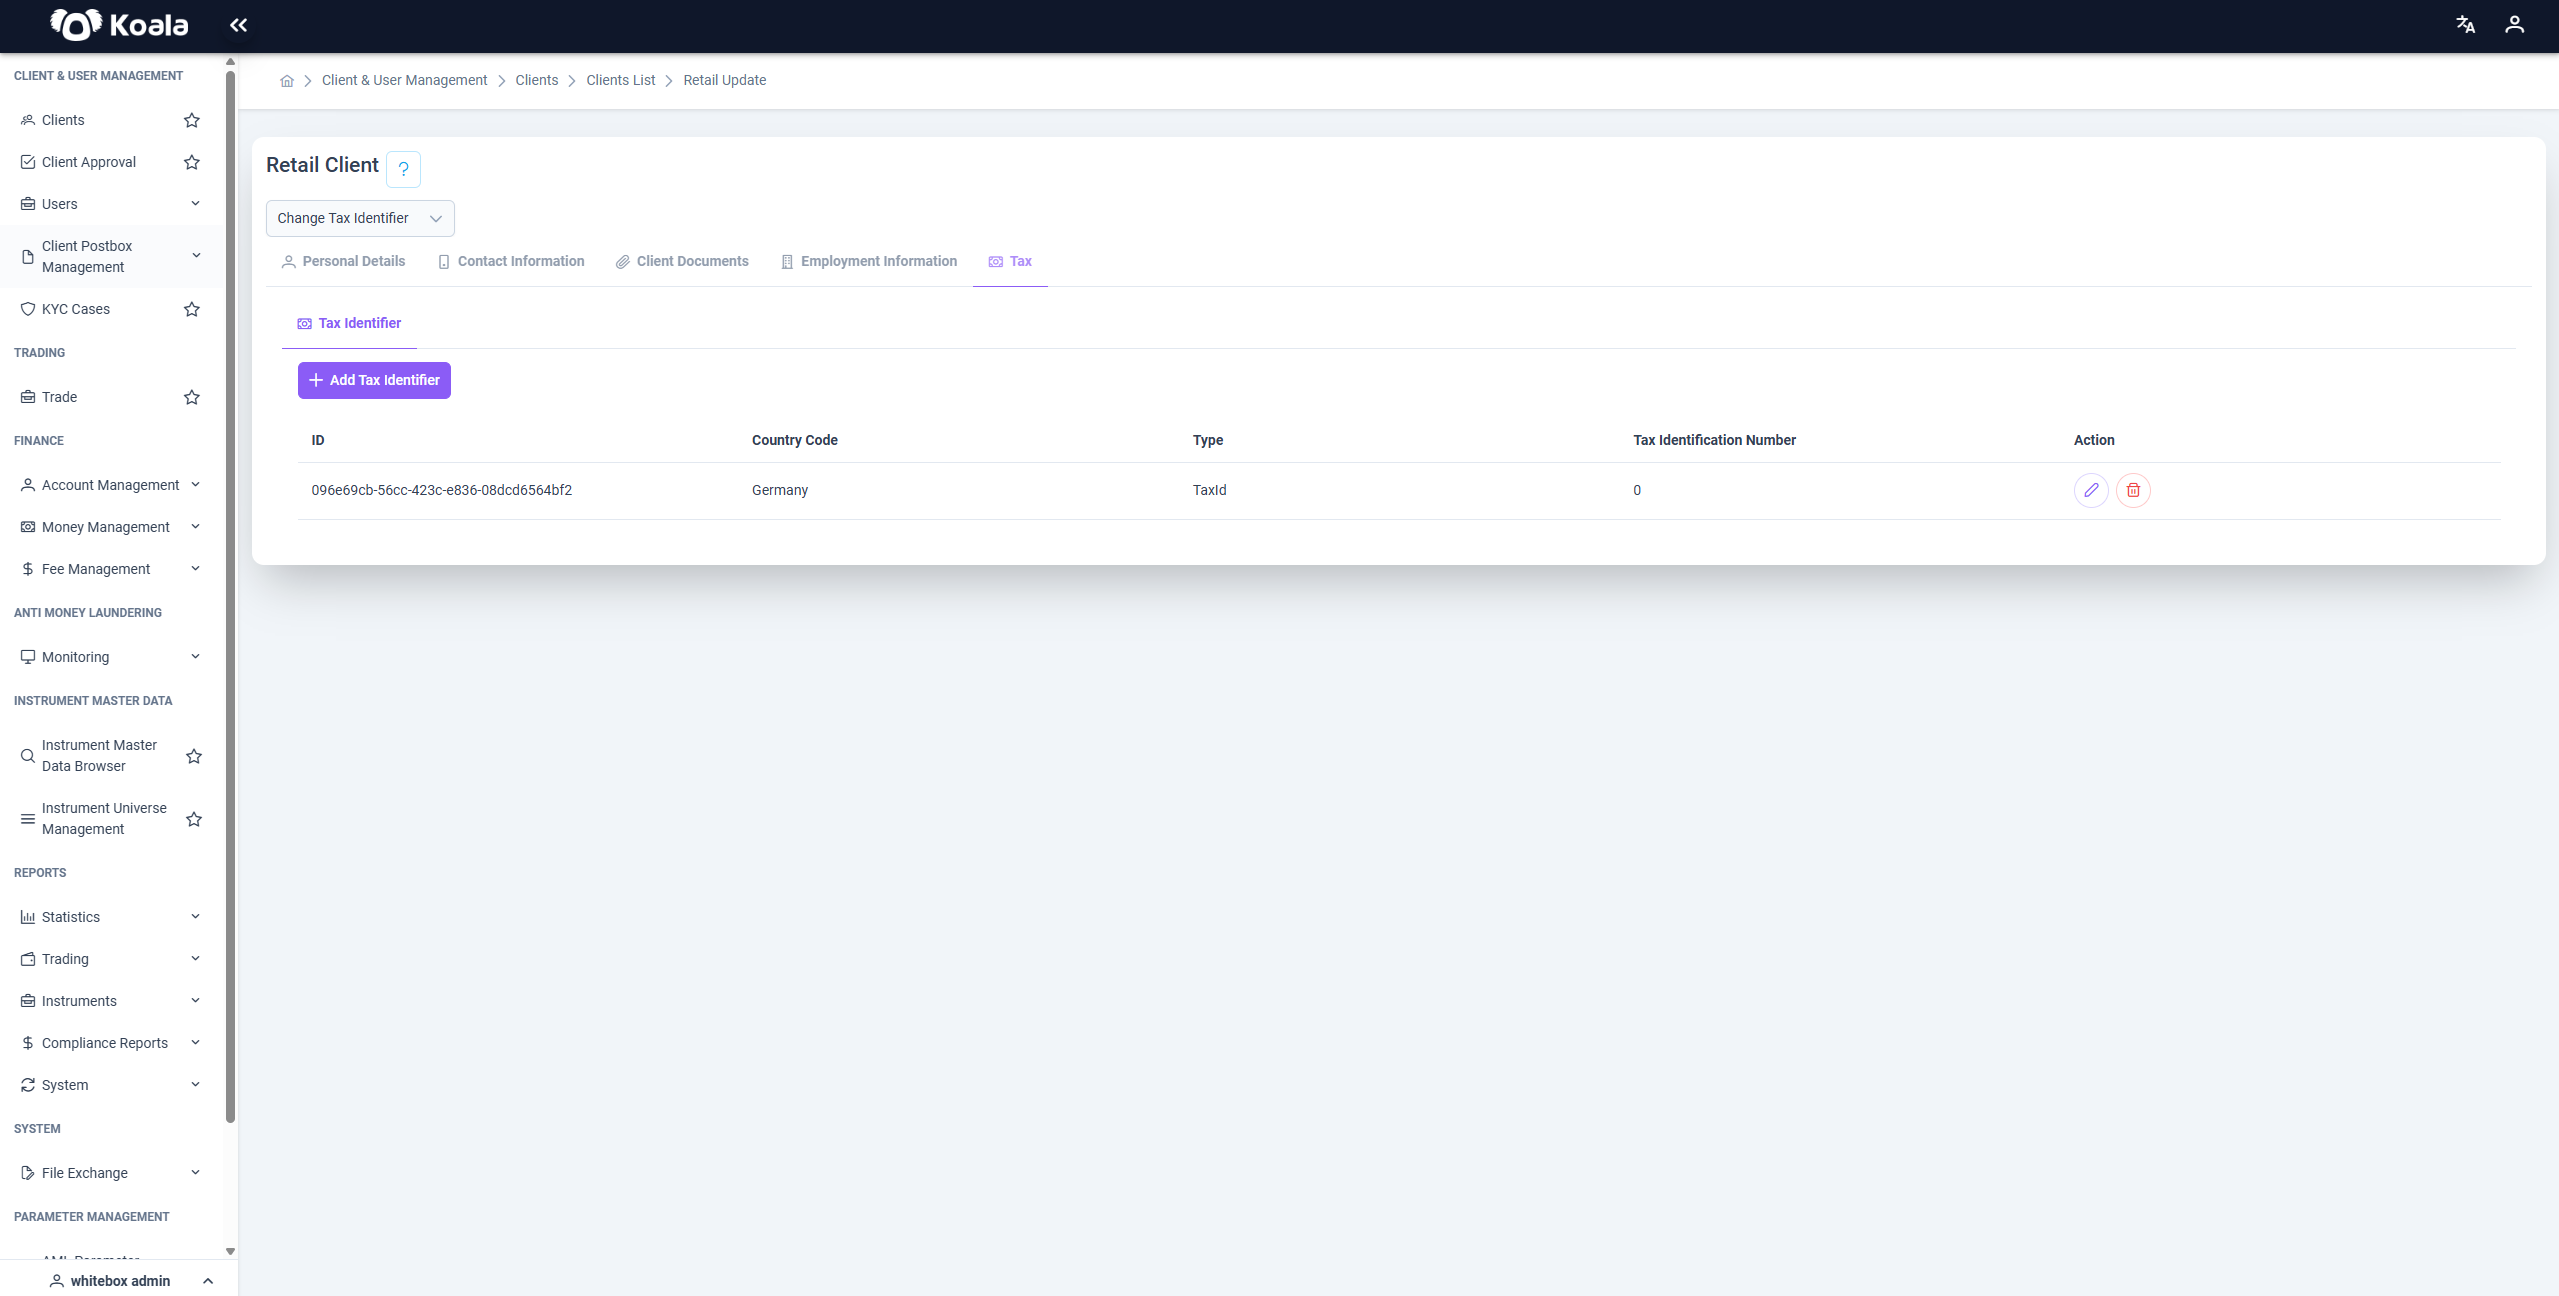
🆔 Tax Identifier
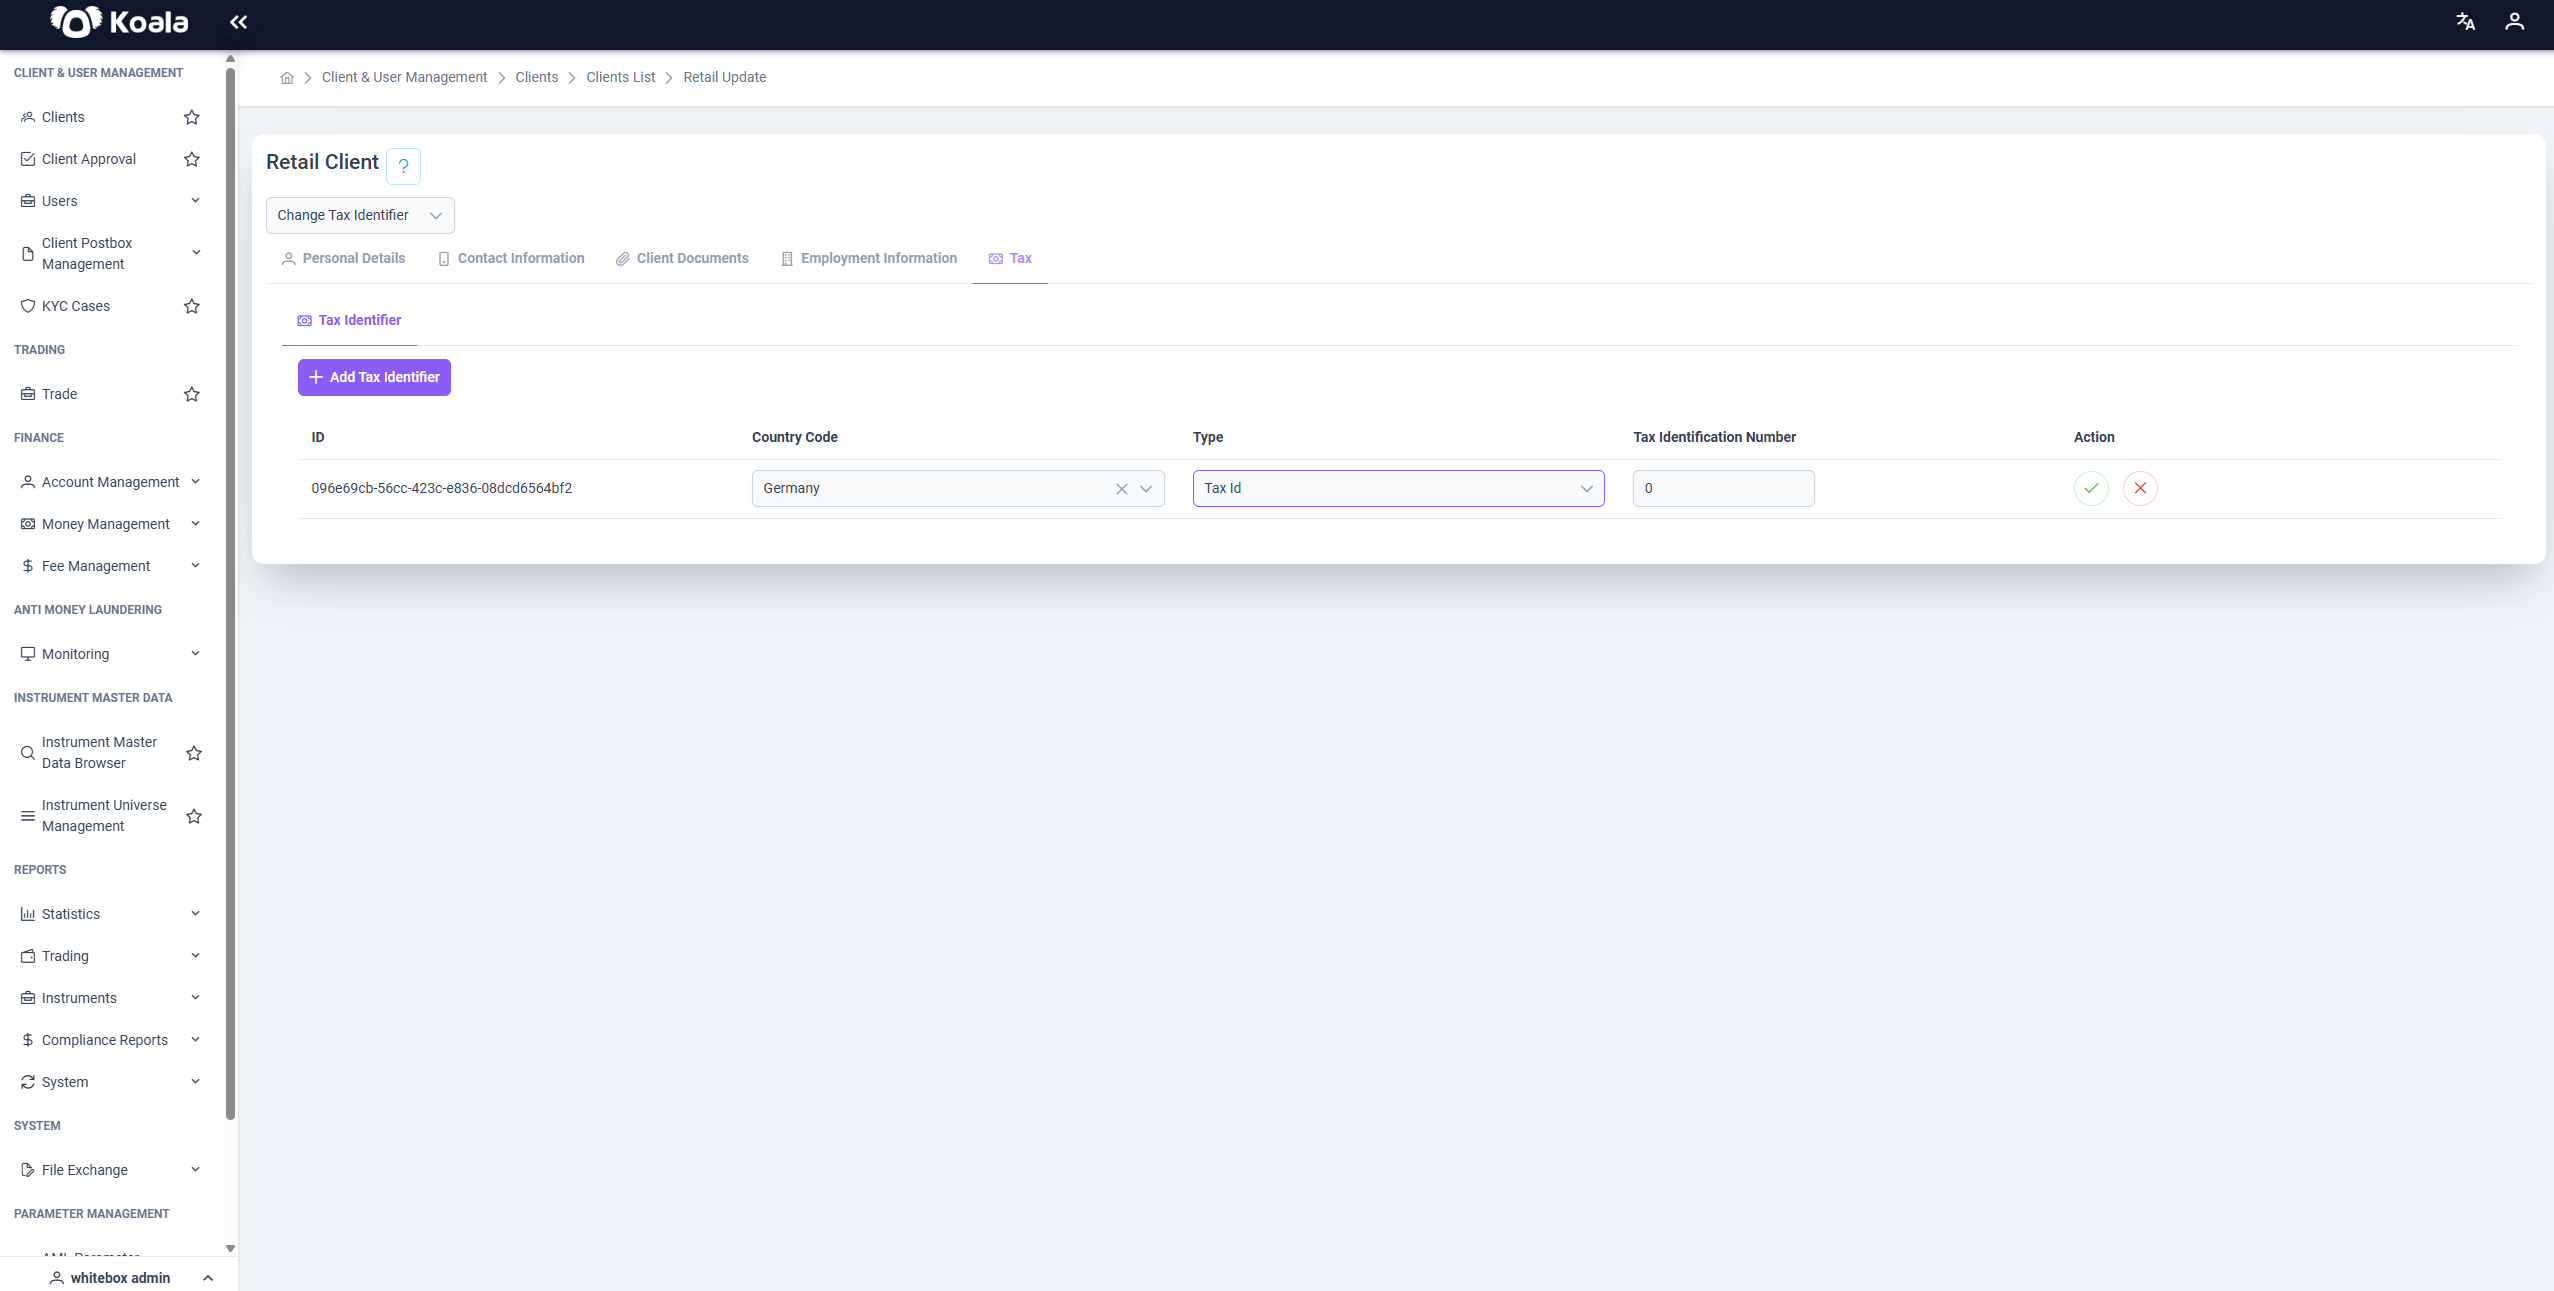
The Tax Identifier page provides a simple interface for managing a client’s tax ID records. Users can easily add new tax identifiers, update existing ones, or delete outdated entries. Maintaining accurate tax information is critical for compliance and reporting, and this module ensures it is structured and up-to-date.
The Tax Identifier screen is used to record the client’s tax identification numbers (TIN) for different jurisdictions. These records are essential for ensuring tax compliance, especially in cross-border financial services or international reporting obligations (e.g., FATCA, CRS).
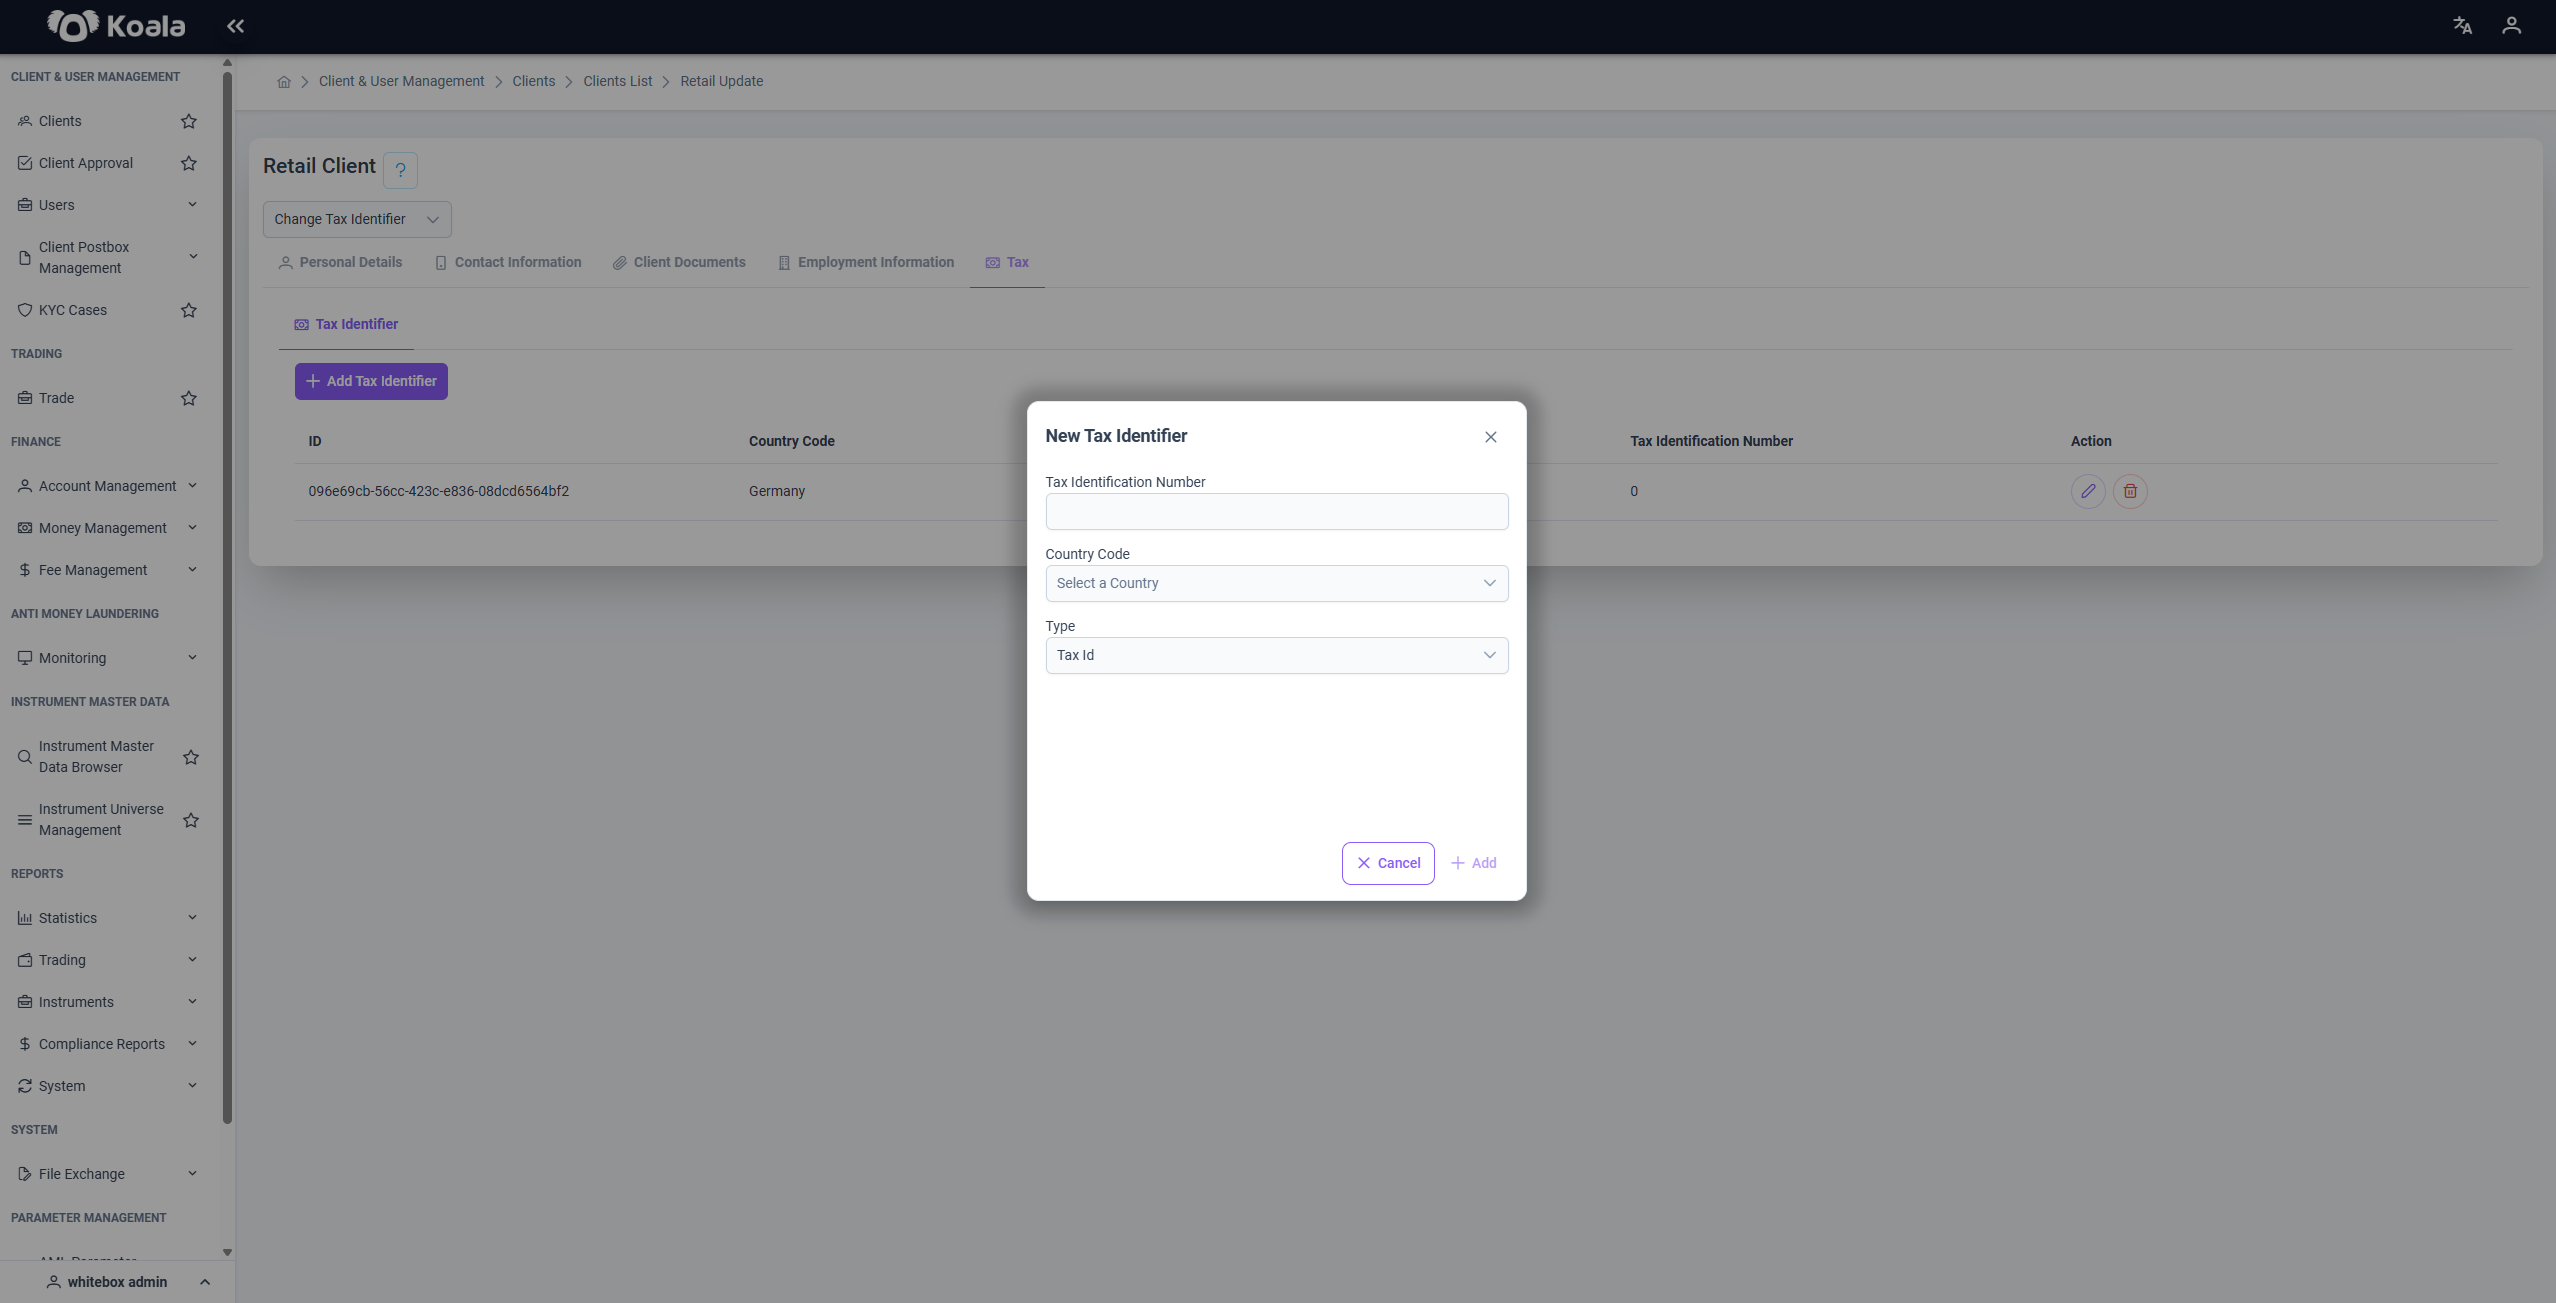
Tax Identifier Create
This screen is used to enter a new tax identifier — a number issued by a tax authority to identify individuals or legal entities for tax purposes. It ensures that the client's tax residency and identification details are properly recorded in the system.
This form is used to register new tax IDs for a client. Once filled and submitted, the tax identifier appears in the main list on the page. Each record can later be edited or removed as needed, helping ensure the client’s tax details are accurate and up to date for compliance purposes.
Tax Identifier Update
This screen is used to edit and correct existing tax identification details, such as if the client’s tax number has changed, the wrong country code was selected, or the identifier type was misclassified. Keeping this information accurate is essential for tax reporting and compliance with regulations such as FATCA and CRS.
The Tax Identifier Update function ensures that client tax data remains accurate and up to date. By editing directly through the table actions, users can quickly revise any incorrect or outdated tax records, supporting proper regulatory reporting and compliance maintenance.
Next to the update (edit) button in the table, there is also a delete (trash bin) icon. Clicking this removes the selected tax identifier from the client’s profile after confirmation.
🔰 Non Assessment Certificate
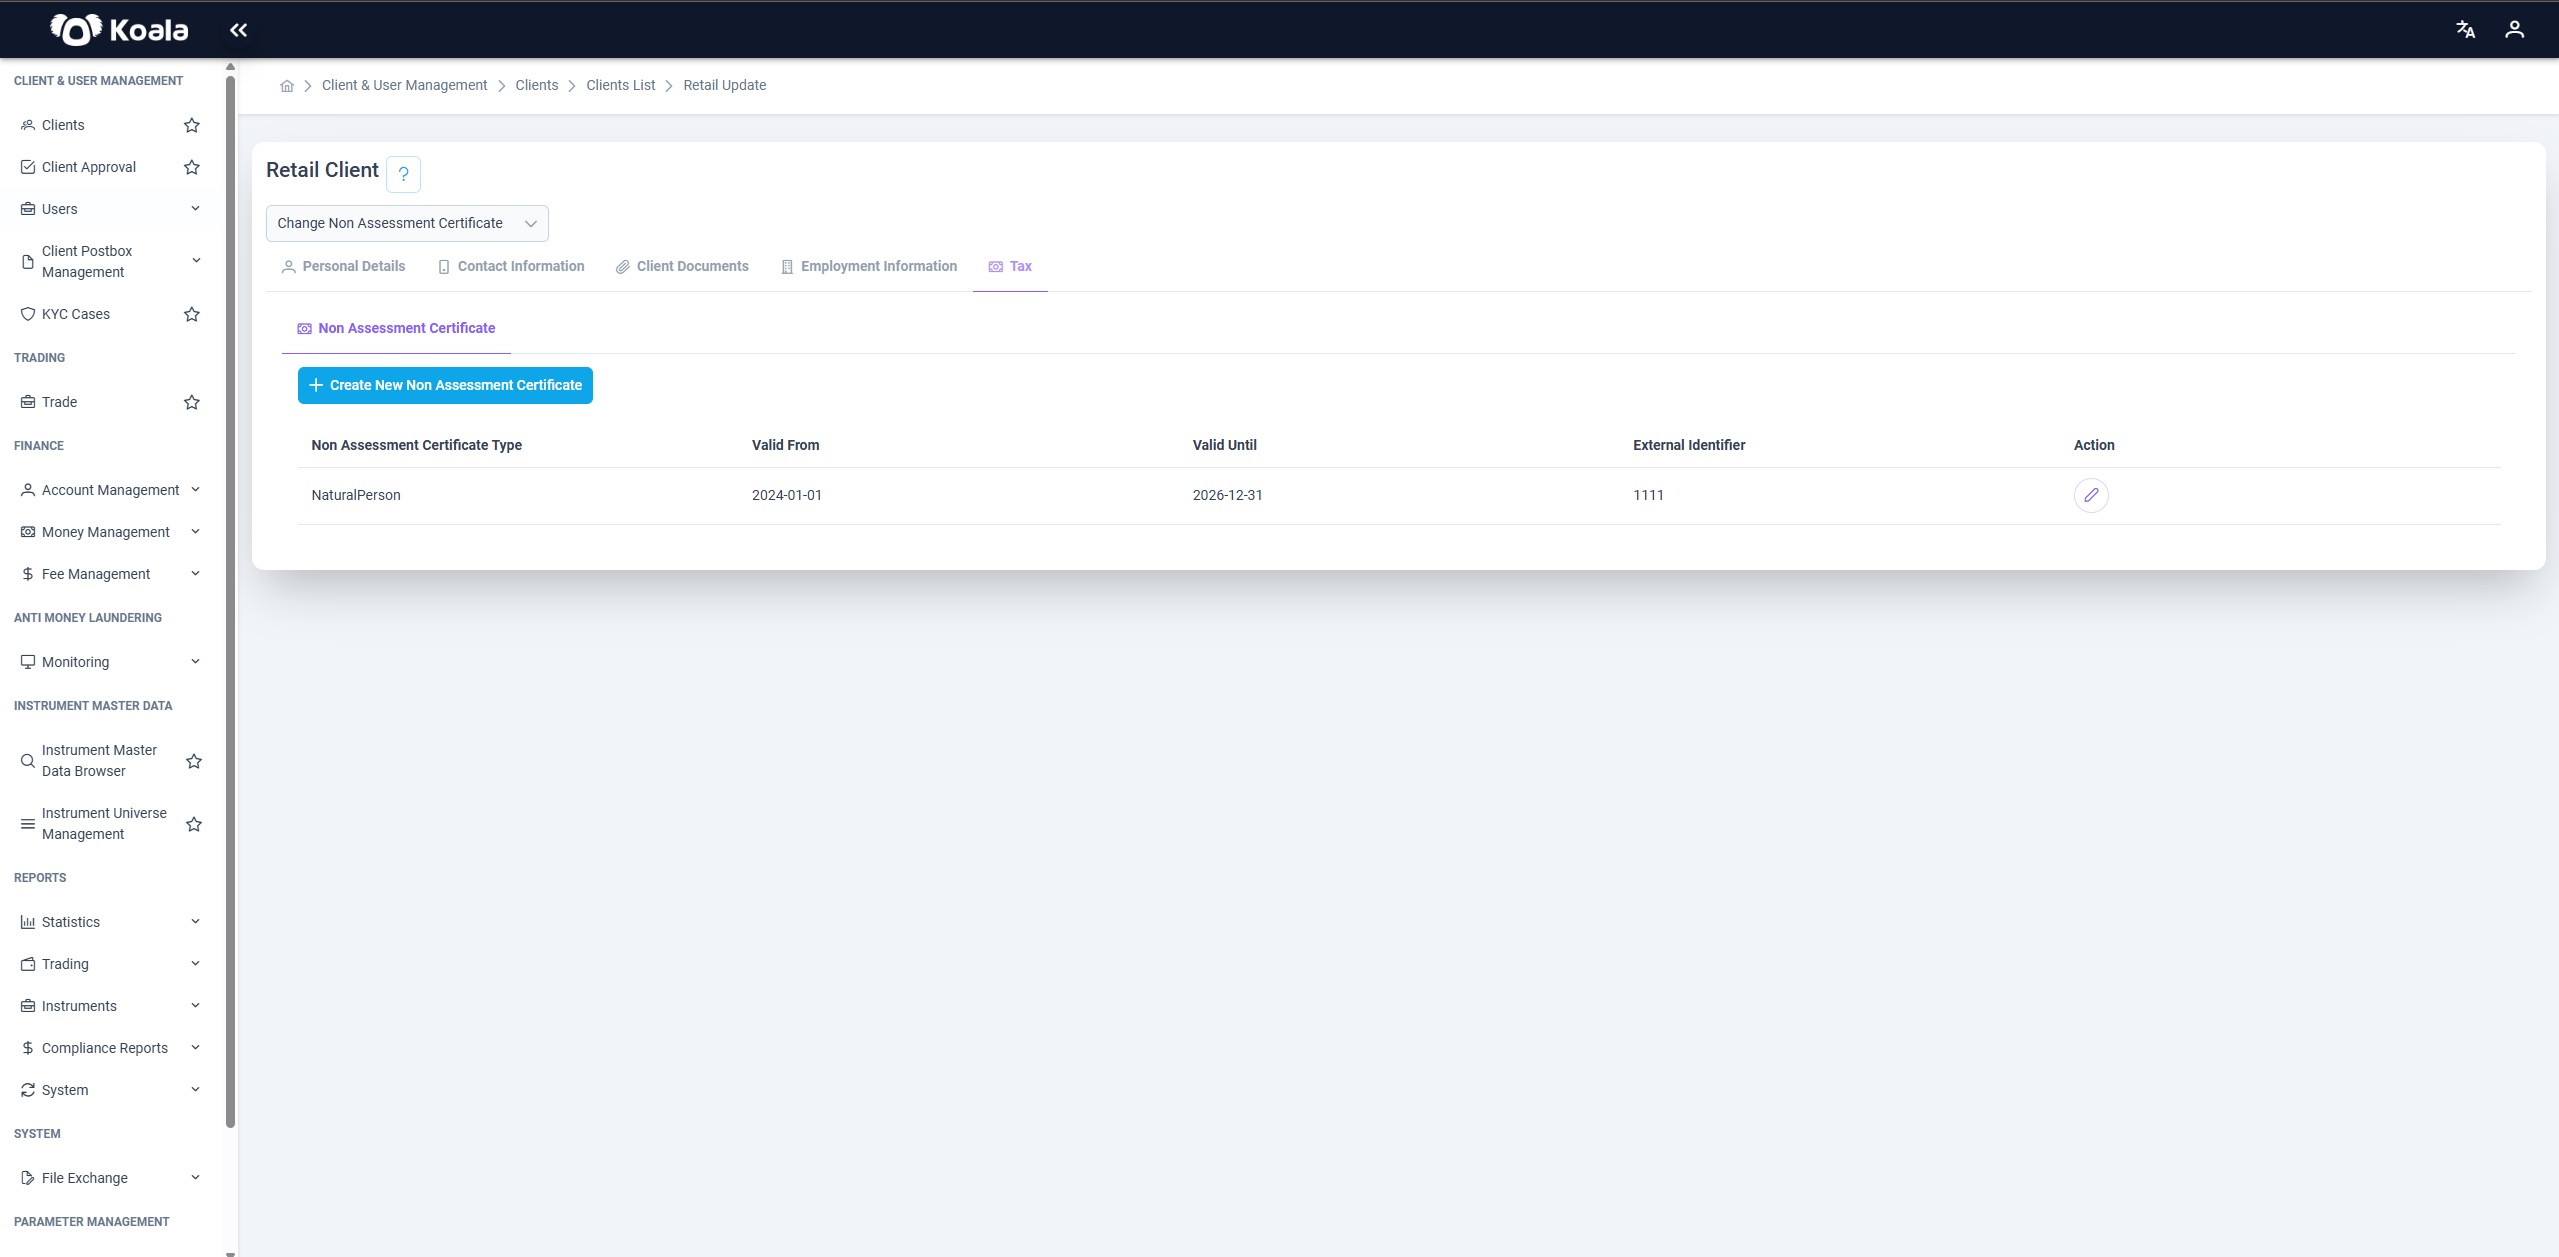
The Non Assessment Certificate page in the Koala platform is used to manage certificates that exempt a Retail Client from certain tax assessments. These certificates are often issued by authorities to confirm that the client is not subject to specific taxes under certain conditions.
This screen allows users to add, view, and manage non-assessment certificates for individual clients. These certificates help document the client’s tax-exempt status within defined time periods and are part of broader compliance and tax management processes.
Non Assessment Certificate Create
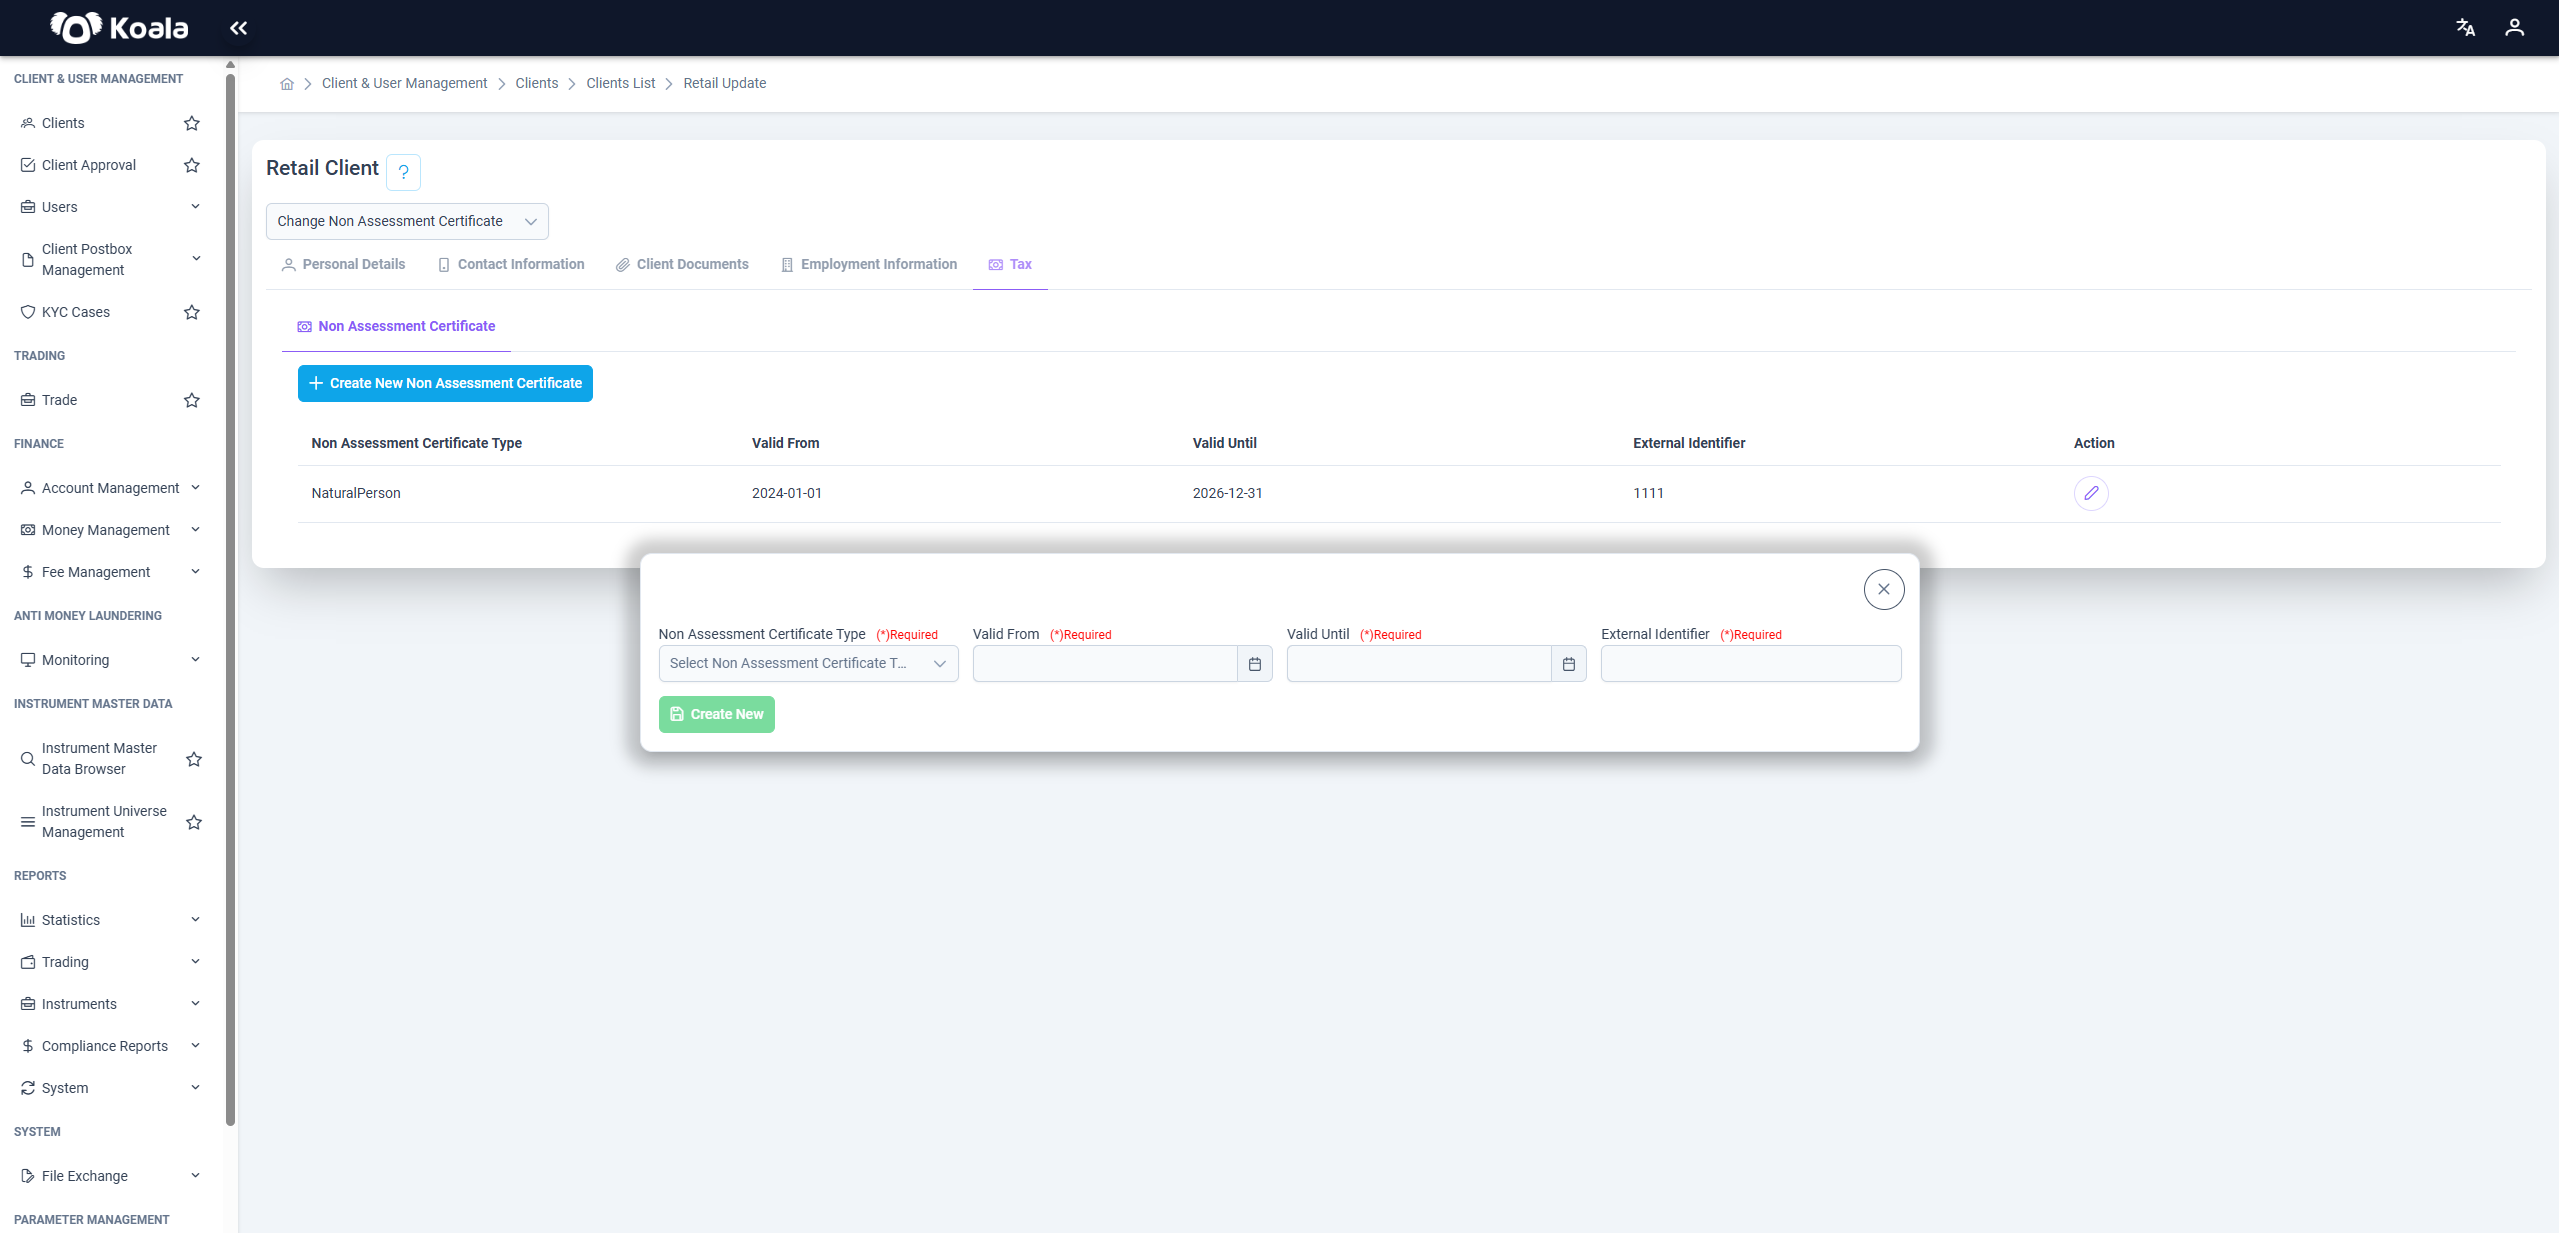
The Create New Non Assessment Certificate pop-up in the Koala platform is used to add a new certificate that confirms a Retail Client is exempt from certain tax obligations. These certificates typically apply for a limited time and must be recorded for compliance purposes.
After entering the necessary details and clicking Create, the certificate is added to the client's record and displayed in the main table.
Non Assessment Certificate Update
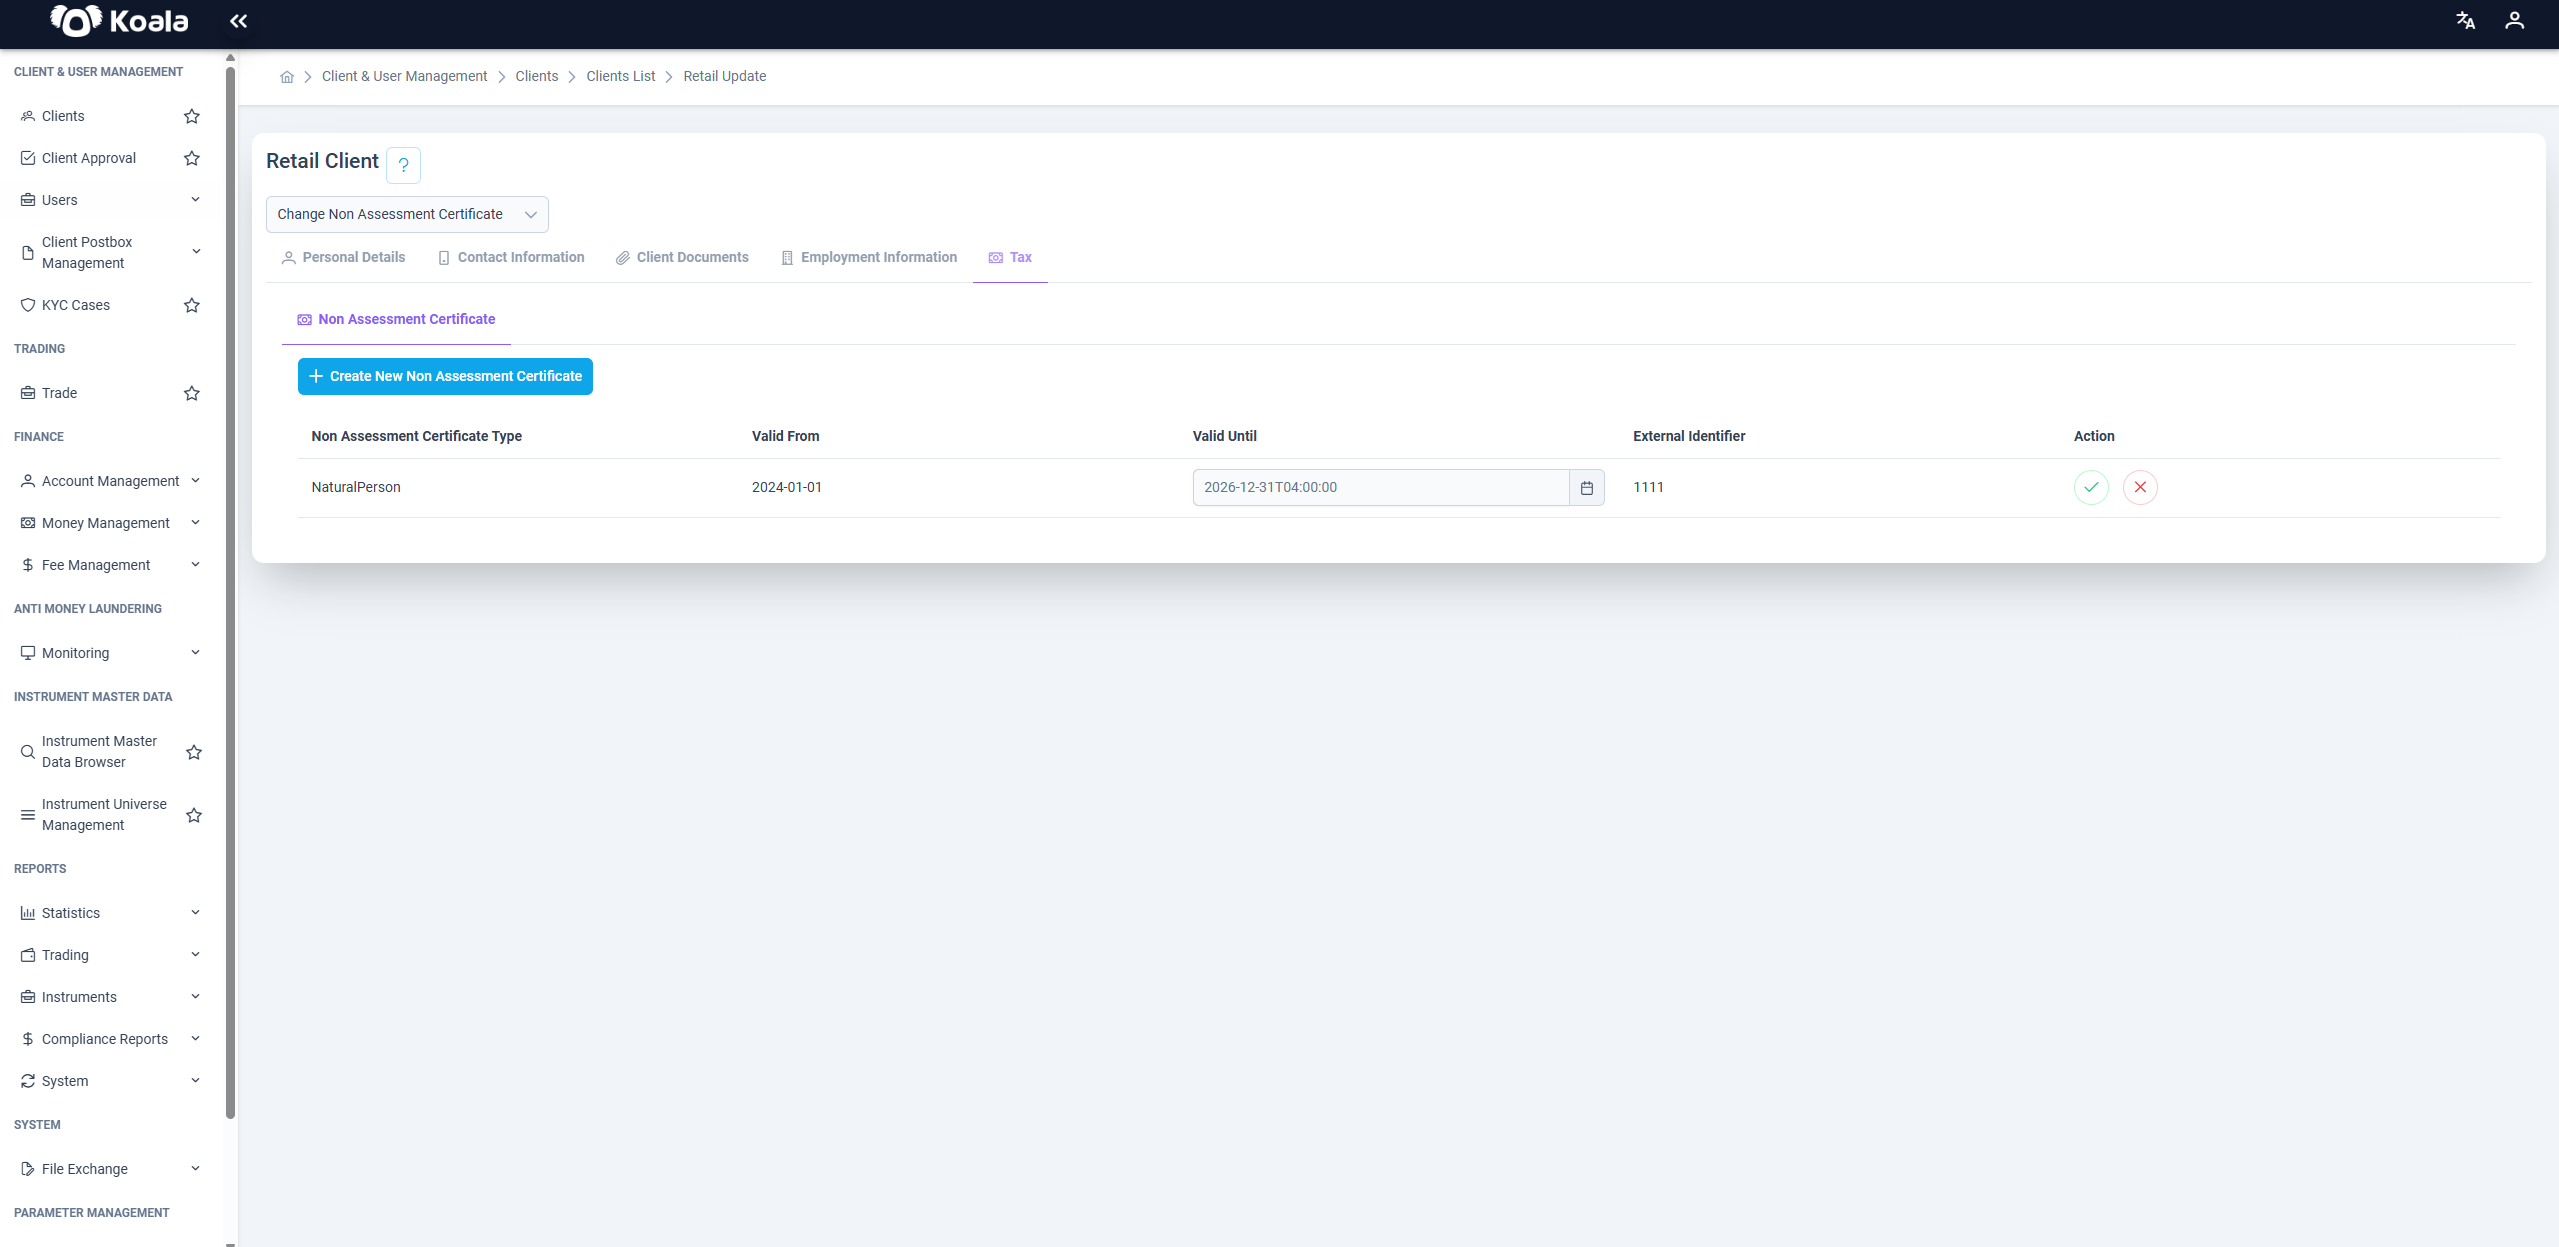
Unlike other sections, the update process here does not open a pop-up. Instead, the "Valid Until" field is edited directly within the table (inline editing). Users can click on the Valid Until cell, make changes to the date, and the system saves the update immediately or upon confirmation (depending on implementation).
All other fields — such as certificate type, valid from, or external identifier — are read-only and cannot be modified once the certificate is created.
This streamlined approach makes it quick to update expiration dates while maintaining the integrity of the original certificate data.
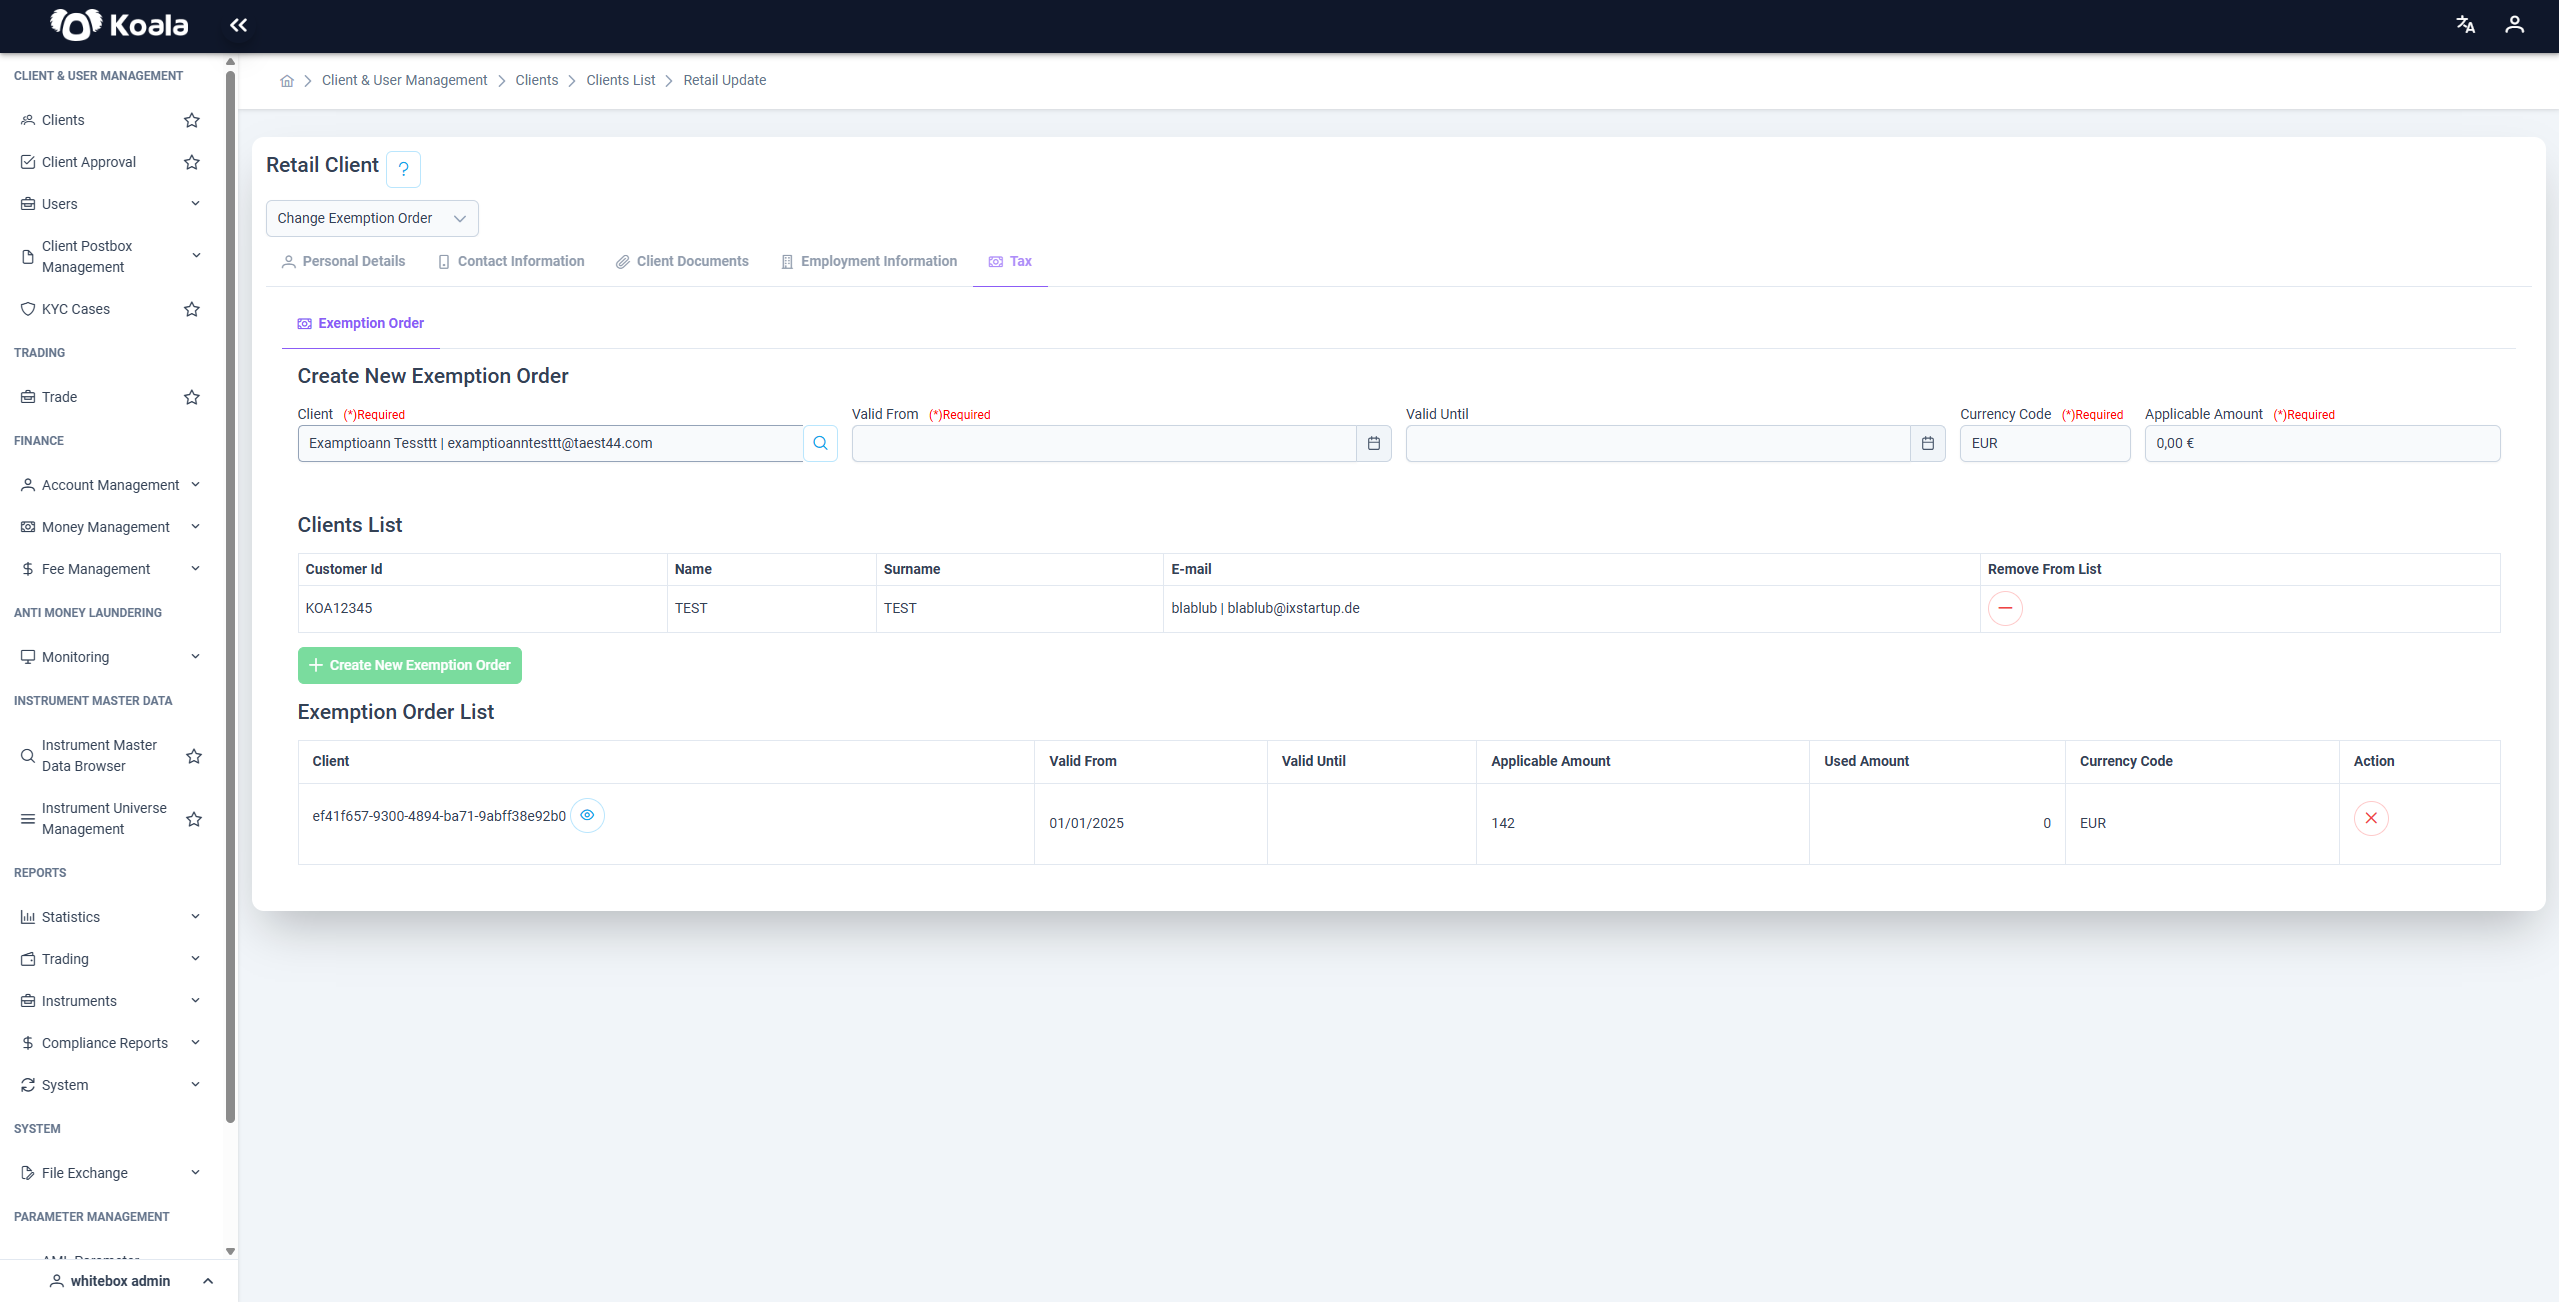
✅ Exemption Order
The Exemption Order page in the Koala platform is used to create and manage exemption orders for one or more clients. These orders define tax or fee exemptions that apply over a specific period and amount, typically based on client status, regulation, or agreement.
This screen allows users to create a new exemption order by selecting one or more clients and defining the exemption conditions such as period, currency, and applicable amount. It is especially useful when the same exemption applies to multiple clients.
This screen enables the bulk creation of exemption orders across multiple clients with a single action. It combines a dynamic client selection interface with a structured form to ensure all exemption details are clearly defined and properly recorded.
No updates can be made on the page; only the existing exemption order can be revoked
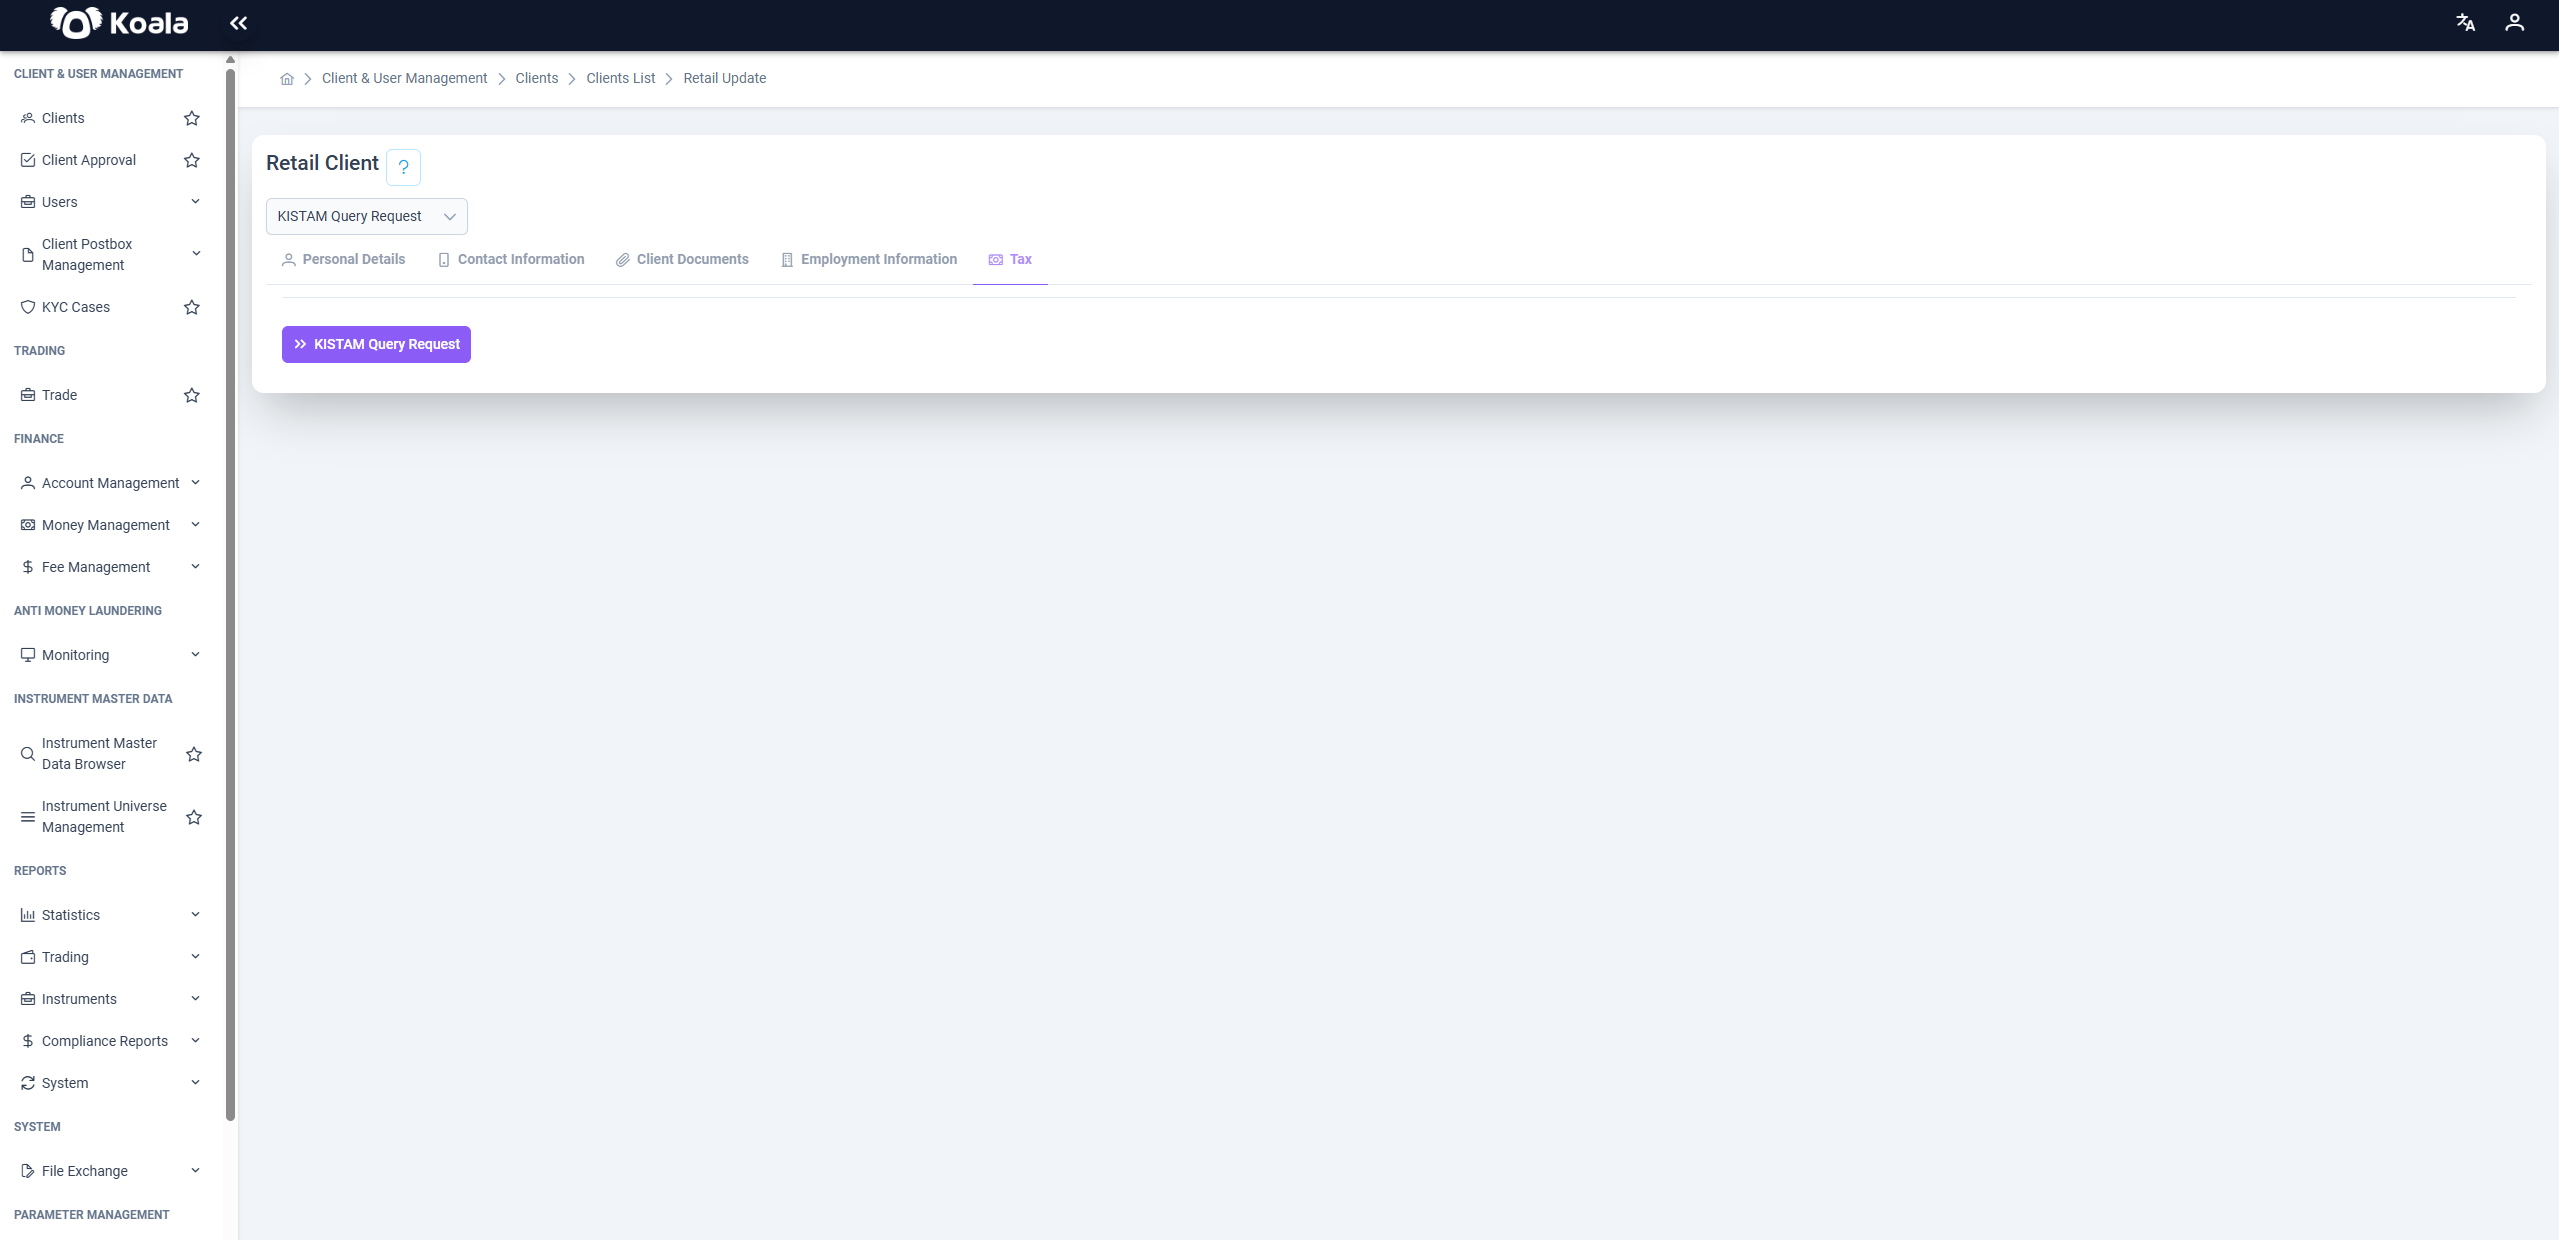
📨 KISTAM Query Request
Business Update
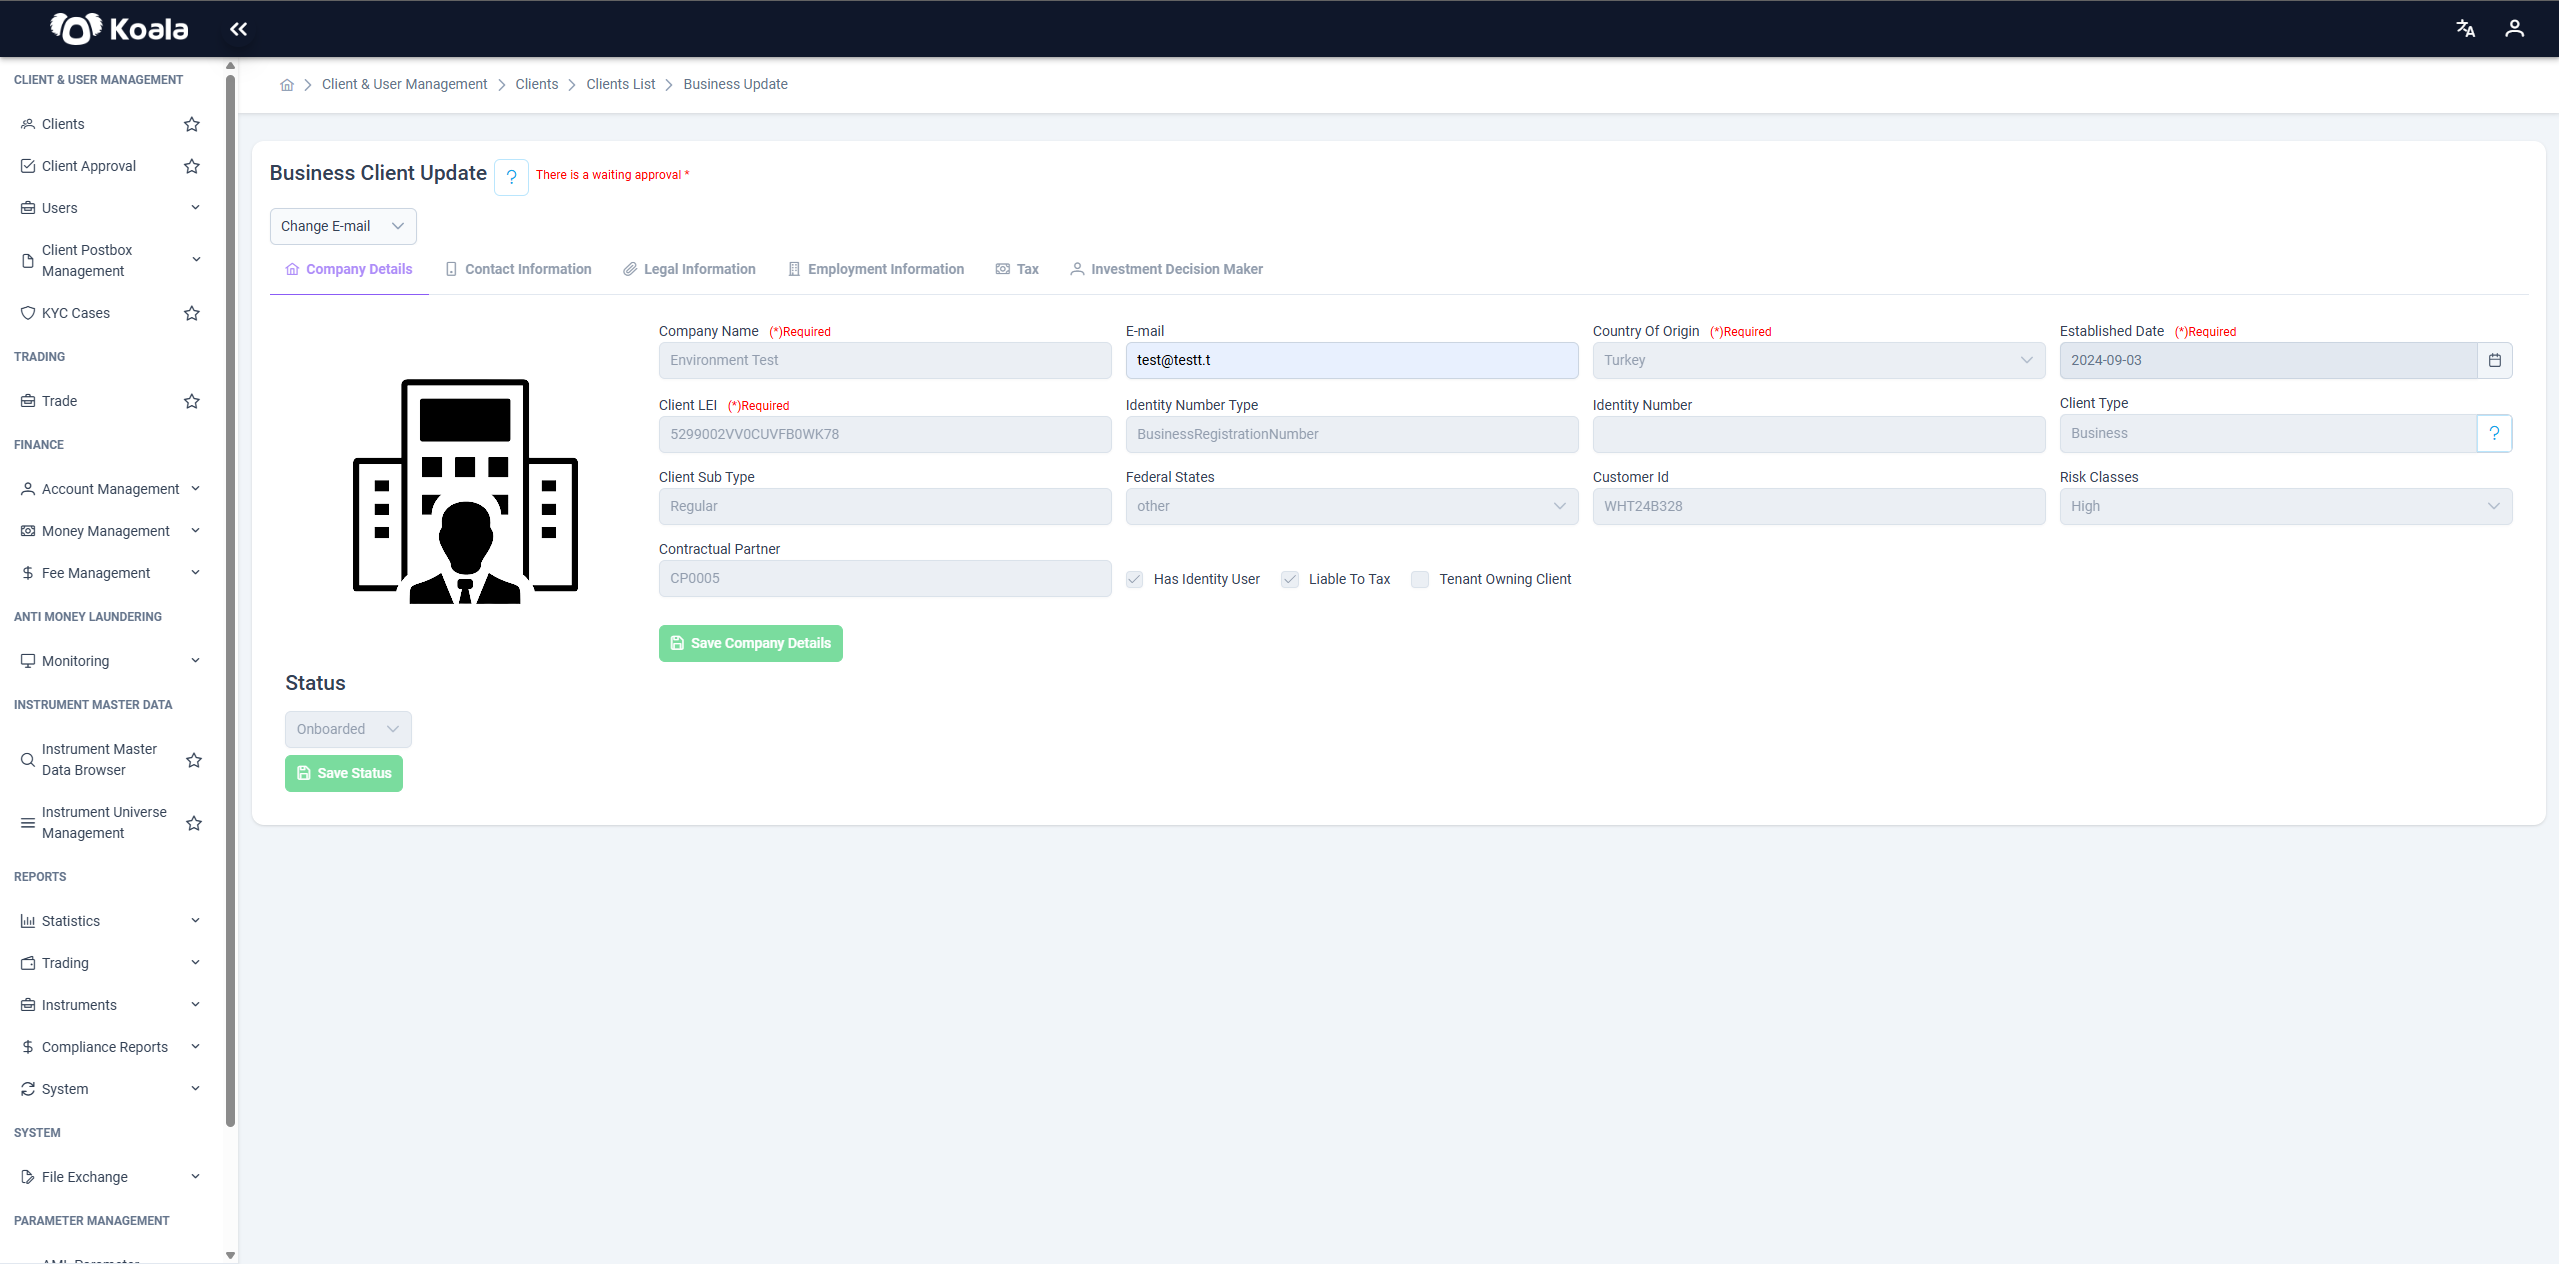
This page is used to update existing business client records. Users can edit fields across various tabs, including company information, contact details, legal information, employment status, tax information, and investment decision maker details.
If you clicked the 🖉 (pen) icon on the previous page, this is the page you are redirected to. Here, you can update the client’s information. First, select the type of change you want to make from the dropdown at the top left (e.g., Change Name). Once selected, the related section will become editable. After making your changes, click the Save Details button at the bottom to save them.
-
The Company Details tab contains critical data such as the company's basic information, client type, and risk classifications, which can be entered or updated.
-
Mandatory fields are marked in red and must be fully completed before saving updates.
-
Changes made in each tab should be saved by clicking the Save button in that respective tab.
-
The Status section at the bottom of the page allows selecting and saving the client's status (e.g., Onboarded).
Note: The status can only be updated by Tenant Management or the Tenant API.
Once a status is set to Onboarded, it cannot be changed back to Initial. Similarly, a client with a Deleted status cannot be changed to Onboarded. -
The question mark icon at the top right corner of the page provides help and guidance related to the fields.
This page is exclusively for updating business client information, and ensuring accurate data entry is essential.
🏢 Contact Information
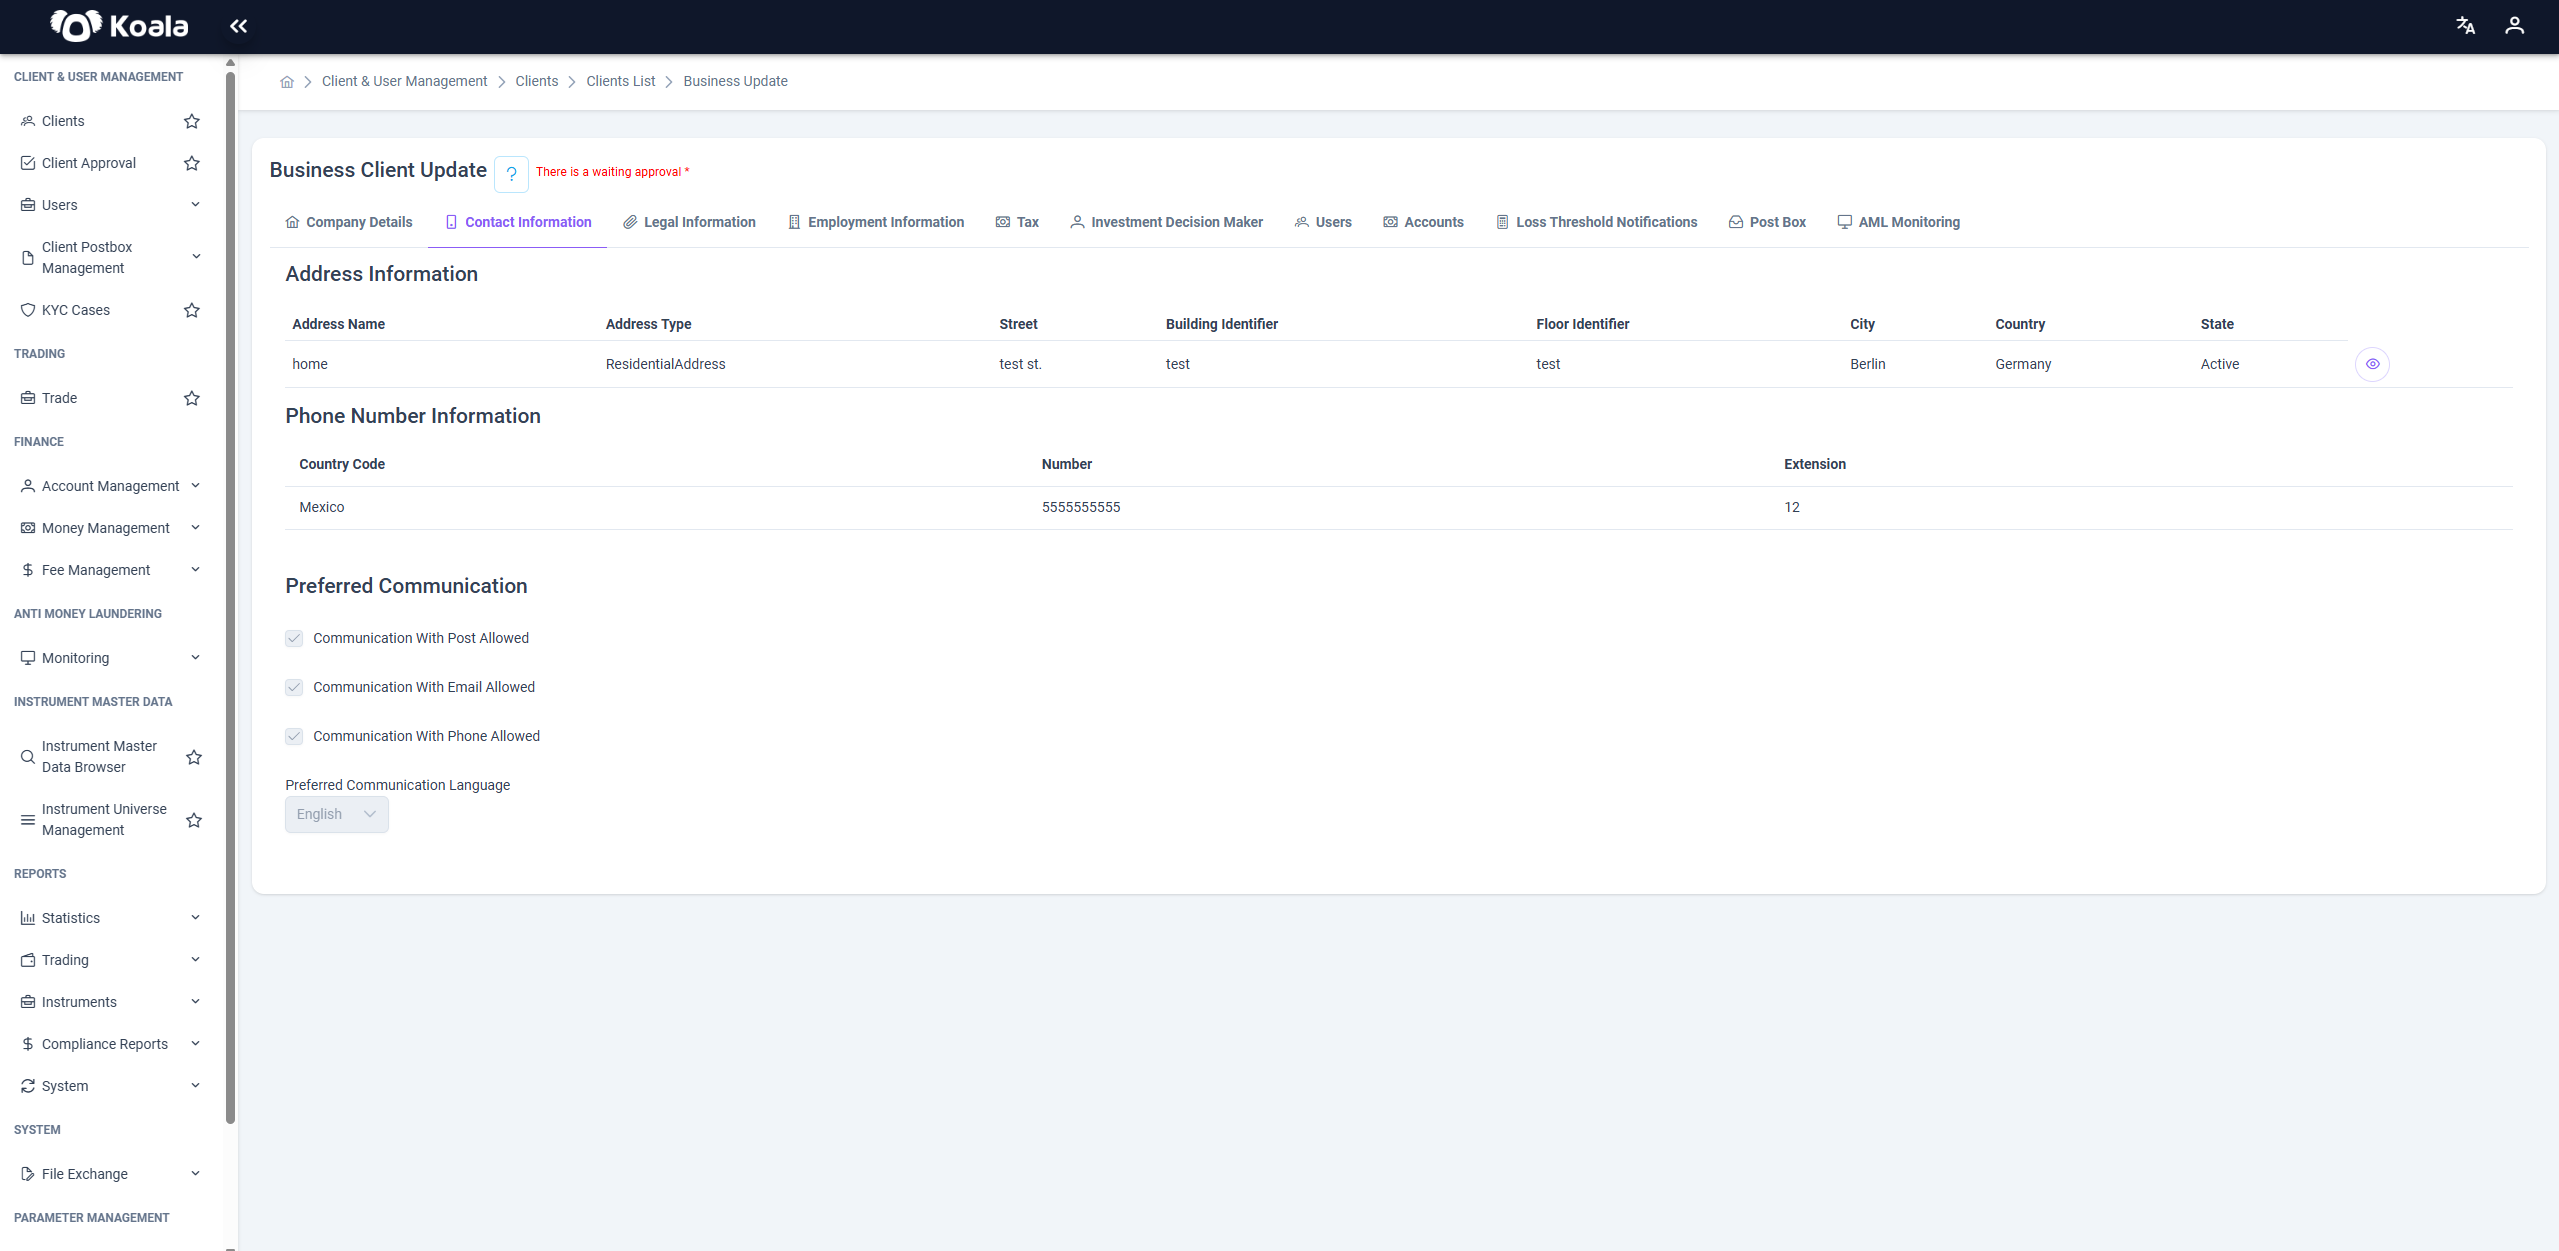
The Business Contact Information section allows you to manage the communication details of a Business Client. It consists of the following three key subsections:
Address Information: Contains the official business address details such as street, city, country, and postal code. This information is used for regulatory and mailing purposes.
Phone Number Information: Stores the contact numbers of the business, typically including landline and mobile numbers, which can be used for operational or emergency communication.
Preferred Communication: Specifies the client's preferred method of contact (e.g., email, phone). This helps ensure that important notifications are delivered through the most appropriate channel.
This section is essential for maintaining up-to-date contact data to support smooth communication between the platform and the client.
🏠 Address Information
If you want to change the address, add a new address to the business client, or remove the existing one, you can select Address from the dropdown. You’ll be redirected to the appropriate tab to proceed with your changes.

If you click the Add Address Information button, a screen will appear allowing you to create a new address. After filling in the required information, you can add the new address by clicking the Add button.
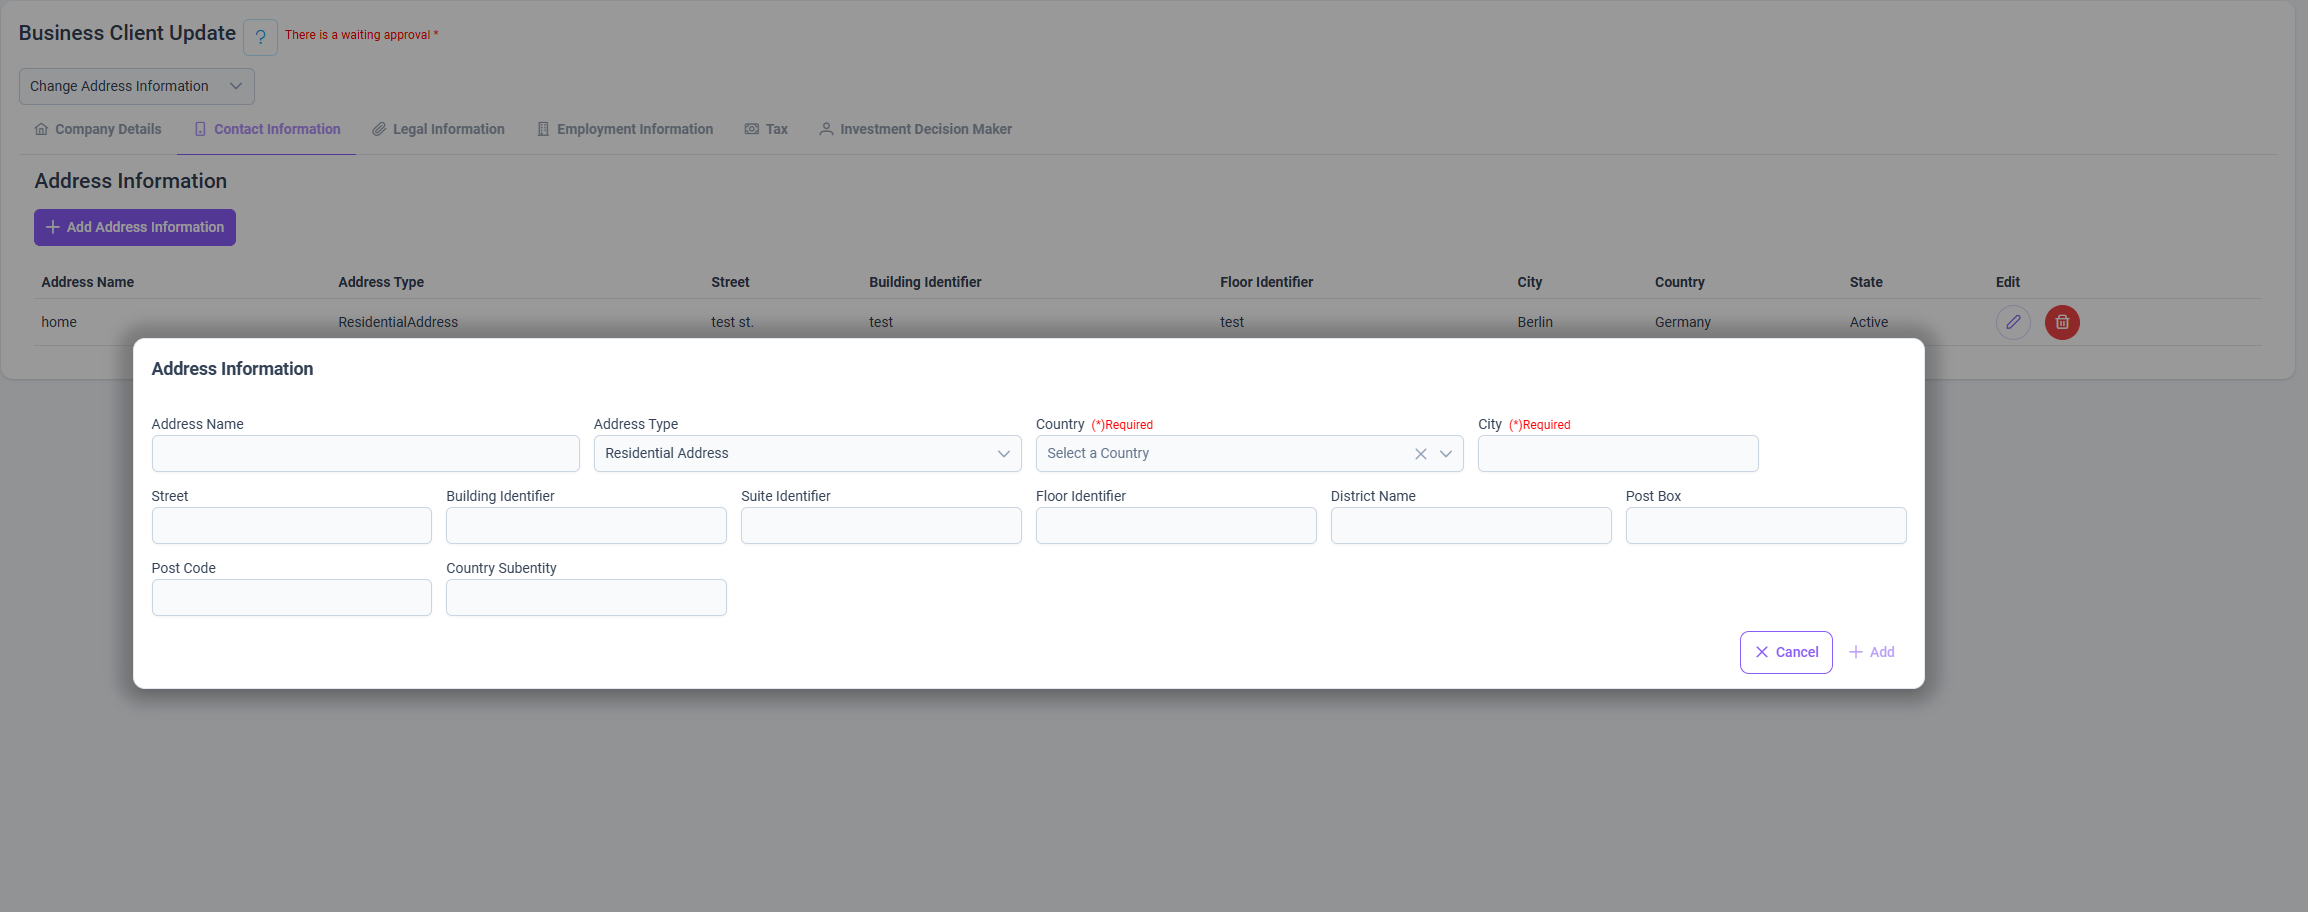
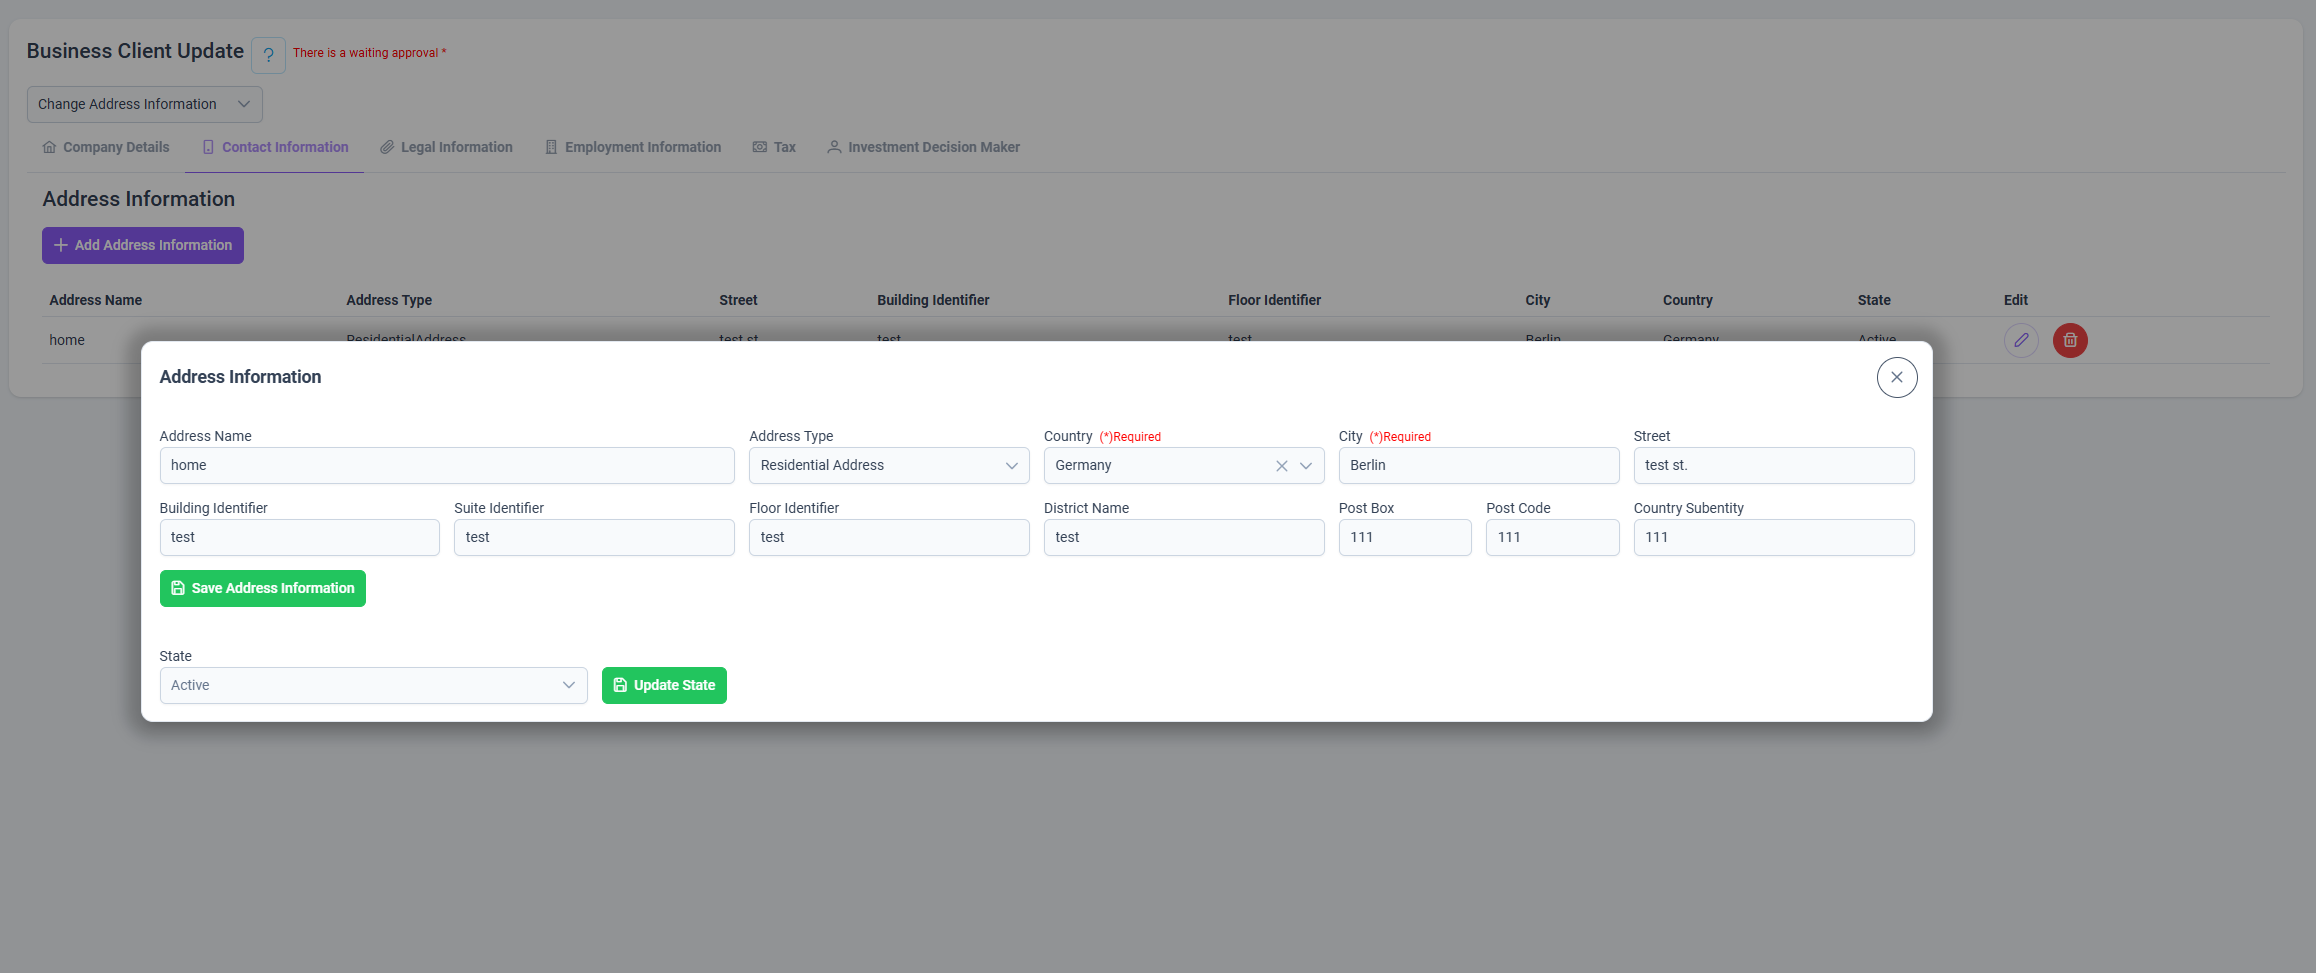
To update an address, simply click the 🖉 (pen) icon. Then, similar to adding an address, a screen will appear where you can fill in the necessary fields and update the address. Additionally, you can also change the status of your address to Active or Inactive.
📞 Phone Number Information
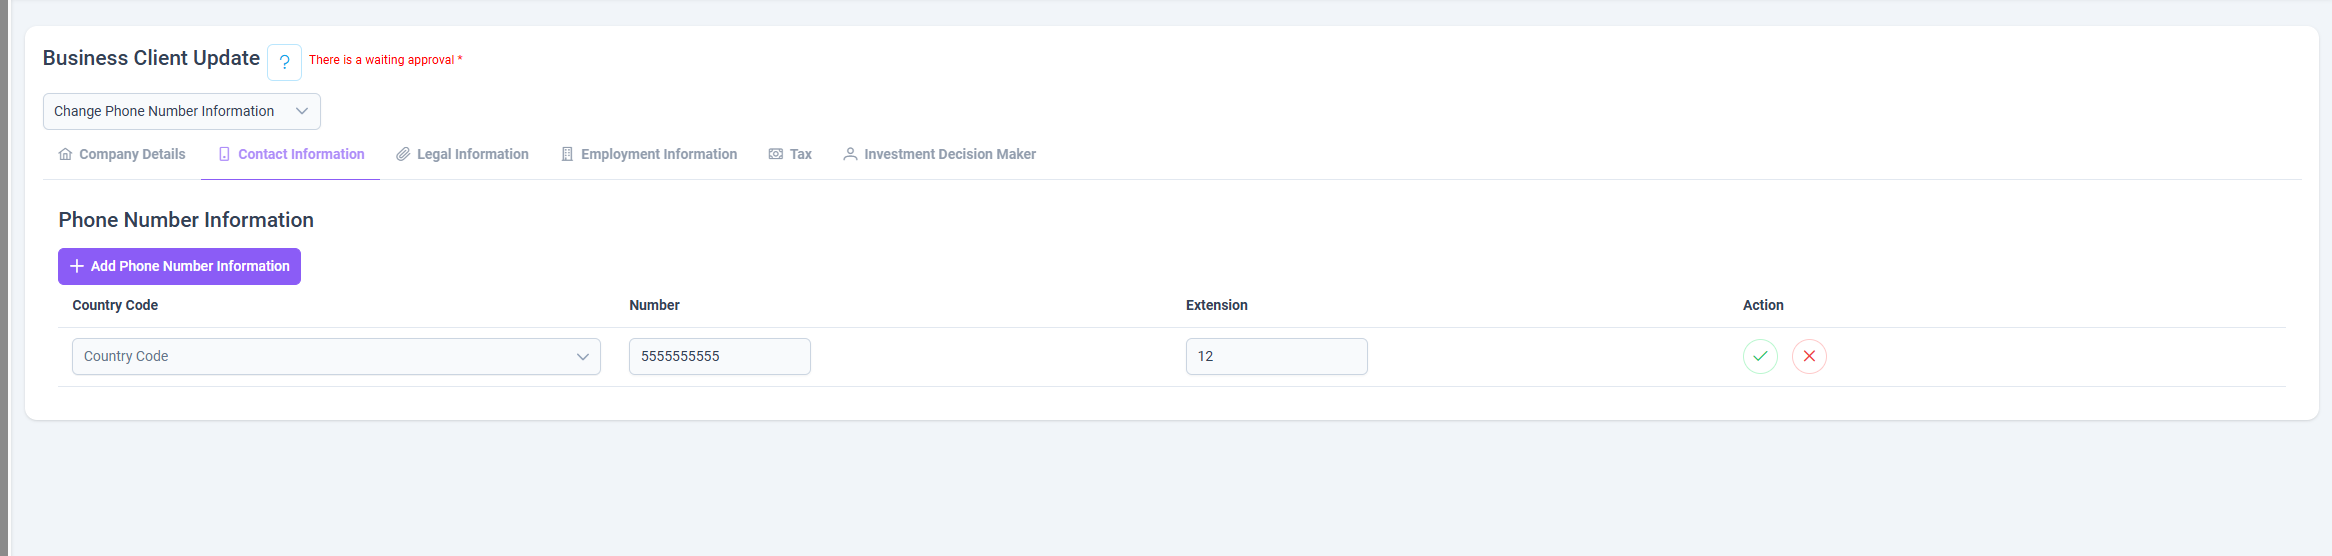
If you want to change the phone number, add a new phone number to the business client, or remove the existing one, you can select Phone Number from the dropdown. You’ll be redirected to the appropriate tab to proceed with your changes.
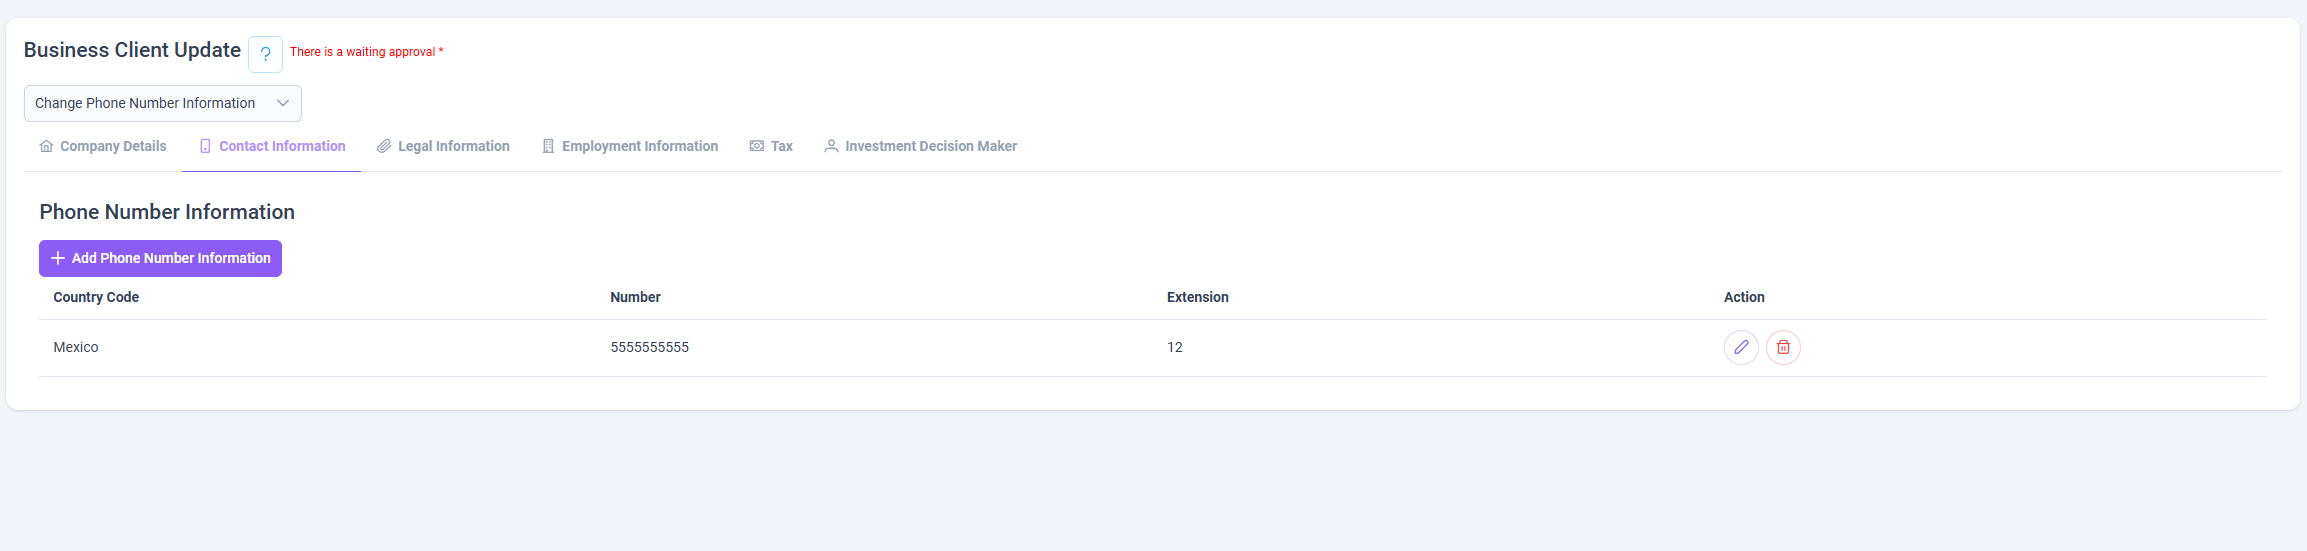
If you click the Add Phone Number button, a screen will appear allowing you to create a phone number. After filling in the required information, you can add the new phone number by clicking the Add button.
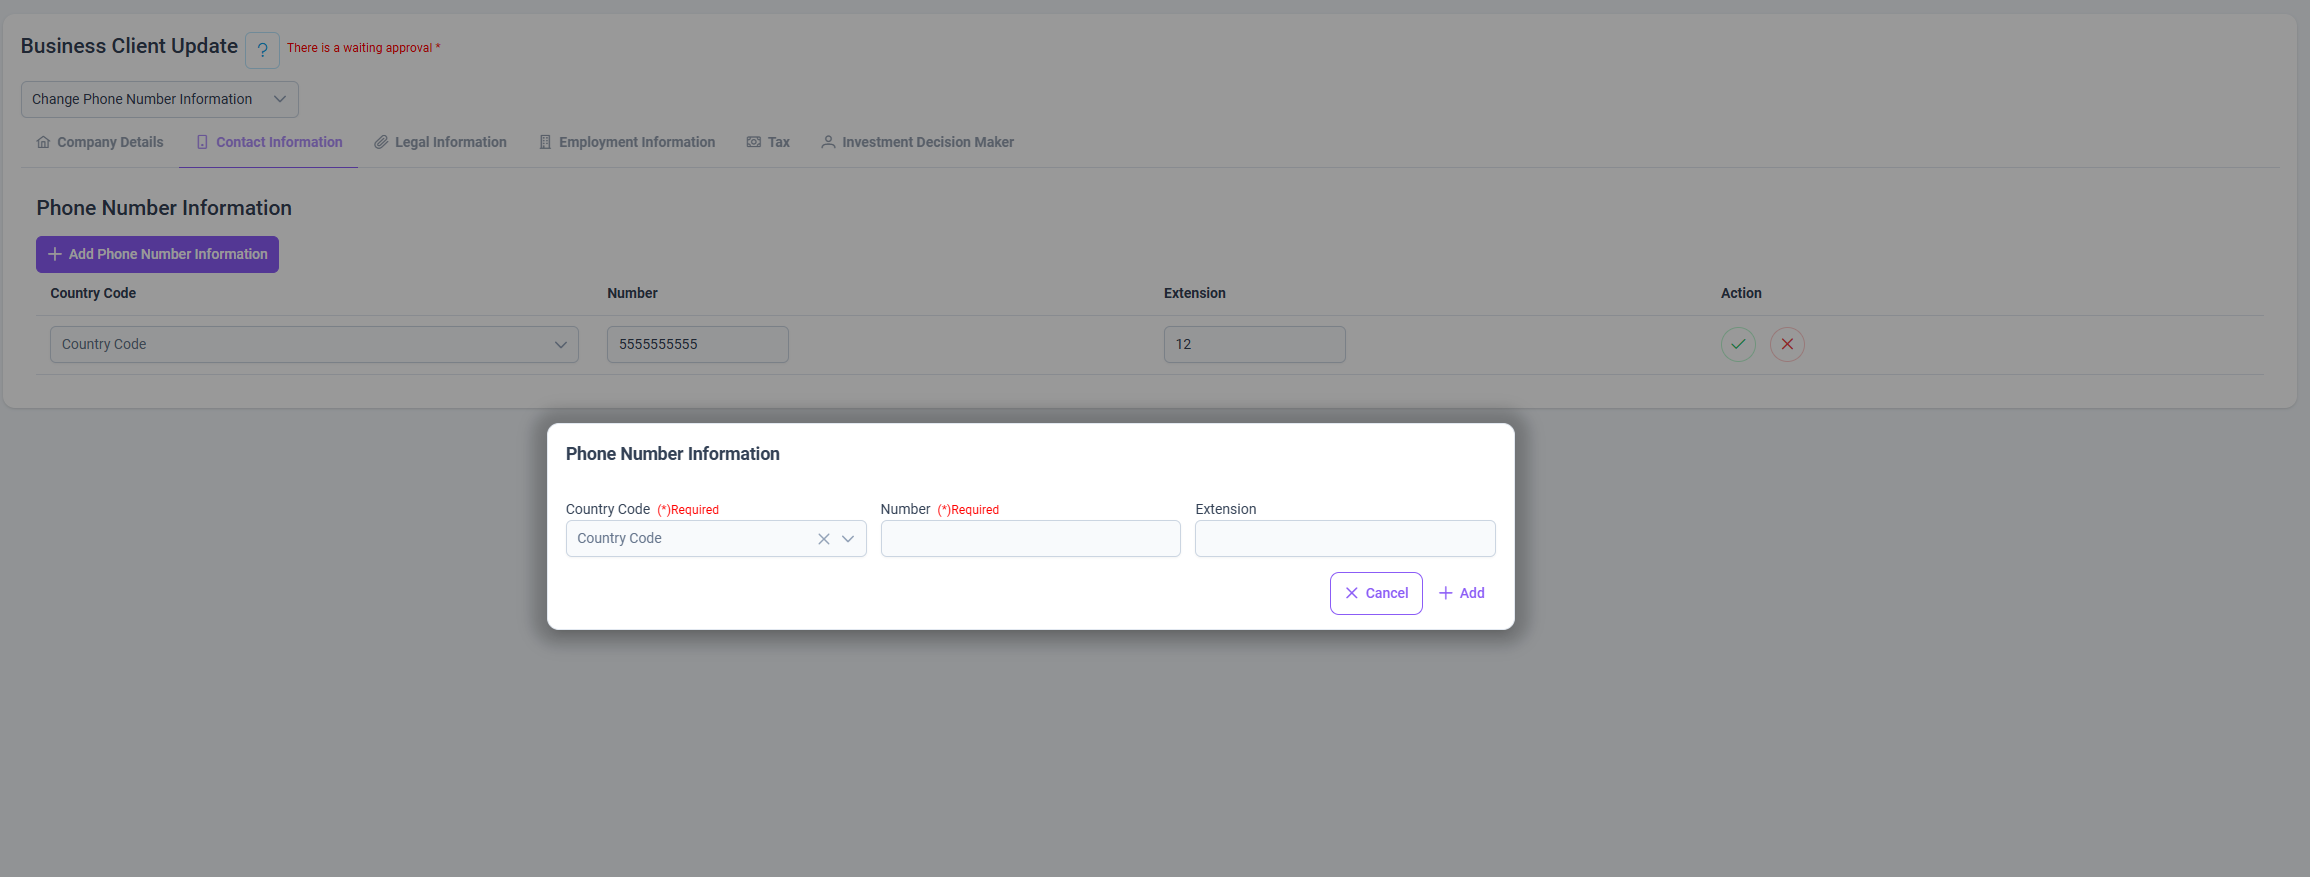
To update the phone number, simply click the 🖉 (pen) icon. Then you can update it by filling in the required fields directly on the table.
📩 Preferred Communication
If you want to update the client's preferred communication method — such as switching between email, phone, or postal — you can select Preferred Communication from the dropdown. You’ll be redirected to the corresponding section where you can make the necessary adjustments.
🏢 Business Legal Information
This section covers all essential legal and compliance-related information regarding a Business client. It is divided into three main parts:
👥 Authorized People
This section within the Business Client Update panel of the Koala platform is designed to manage and document the individuals authorized to represent the business client. These authorized signatories have official capacity to act on behalf of the company in legal and financial matters.
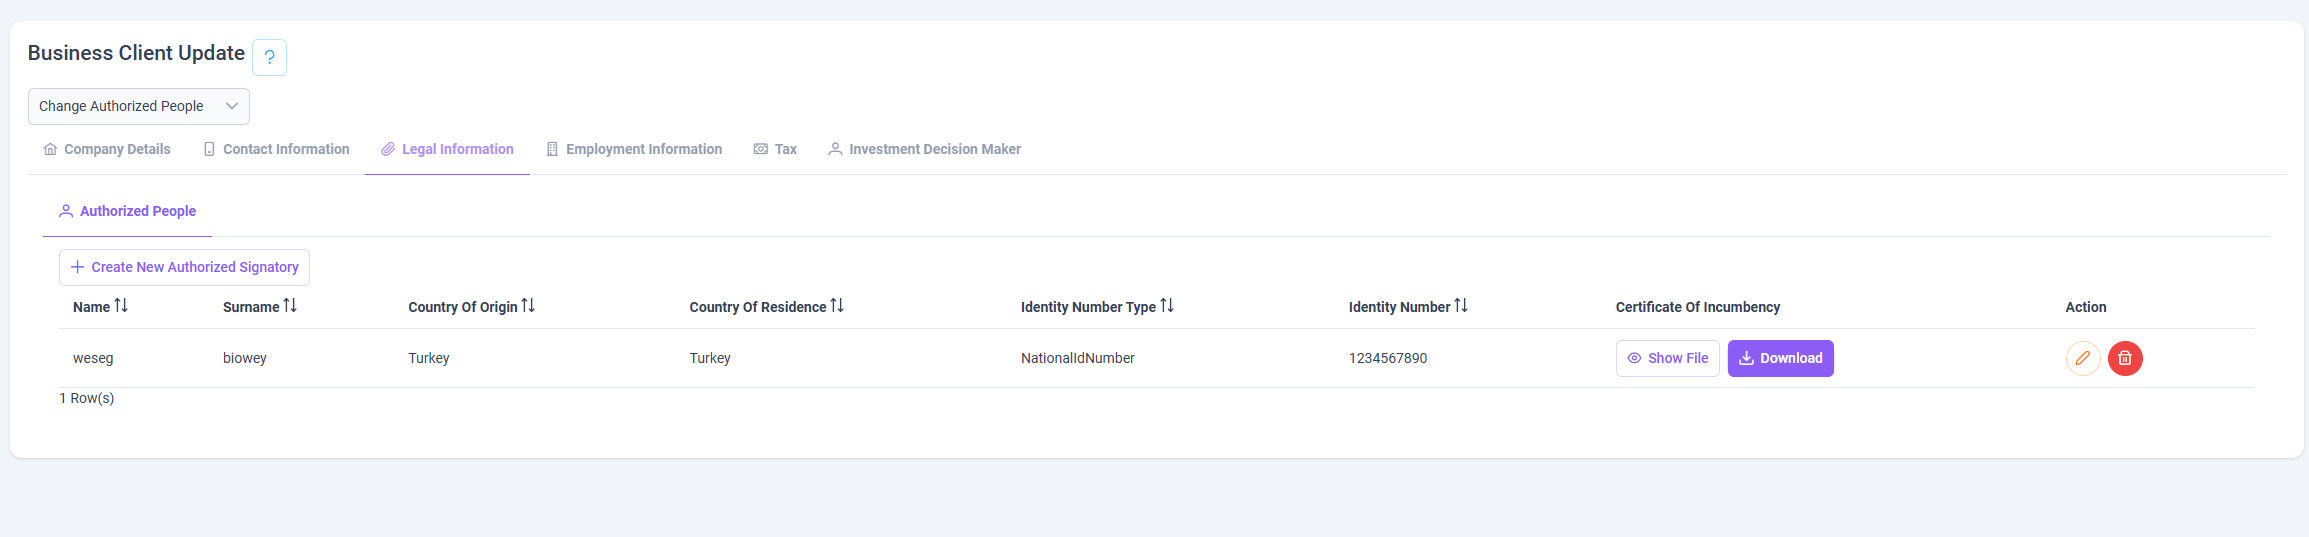
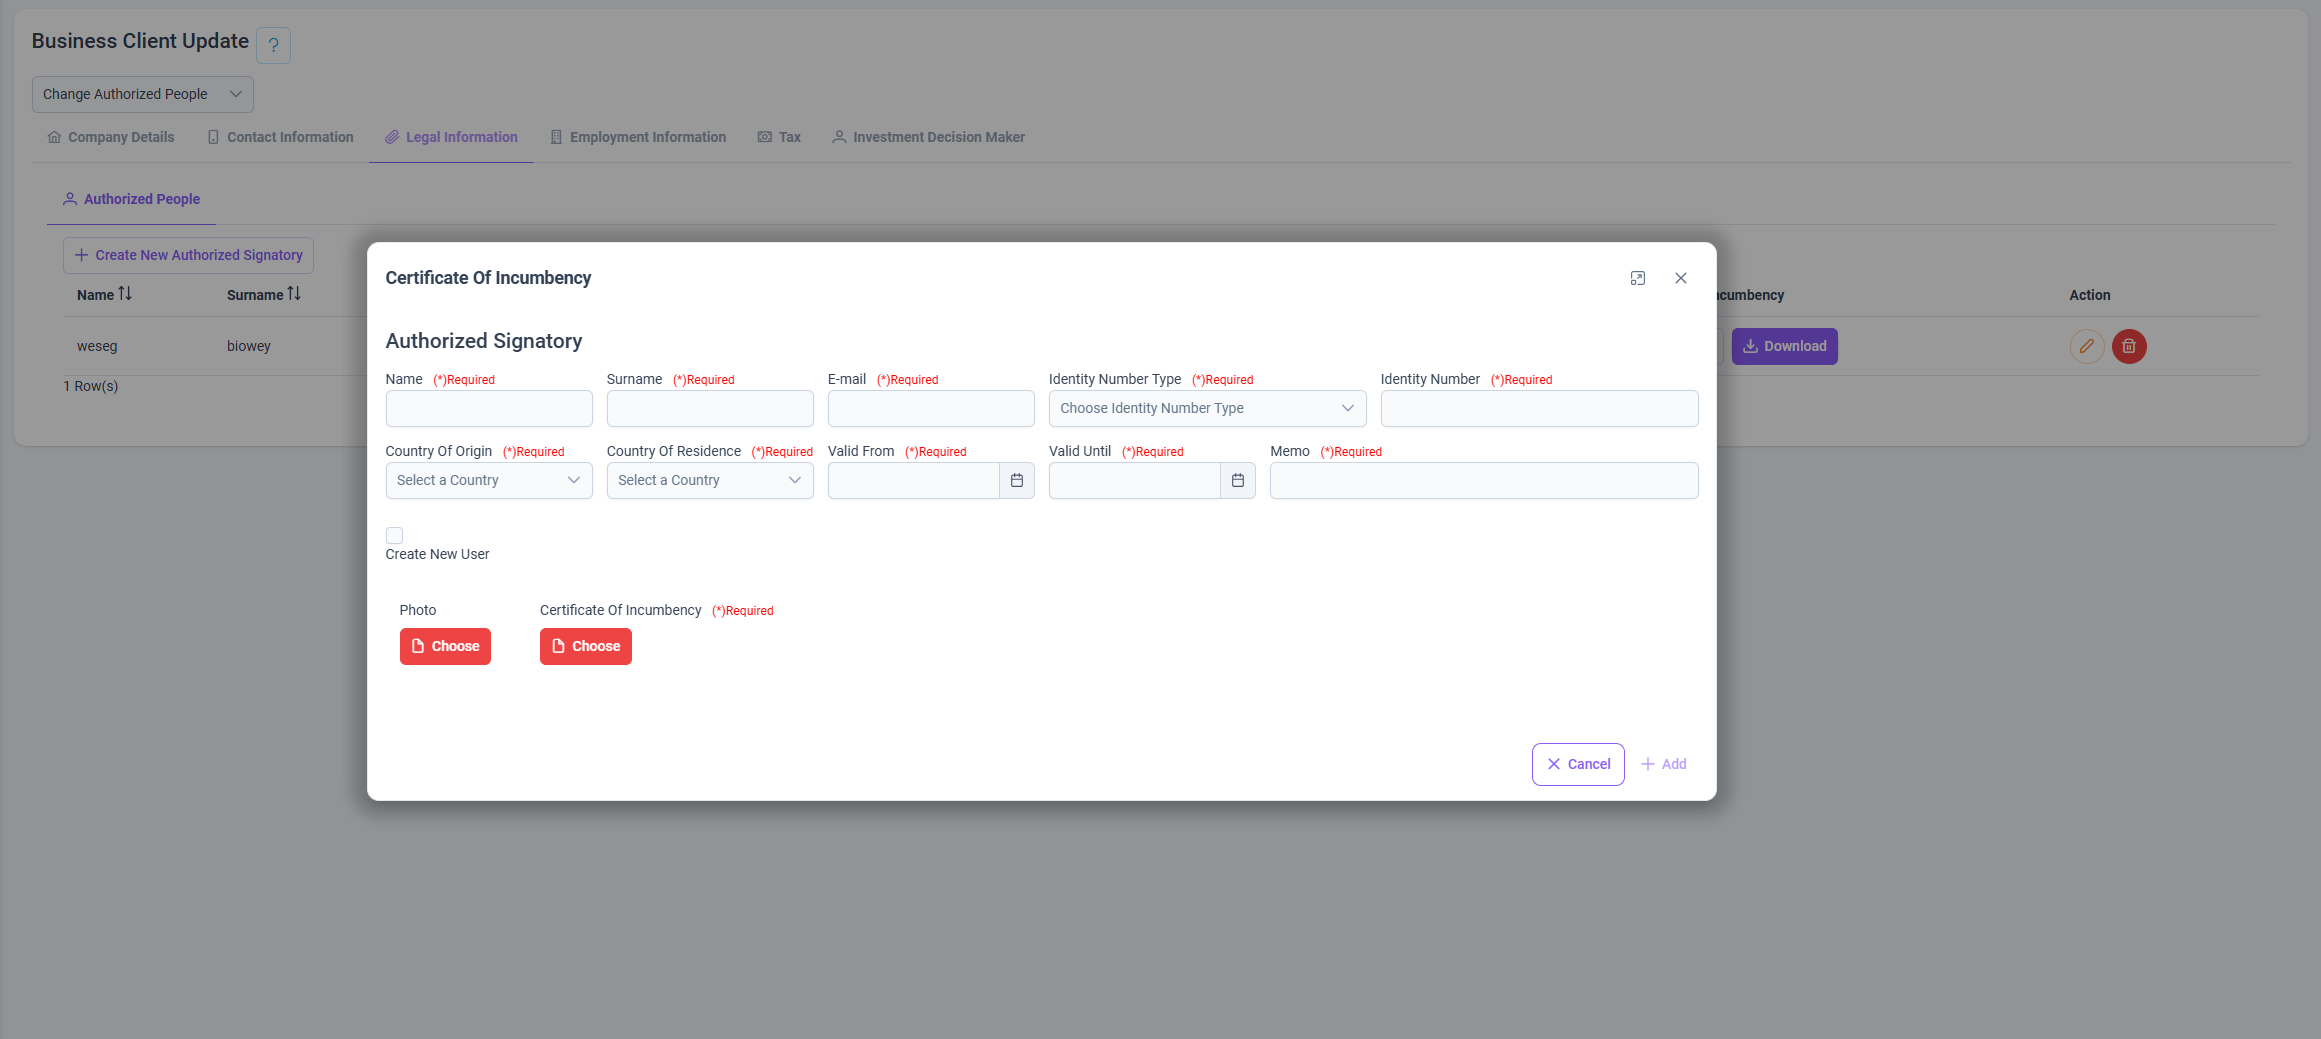
Create New Authorized Signatory
A button to add a new authorized person by entering their personal and identification details.
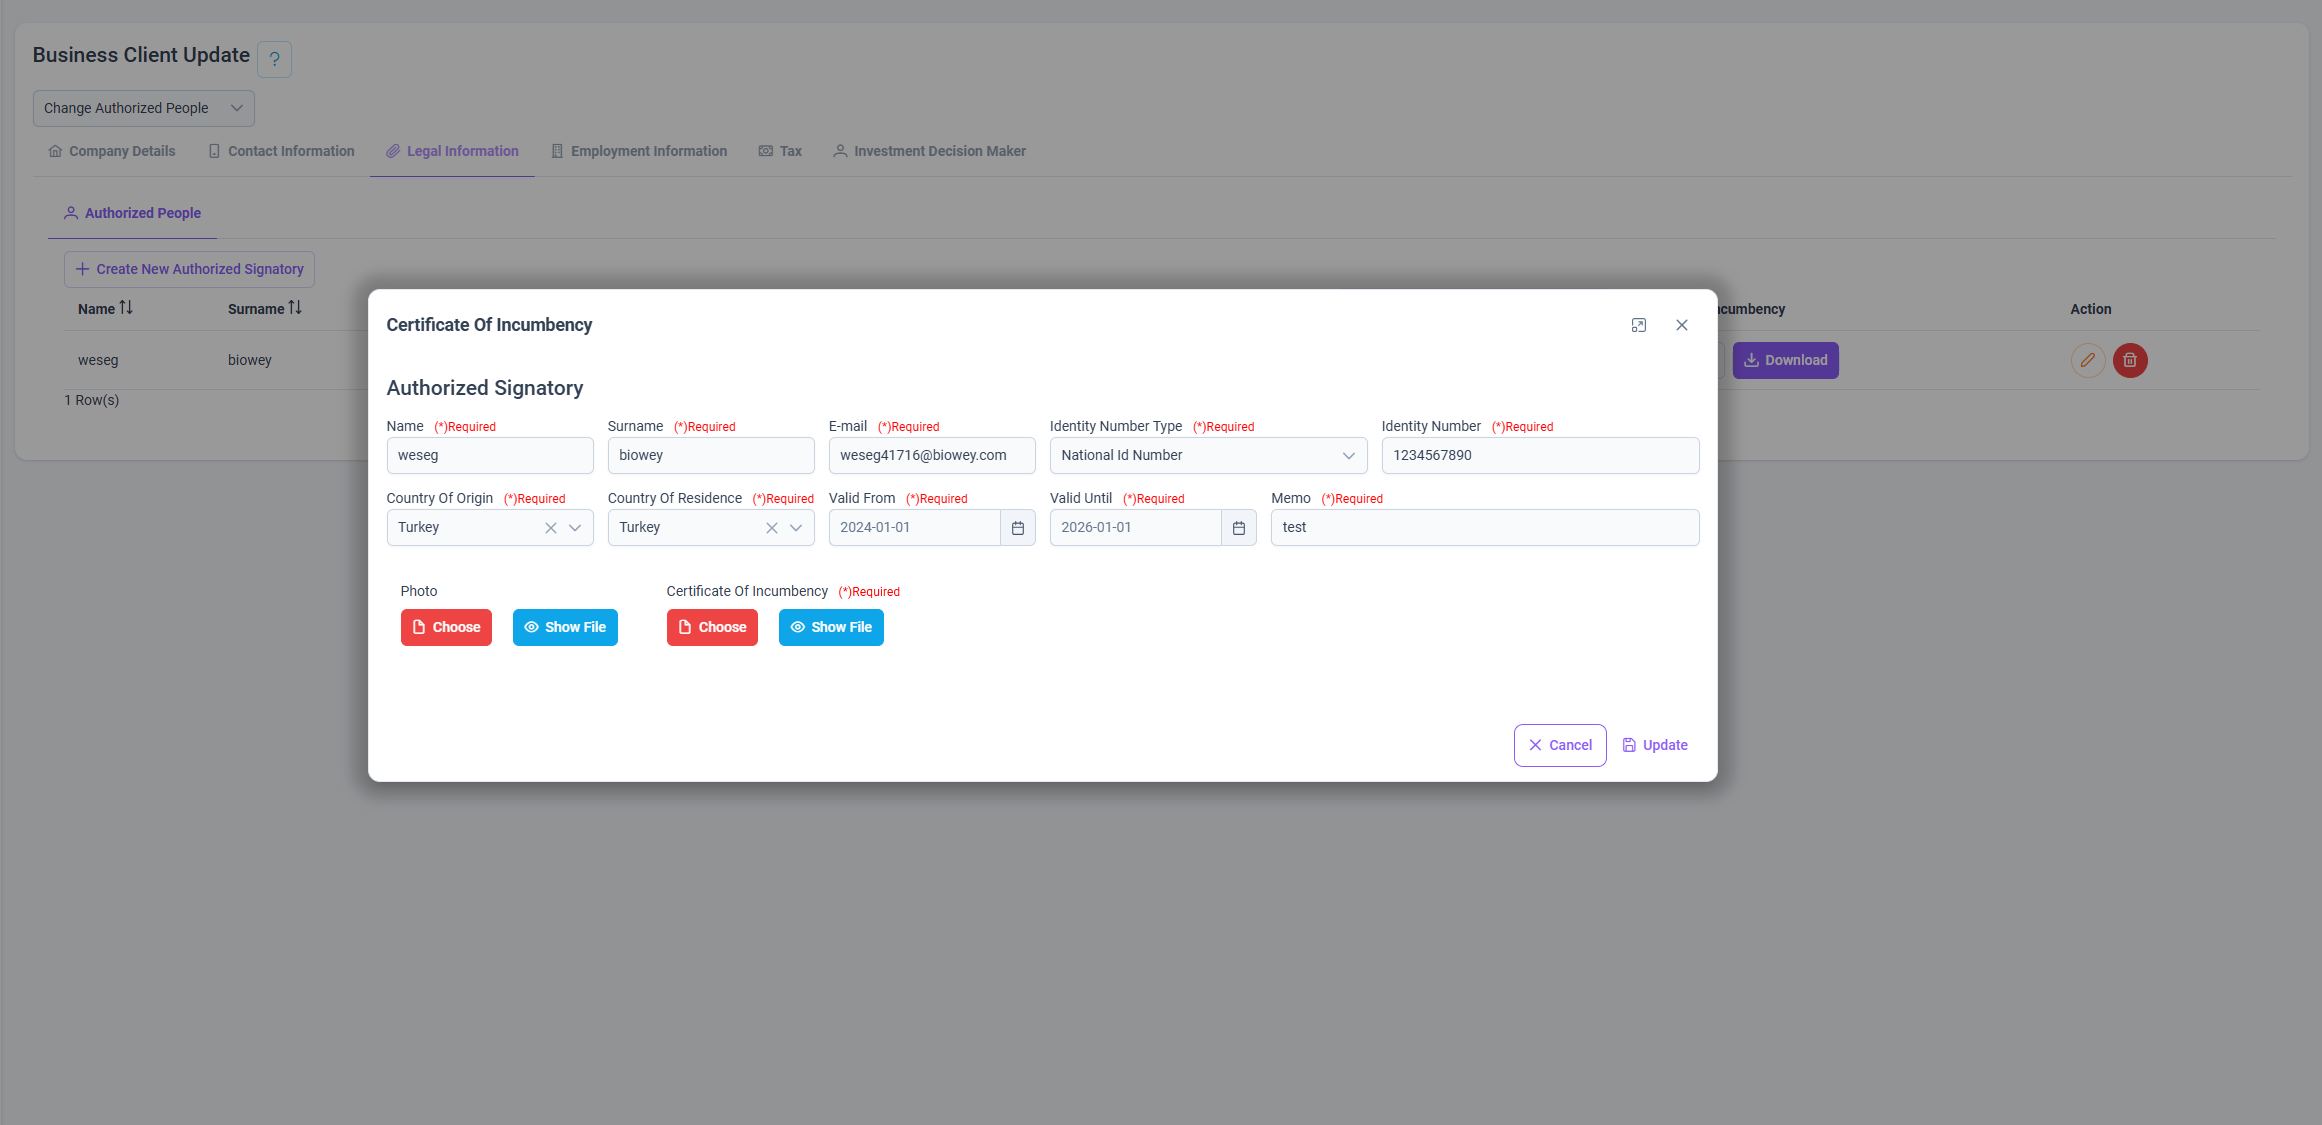
Update Authorized Signatory
To update an authorized signatory, simply click the 🖉 (pen) icon next to the signatory’s information. A screen will appear similar to the add form, where you can modify the necessary details and save the updated information.
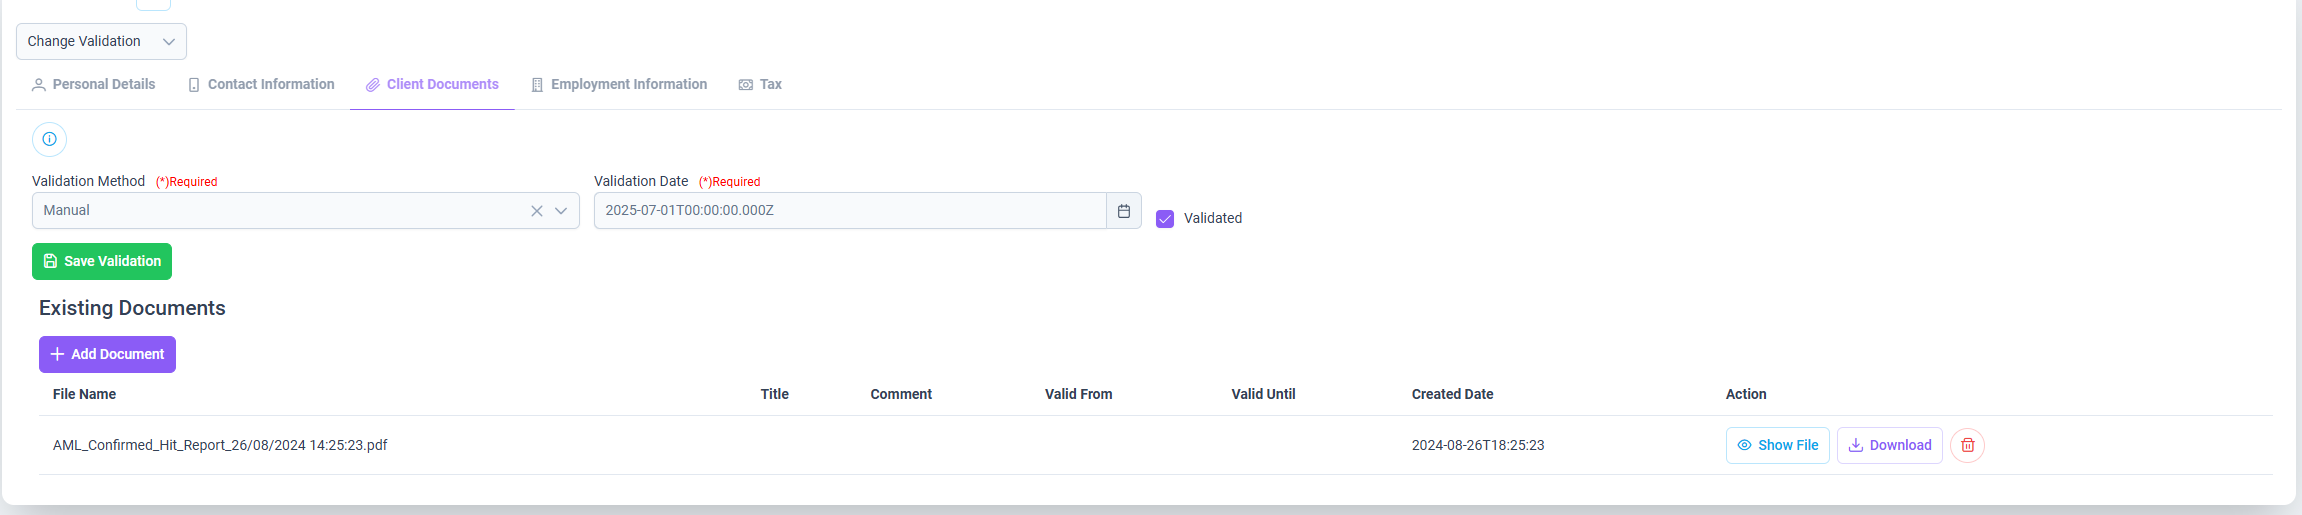
📄 Client Documents
This page is a panel within the Koala platform used for the document validation process of a business client. The purpose is to upload identification, authorization, or similar documents related to the business client and validate them, registering this validation within the system. These actions are typically part of the KYC (Know Your Customer) and AML (Anti-Money Laundering) processes.
This screen is used to document and record the legal identity and authorized representatives of a business client within the system.
It is not possible to complete the validation process by only entering a validation method and date. At least one document must be uploaded in order to proceed.
Documents are saved in the system with a specified validity period, and the validation becomes valid only after these steps are completed.
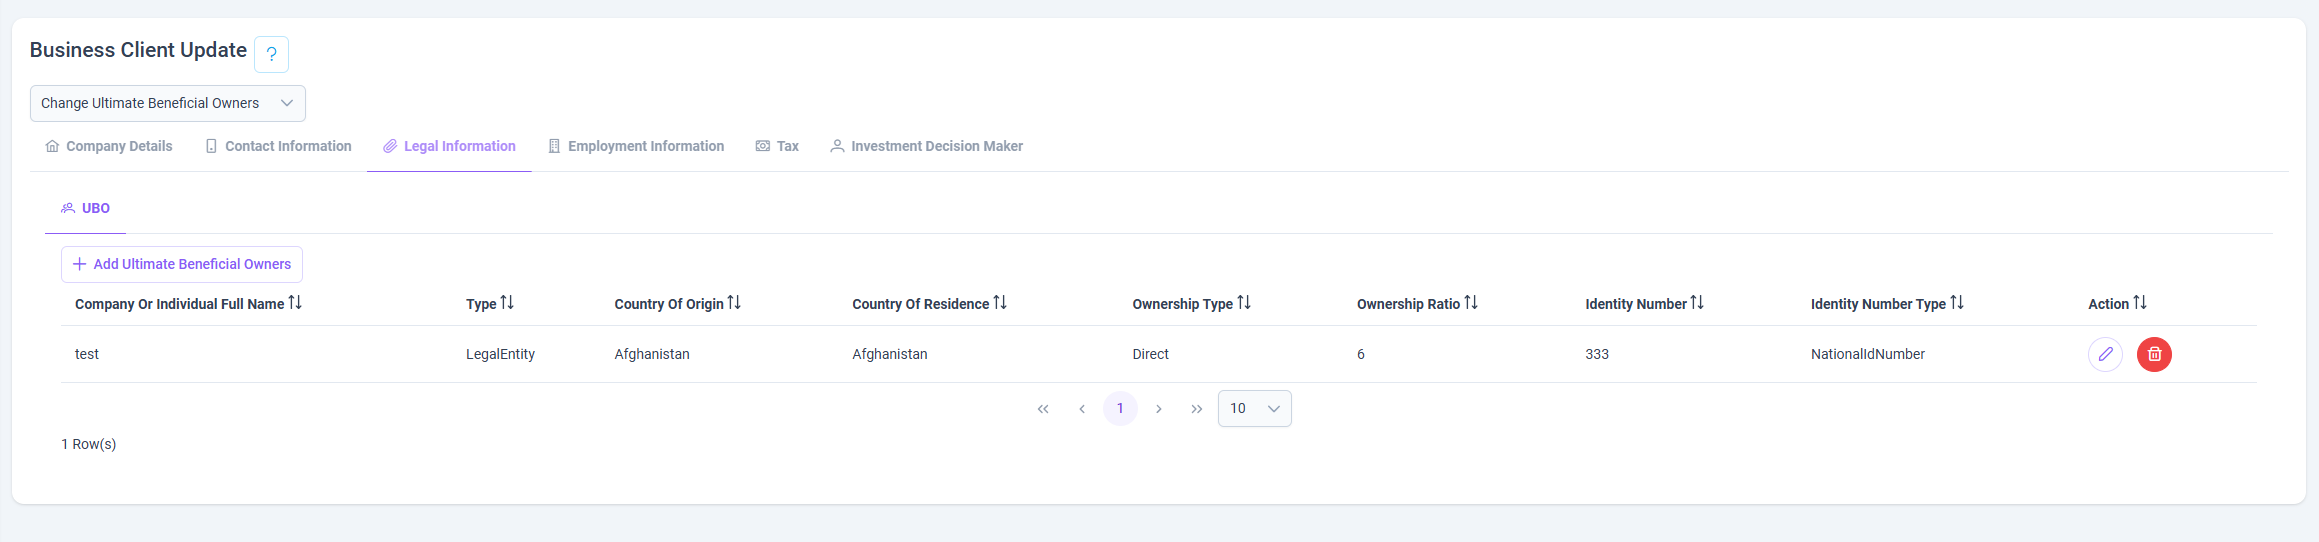
🧑💼 Ultimate Beneficial Owner (UBO)
This section identifies the natural persons who ultimately own or control the business client. Identifying UBOs is critical for transparency and compliance with regulations to prevent money laundering and illicit activities.
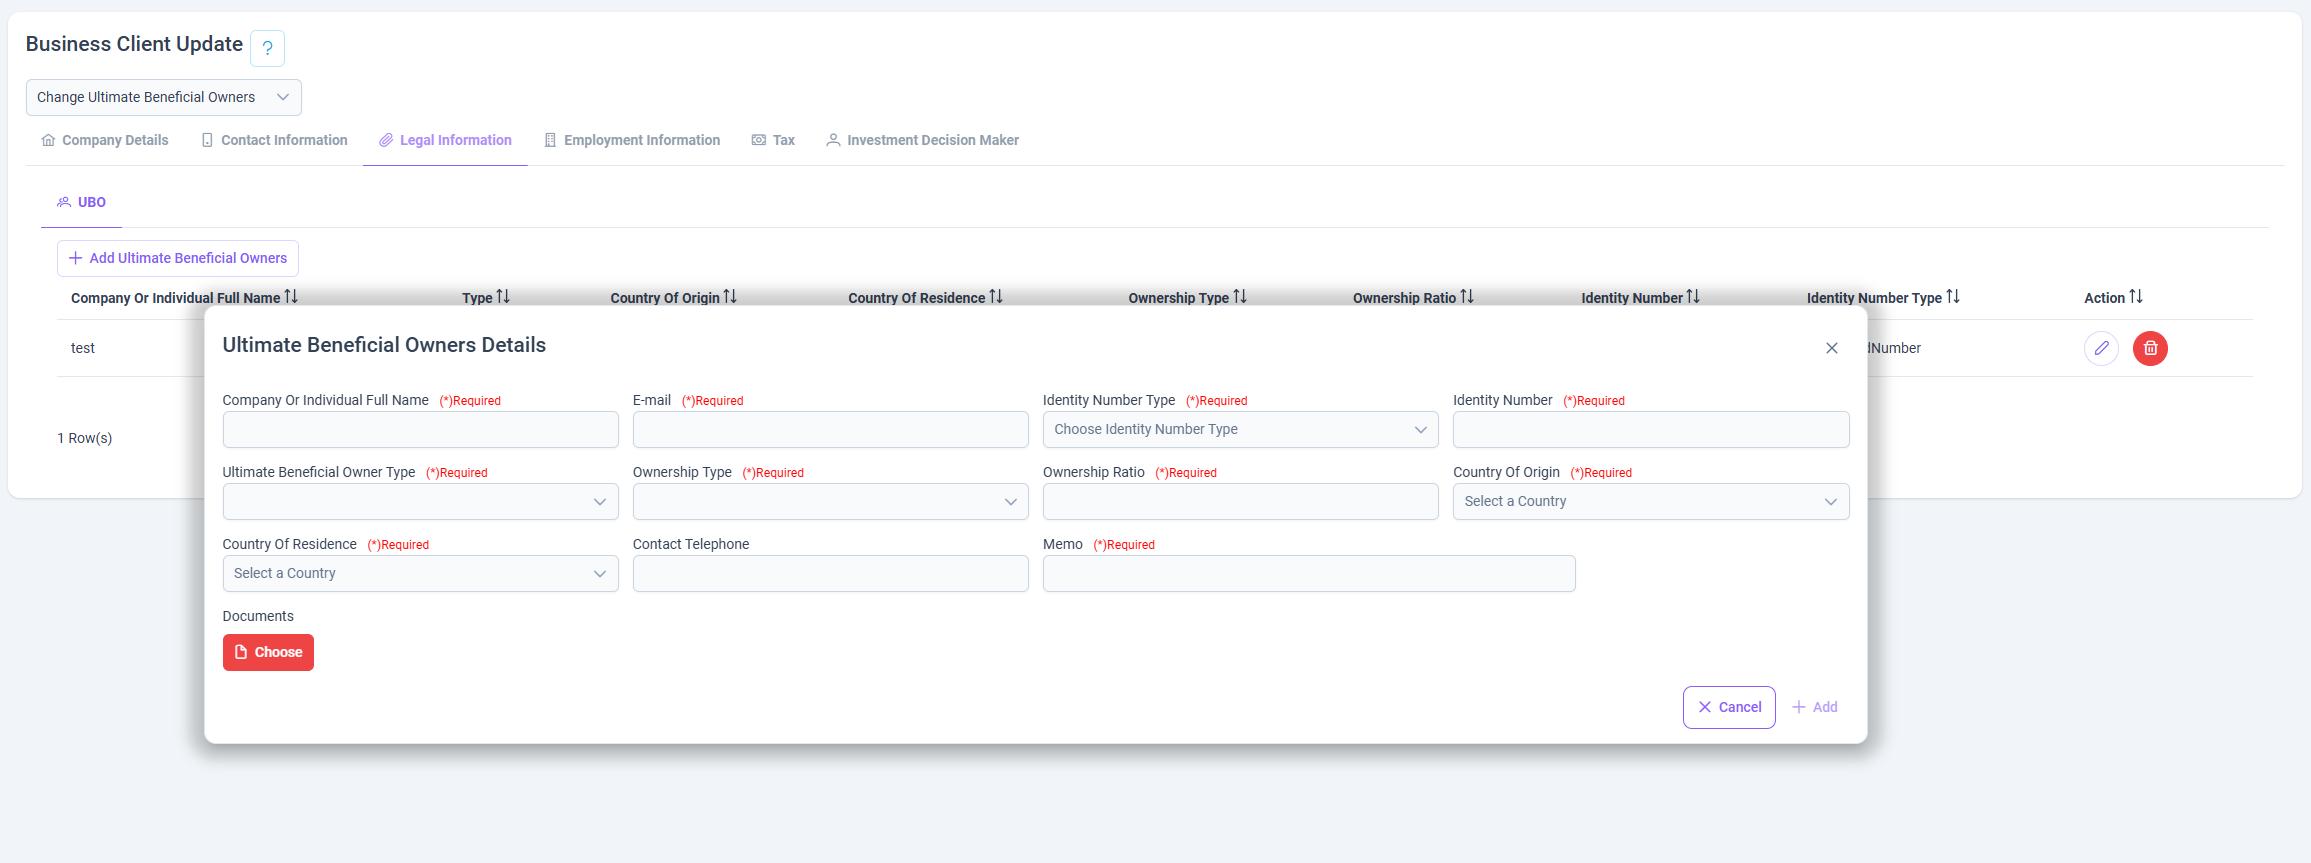
➕ Creating a New UBO Record
To register a new UBO, follow these steps:
- Click "Add Ultimate Beneficial Owners".
- Complete the mandatory fields:
- Upload the required supporting document(s) verifying ownership.
- Submit to finalize the creation.
⚠️ All mandatory fields must be provided and documentation must be uploaded for the UBO record to be valid and stored.
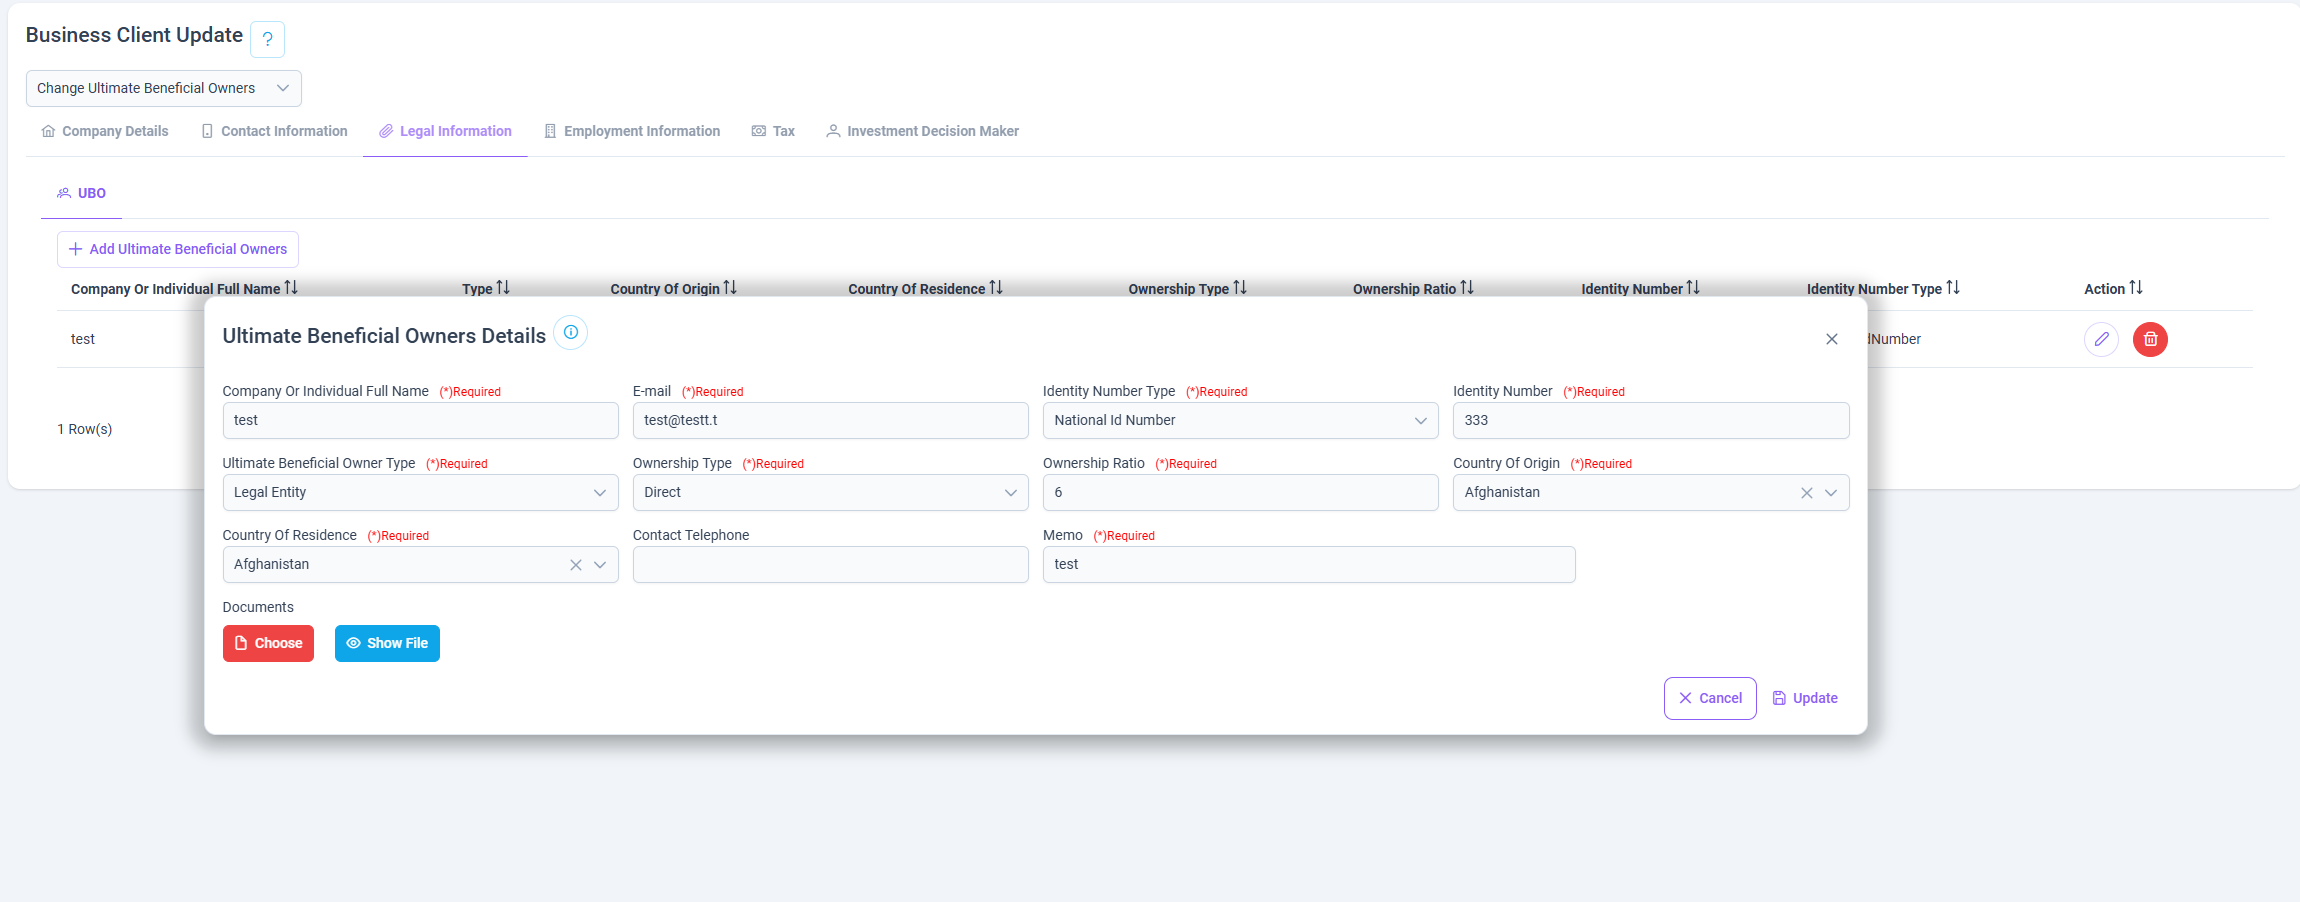
✏️ Updating an Existing UBO Record
To modify an existing UBO entry:
- Click the edit icon (🖉) under the "Action" column.
- Update the relevant data fields such as ownership percentage, identity details, or residency.
- If needed, re-upload updated documentation.
- Save the changes to apply the update.
✅ The system logs all changes for compliance and auditing purposes.
🗑️ Deleting a UBO
To remove a UBO entry, click the trash icon (🗑️) under the Action column. A confirmation prompt will appear before permanent deletion.
🔐 Deletion of UBOs may be restricted based on system roles or client status.
👷 Employment Information
The Employment Information tab is used to maintain records of a business client’s professional and occupational background. This data is often required for compliance, KYC (Know Your Customer), and financial profiling processes.
Displayed fields include:
- Section Code / Section Information: Broad classification of the client's sector of employment.
- Division Code / Division Information: Detailed classification of the business activity.
- Job Title: The client’s role or occupation title.
- Average Annual Income: Declared average yearly income.
- Currency Code: The currency in which the income is earned.
- Valid From / Valid Until: The effective date range for the given employment information.
Each row has an Action column that allows the user to:
- 🖉 Edit the existing employment record.
- 🗑️ Delete the record permanently.

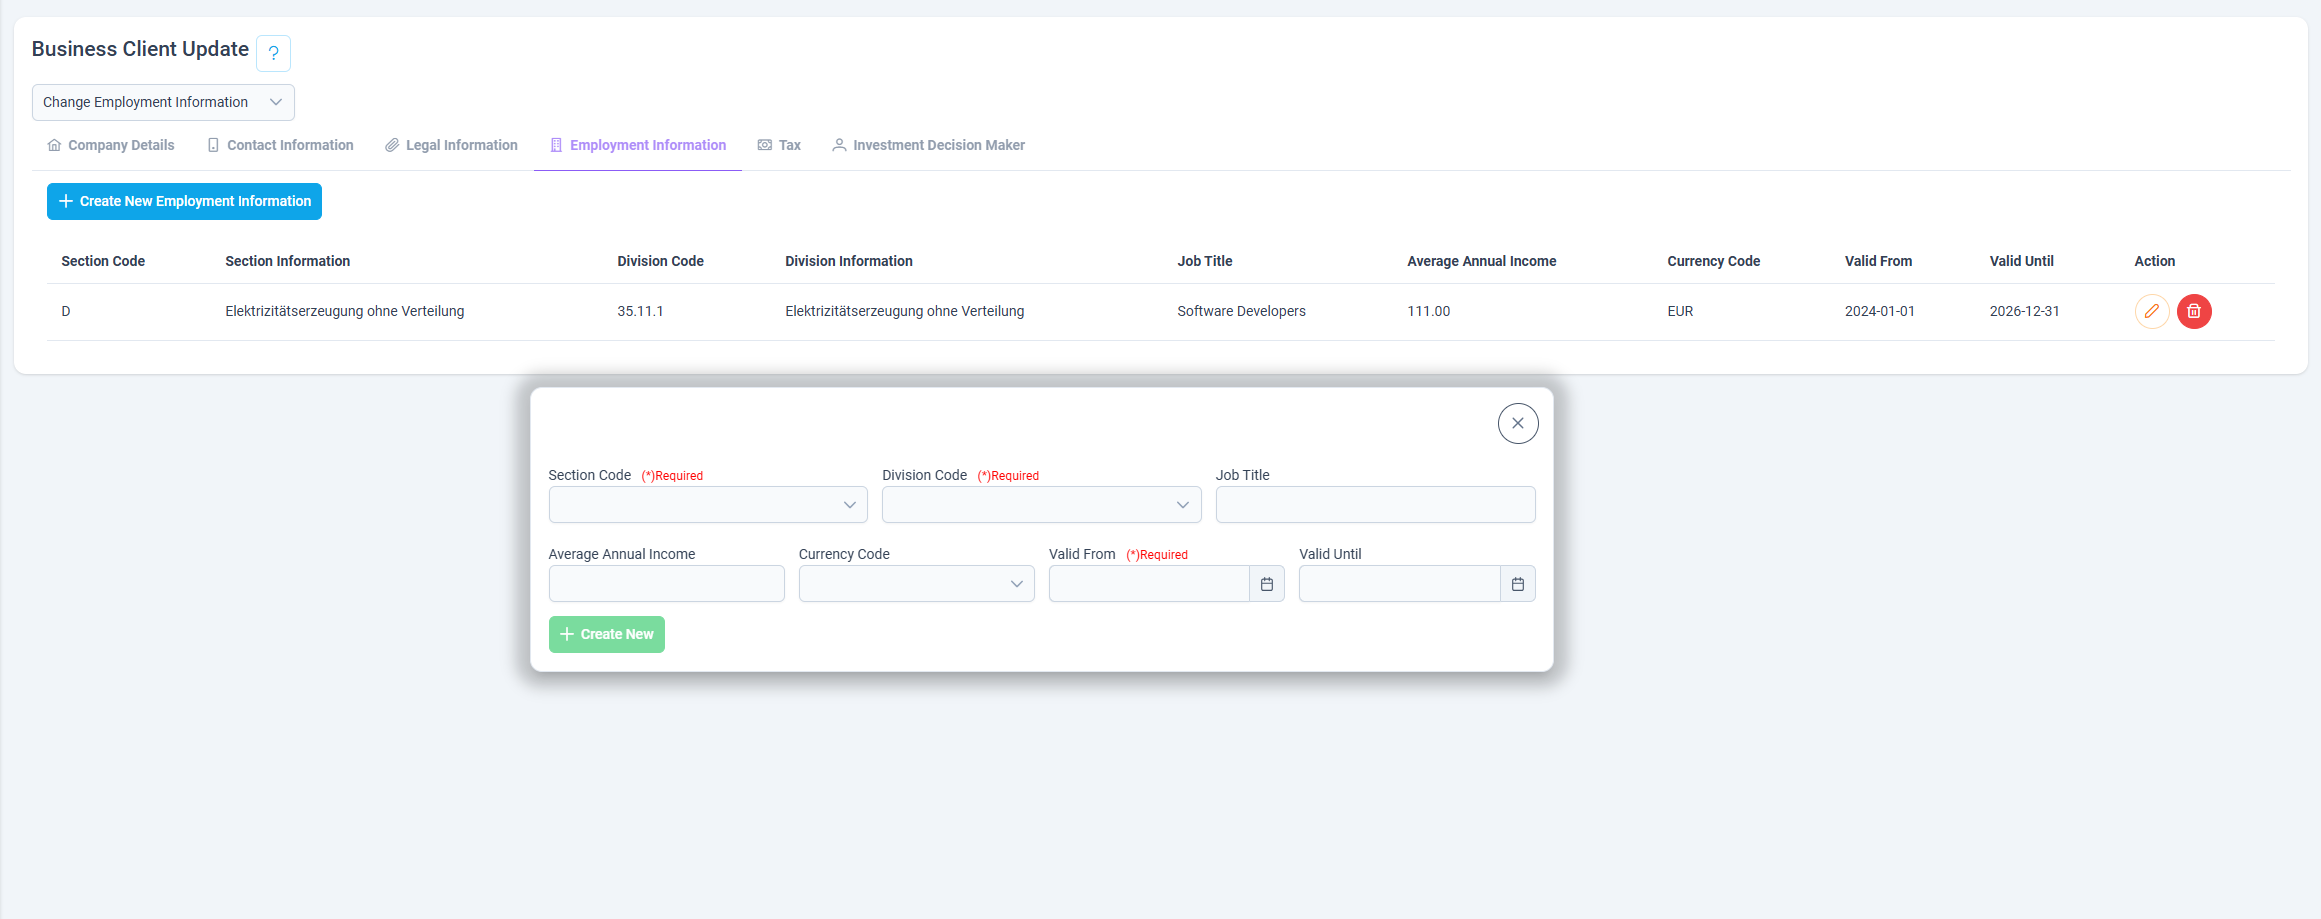
➕ Create New Employment Information
To create a new employment record, click the “Create New Employment Information” button. You will be prompted to enter the following mandatory fields:
- Section Code and Division Code (with corresponding descriptions)
- Job Title
- Average Annual Income and its currency
- Valid From and Valid Until dates
Once the form is completed, click Save to submit the new information.
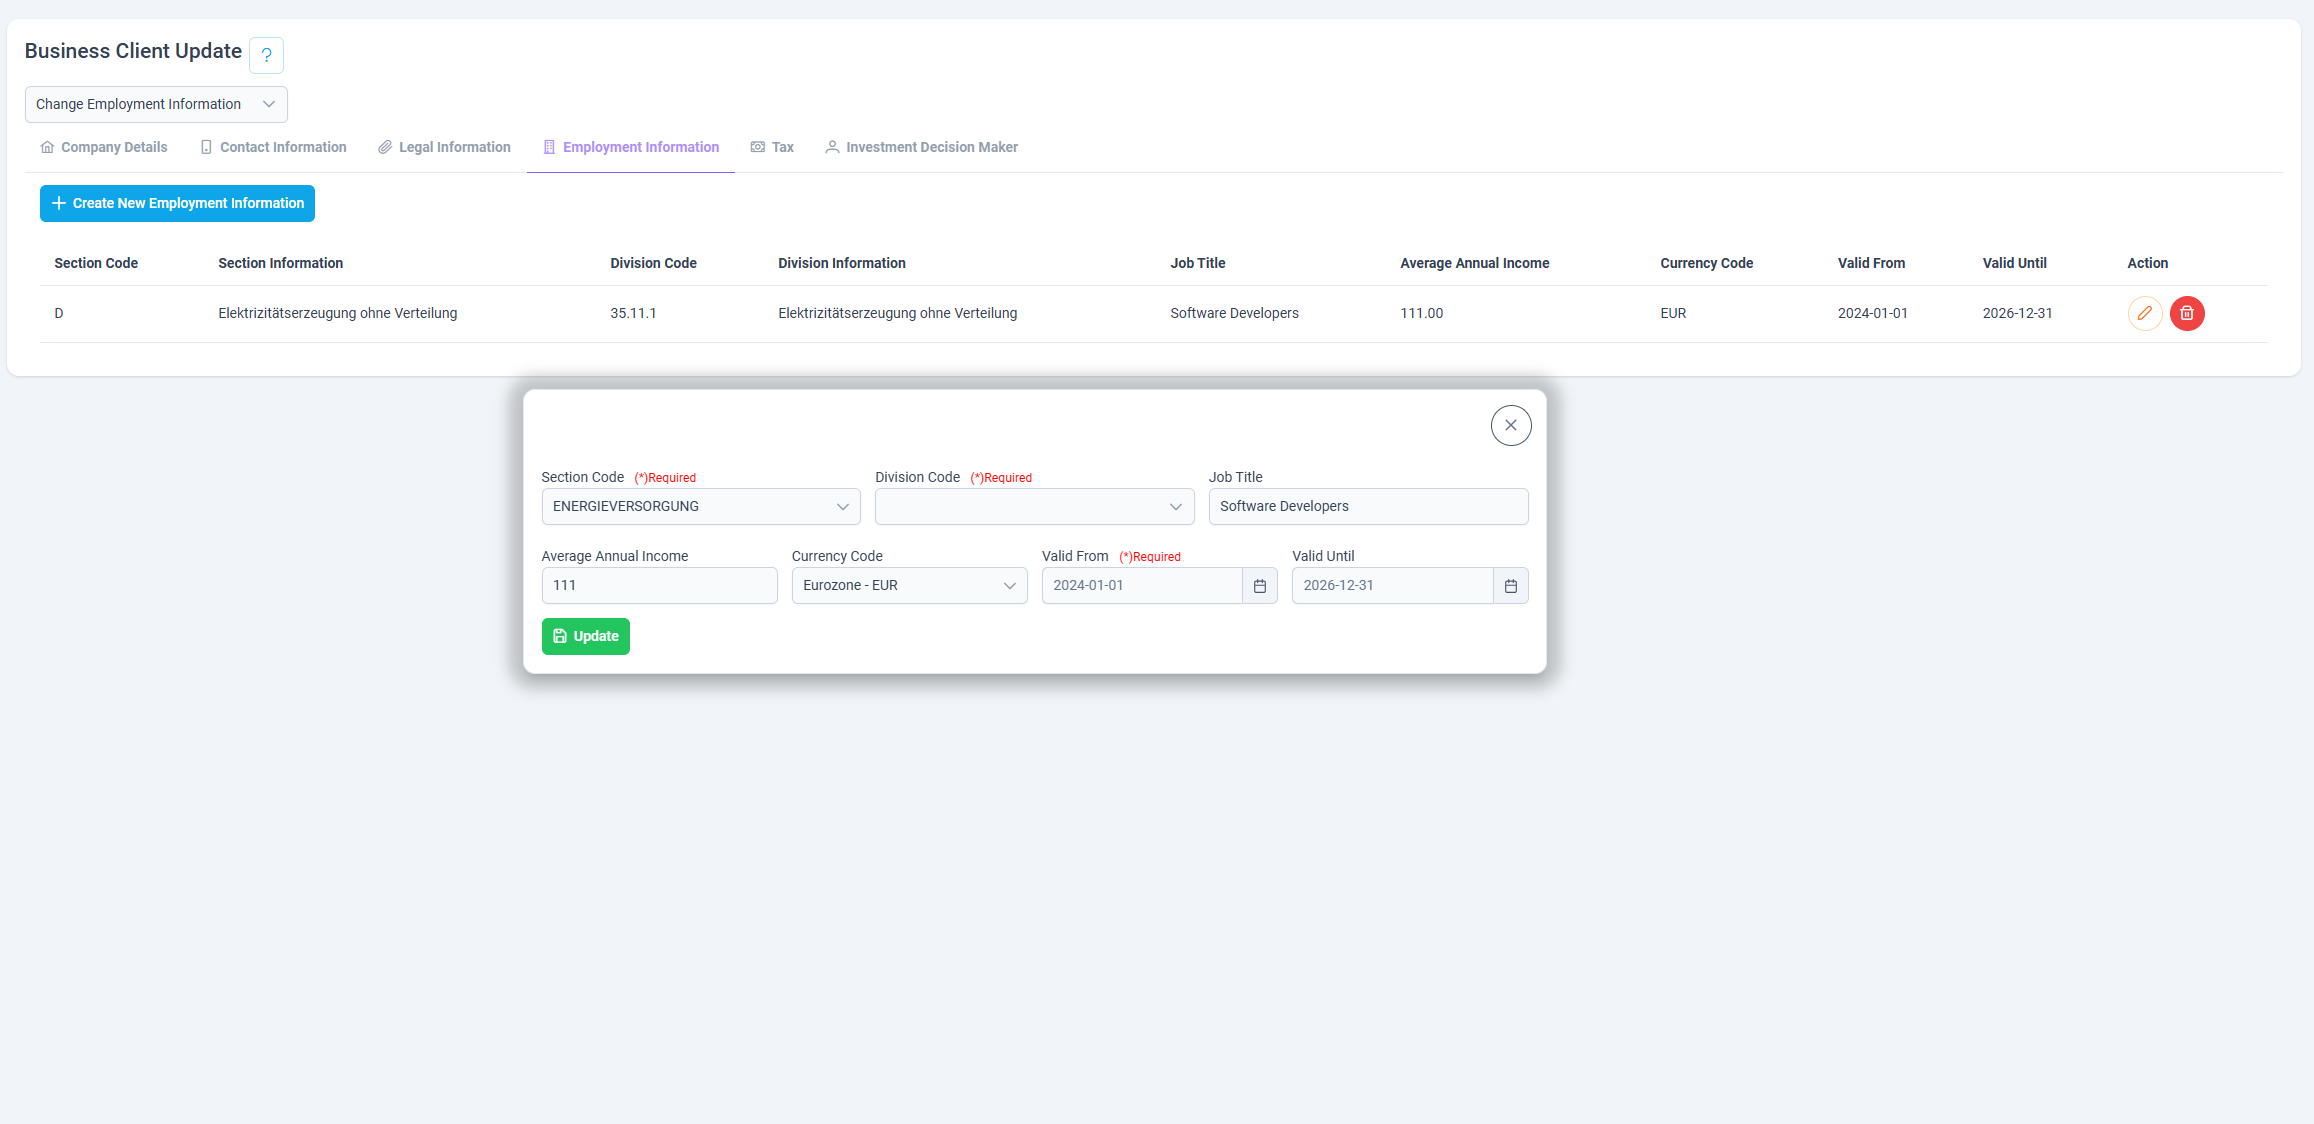
📝 Update Employment Information
To update an existing employment entry, click the 🖉 Edit icon next to the desired row. Modify the necessary fields and click Save to apply changes.
🗑️ Delete Employment Information
To remove an employment record, click the 🗑️ Delete icon. A confirmation dialog will appear to prevent accidental deletions. Once confirmed, the record will be permanently deleted from the system.
🧾 Tax
The Tax tab within the Business Client Update screen is dedicated to capturing the organization's tax-related data. This section enables users to maintain proper tax documentation in accordance with jurisdictional and international regulatory requirements. The structured layout and intuitive interface provide clarity and efficiency in tax record management.
It is divided into two subsections to reflect different aspects of tax compliance and documentation:
-Tax Identifier -Non Assessment Certificate
🆔 Tax Identifier
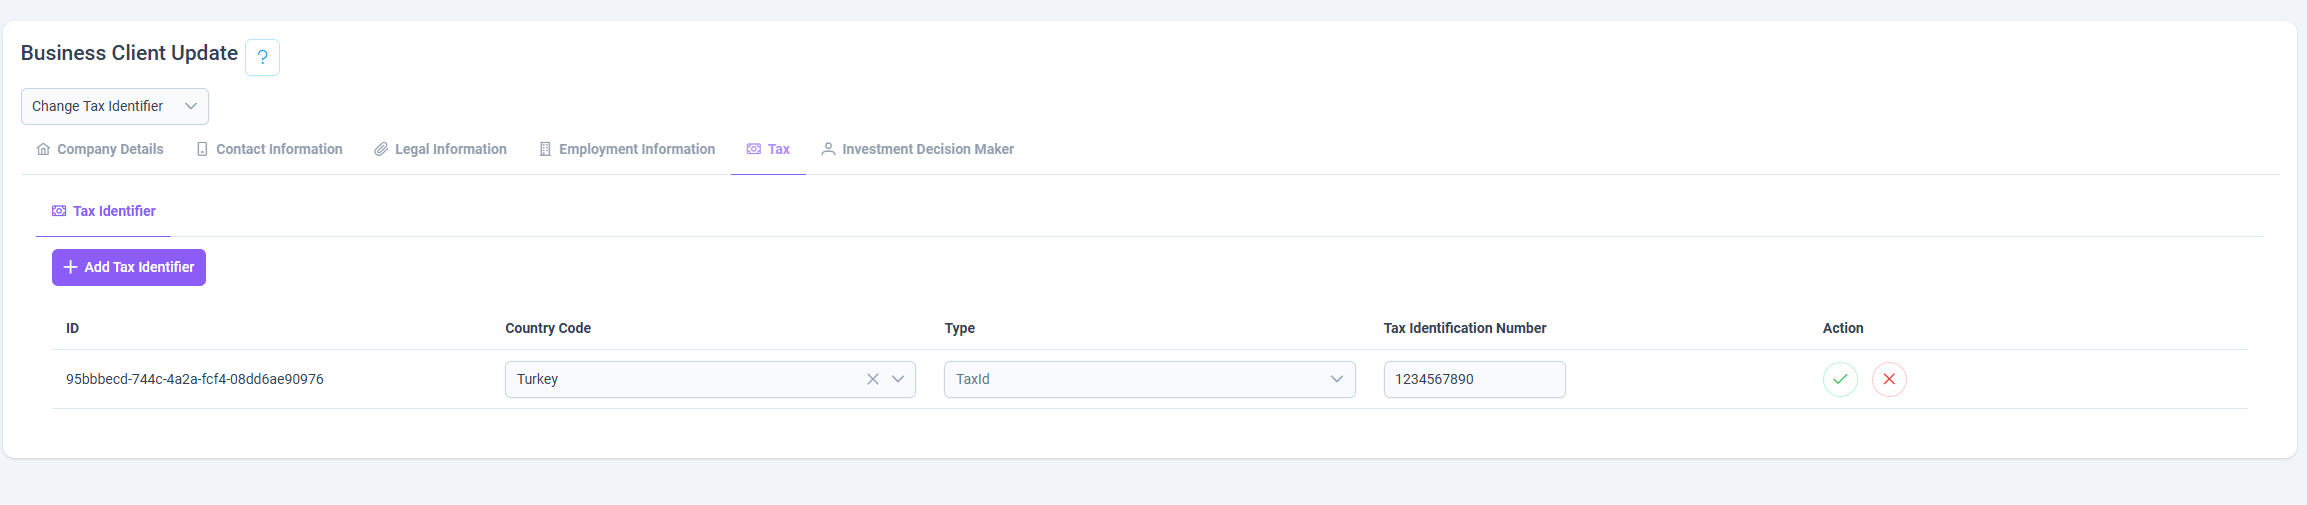
The Tax Identifier tab provides a streamlined and intuitive interface for managing a business client's tax identification details across multiple jurisdictions. It enables users to efficiently add, modify, or remove tax identifier records in accordance with regulatory requirements.
This section plays a crucial role in maintaining tax compliance by ensuring the accurate documentation of Tax Identification Numbers (TINs). Whether for domestic tax reporting or international obligations such as FATCA and CRS, the Tax Identifier tab ensures all relevant information is stored in a clear, organized, and audit-ready manner.
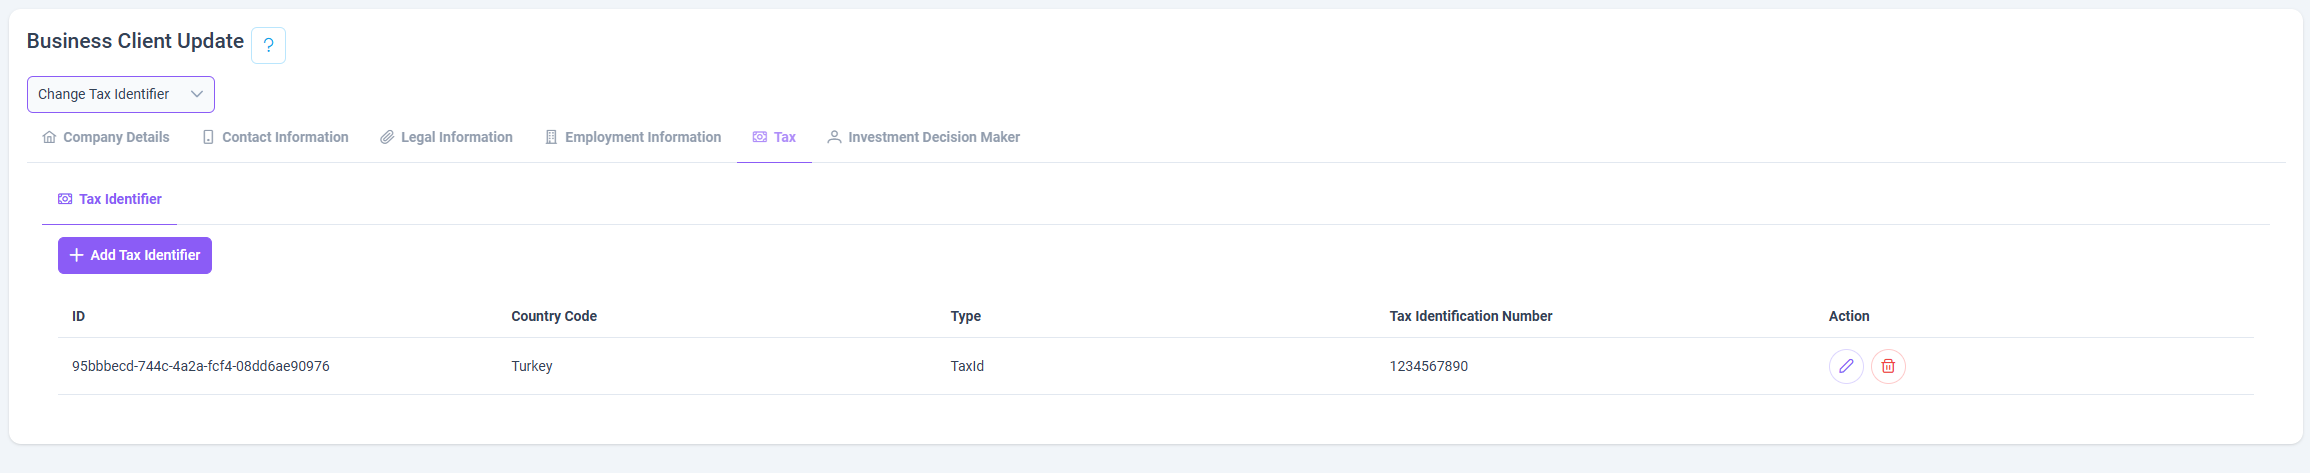
➕ Tax Identifier – Create
The Create Tax Identifier screen allows users to register a new tax identification number (TIN) for a business client. A Tax Identifier is a unique number assigned by a tax authority to identify legal entities for tax-related purposes. This step ensures the client's tax residency and identification are recorded correctly within the system.
By entering the relevant details (such as country, identifier type, and TIN), users can submit and register a new tax record. Once added, it becomes visible in the Tax Identifier list and is available for future reference or regulatory use.
Accurate data entry at this stage is essential to support proper tax reporting, particularly for international compliance obligations such as FATCA and CRS.
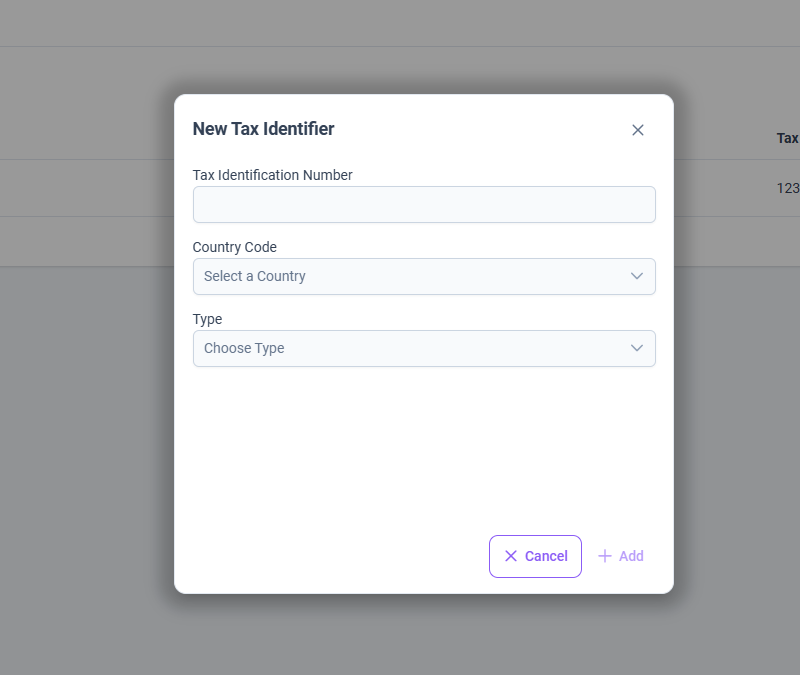
✏️ Tax Identifier – Update
The Update Tax Identifier screen enables users to revise or correct previously entered tax identification records. This may be necessary when:
The client’s TIN has changed
The wrong country code was selected
The identifier type was misclassified
Keeping this data current ensures alignment with local and international reporting requirements. Updates are performed directly from the Tax Identifier table, using the edit action (✏️).
🔰 Non Assessment Certificate
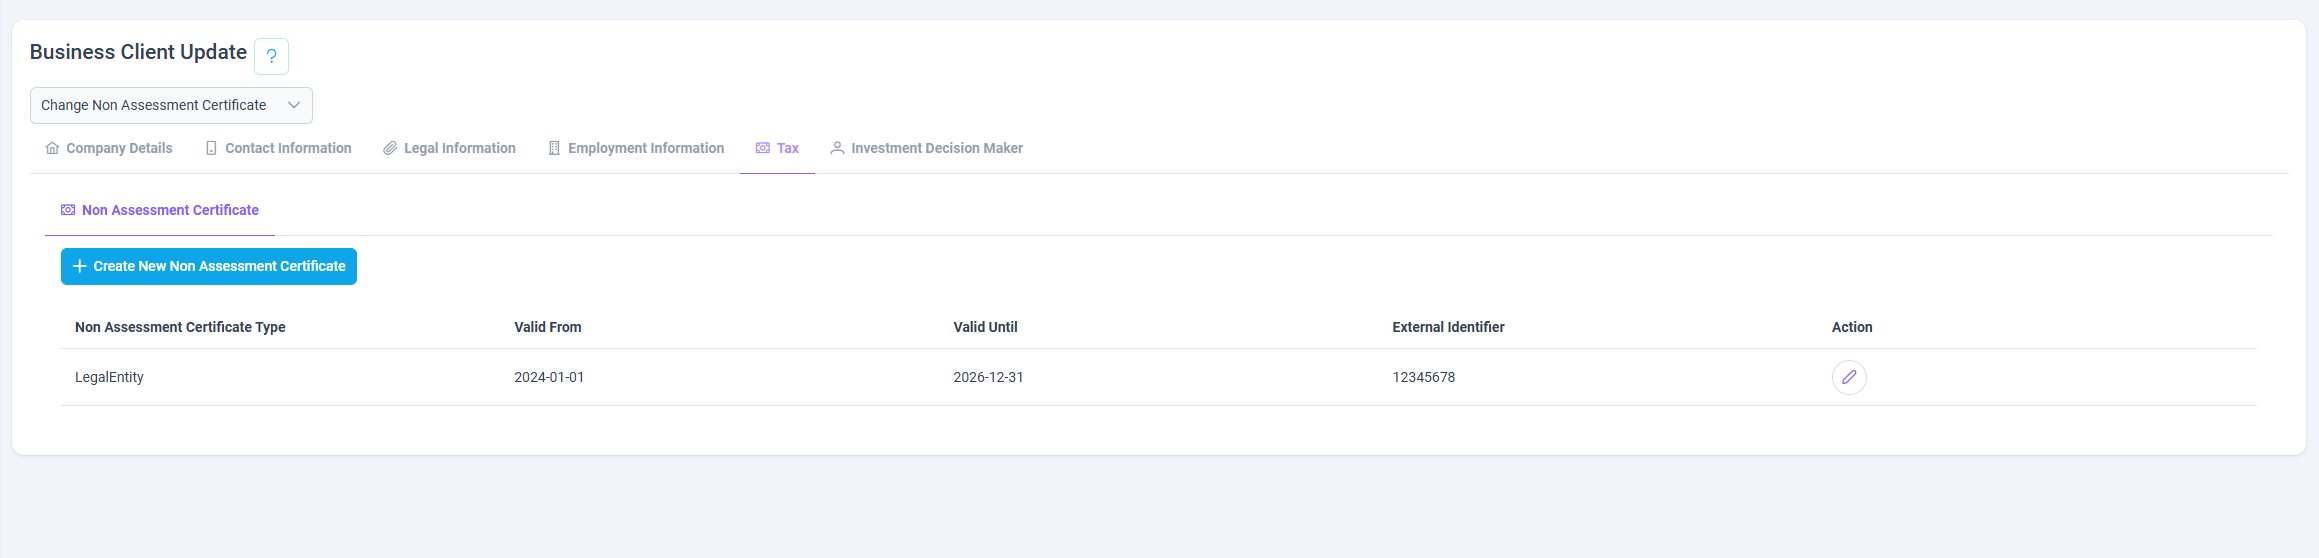
The Non-Assessment Certificate page within the Koala platform serves as a dedicated interface for the administration of certificates that formally exempt corporate clients from specific tax assessments. These certificates are typically issued by authorized tax or regulatory authorities to certify that the entity in question is not liable for certain tax obligations under prescribed conditions.
This module enables authorized users to register, review, and maintain non-assessment certificates pertaining to corporate entities. Such documentation is integral to substantiating the client’s tax-exempt status within defined validity periods and plays a critical role in ensuring compliance with relevant fiscal regulations and internal governance standards.
Non-Assessment Certificate Create
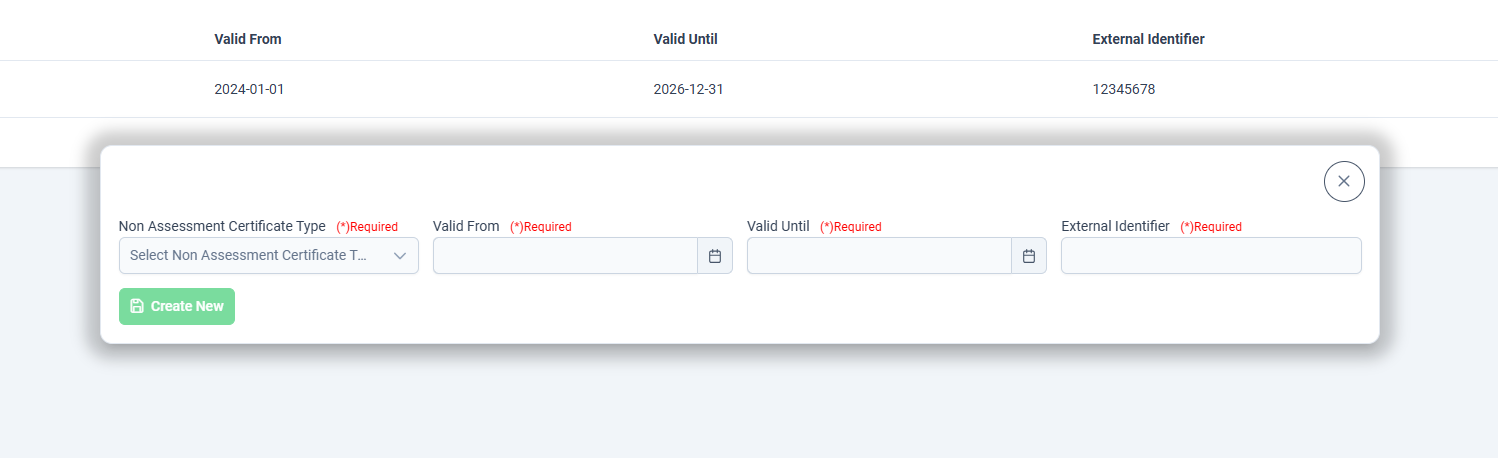
The Create New Non-Assessment Certificate interface within the Koala platform is designed to register a new certificate confirming that a Business Client is exempt from specific tax obligations. These certificates are generally issued for a defined period and are critical for meeting regulatory compliance and audit requirements.
Upon entering the required information and selecting Create, the certificate is linked to the business client's record and becomes visible in the main data table for ongoing reference and tracking.
Non-Assessment Certificate Update
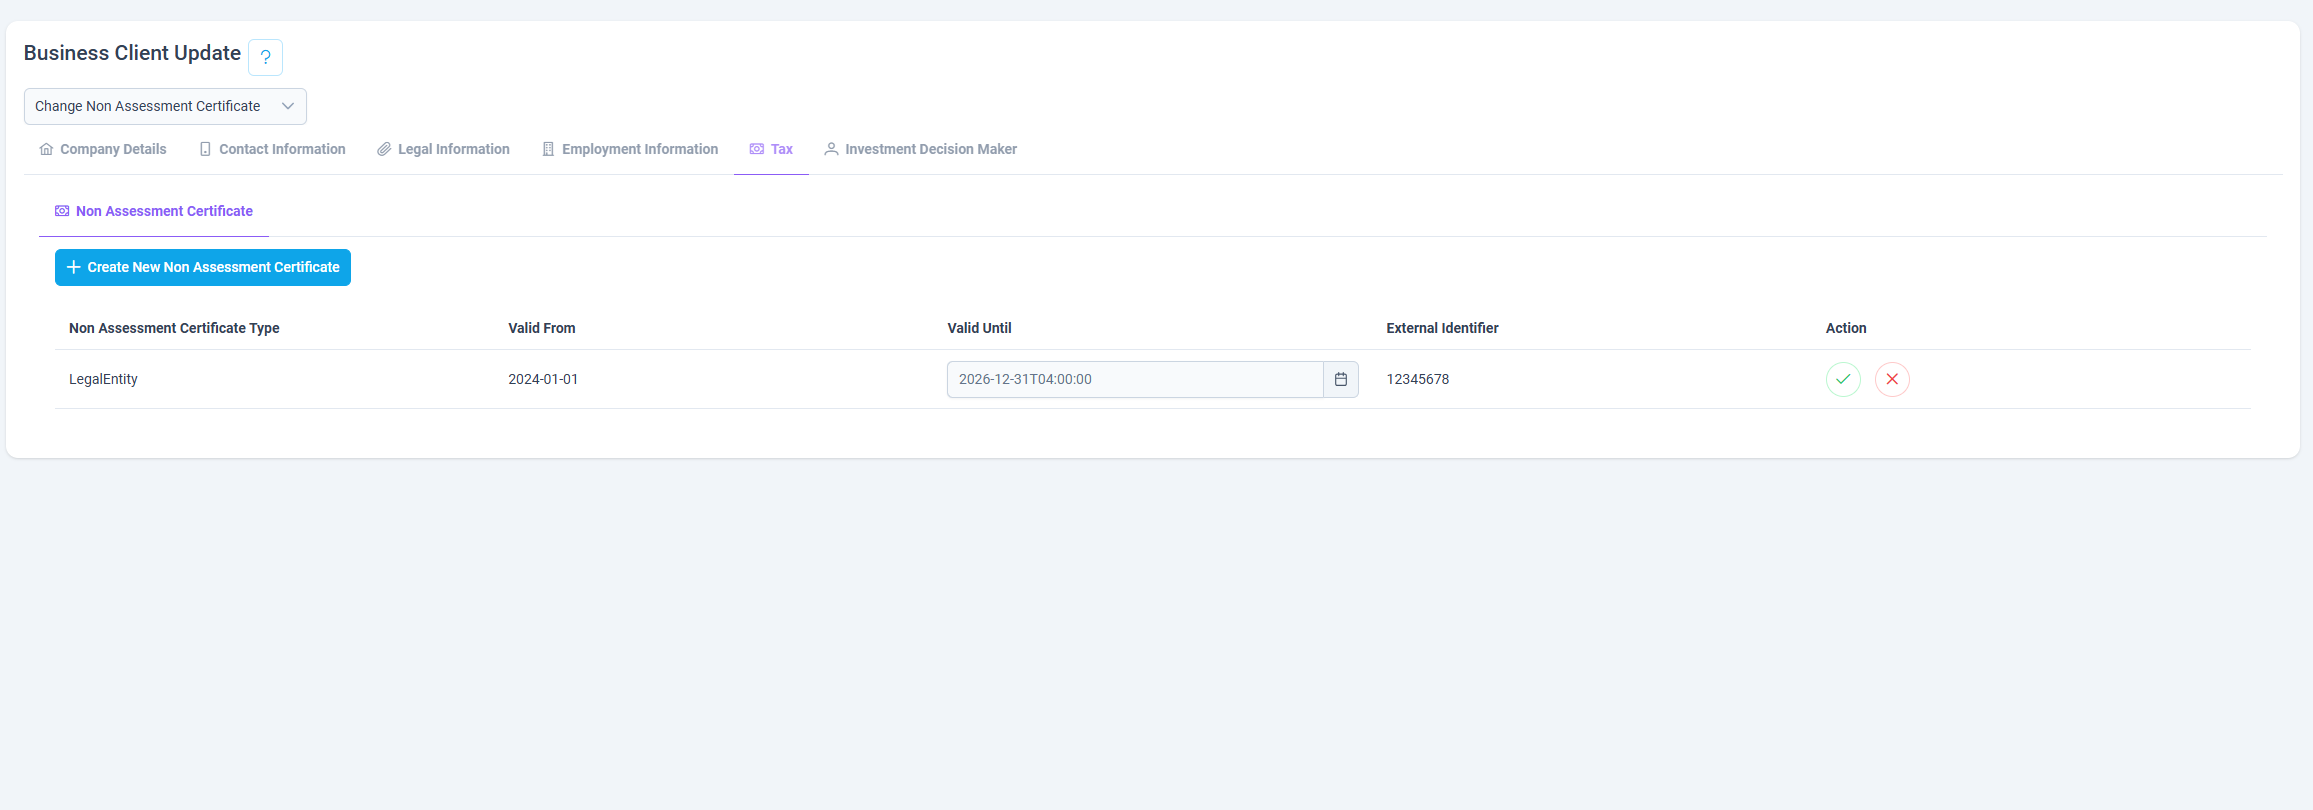
In contrast to other modules, the update functionality for non-assessment certificates does not involve a separate pop-up window. Instead, users can directly edit the "Valid Until" field within the data table using inline editing. By selecting the corresponding cell, users can update the expiration date, which is then either saved automatically or upon confirmation, based on system configuration.
All other fields — including certificate type, valid from, and external identifier — remain read-only and are not editable after the initial certificate creation.
This streamlined mechanism enables efficient date management while preserving the authenticity and audit trail of the original certificate data.
👤 Investment Decision Maker
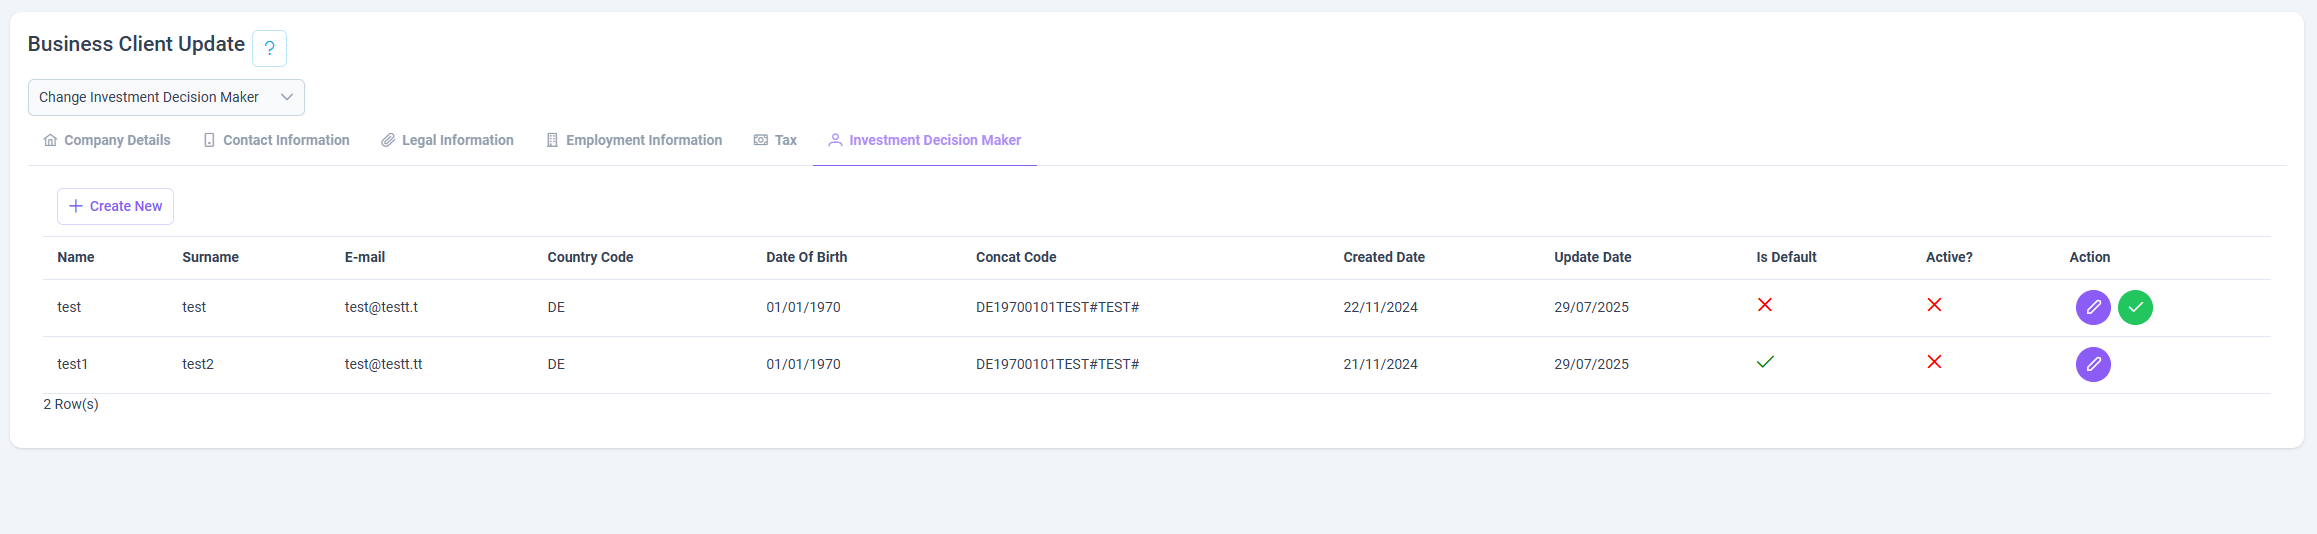
The Investment Decision Maker section within the Business Client Update interface of the Koala platform enables users to manage individuals who are authorized to make investment decisions on behalf of a corporate client. This module is essential for maintaining accurate authorization records and ensuring compliance with regulatory and internal governance requirements.
The interface provides a tabular overview of all designated investment decision makers associated with a business client, along with relevant personal and system-generated data.
📊 Table Columns
- Name / Surname: Full name of the authorized individual.
- E-mail: Contact email address.
- Country Code: Country of residence, selected by the user.
- Date of Birth: Required for identity verification and code generation.
- Concat Code: A unique identifier automatically generated by the system based on a combination of country code, date of birth, name, and surname.
- Created Date / Update Date: Indicates the creation and last modification timestamps.
- Is Default: Shows whether this person is set as the default investment decision maker (only one default allowed per client).
- Active?: Indicates whether the decision maker is currently active.
- Action: Includes icons to edit (✏️) or set as default (✅).
➕ Create Investment Decision Maker
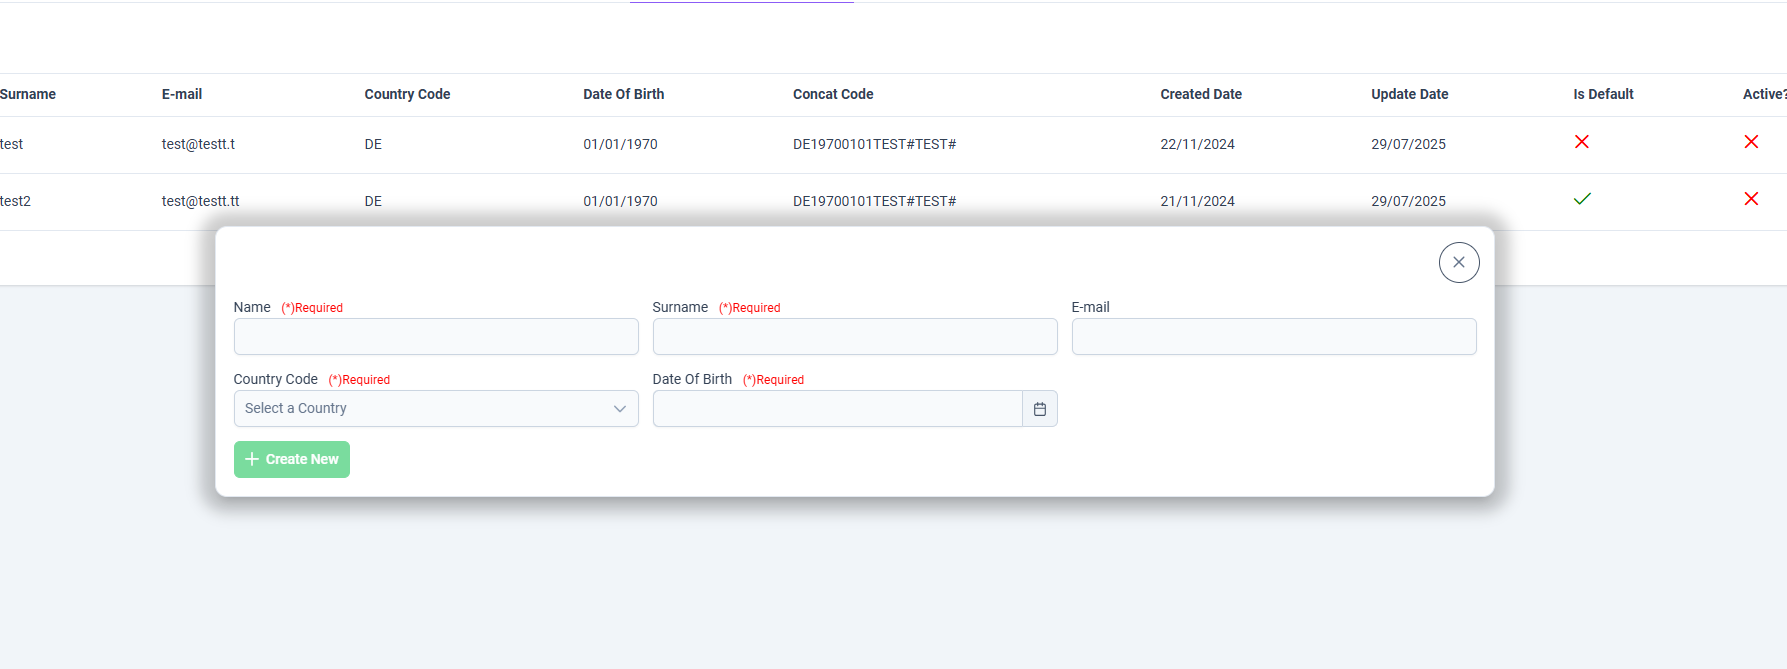
To register a new investment decision maker for a business client:
- Click the + Create New button.
- A form will appear, prompting the user to enter:
- Name and surname
- E-mail address
- Country code
- Date of birth
- Upon submission:
- The system automatically generates a Concat Code based on the provided information.
- The new entry is added to the table and assigned a creation date.
This structured onboarding process ensures consistency, reduces errors, and supports auditability.
🛠️ Update Investment Decision Maker
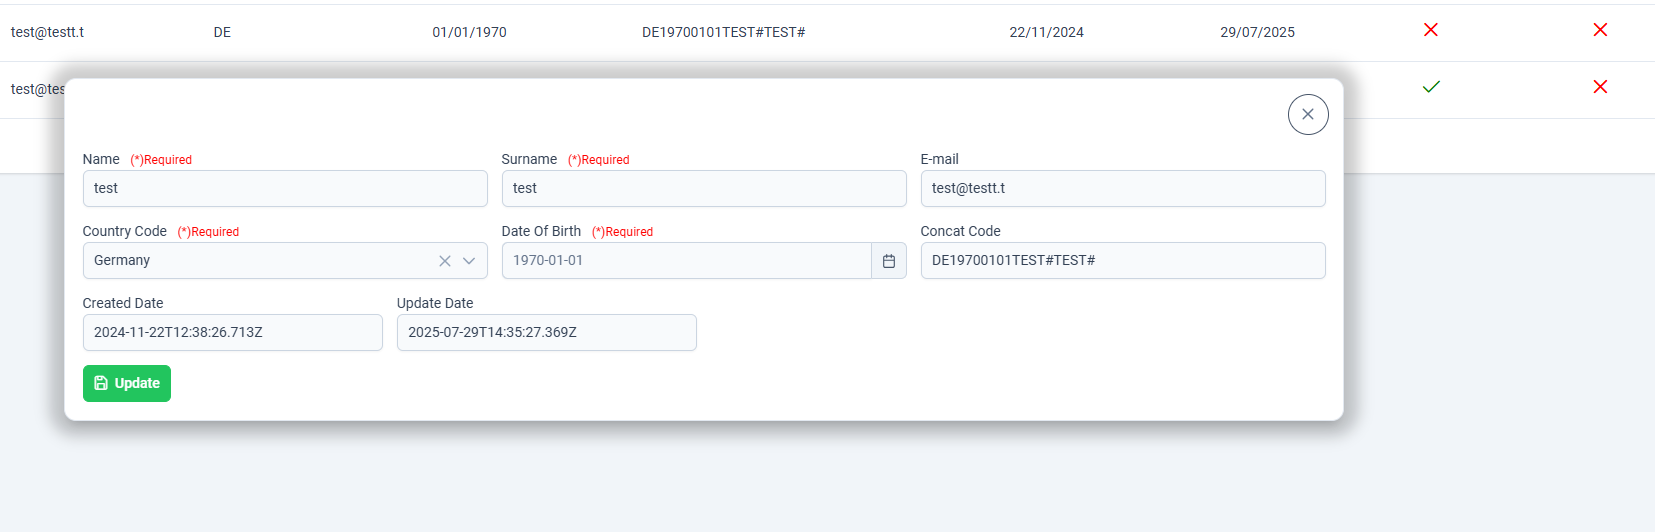
Updates to existing investment decision makers are handled directly within the table interface:
- Edit: Click the ✏️ (pen icon) to update editable fields such as email or country code (depending on permissions).
- Mark as Default: Click the ✅ (tick icon) to assign the selected person as the default investment decision maker.
- Only one default is permitted per business client.
- Selecting a new default automatically removes the status from the previous one.
This controlled mechanism ensures that the designated authority is always accurate and up to date.
🔐 Read-Only Sections
You can view all sections in read-only mode by clicking the 👁️ (eye) icon. The headings listed below refer to screens that are only available in read-only mode, where no modifications can be made.
📉 Loss Threshold Notifications
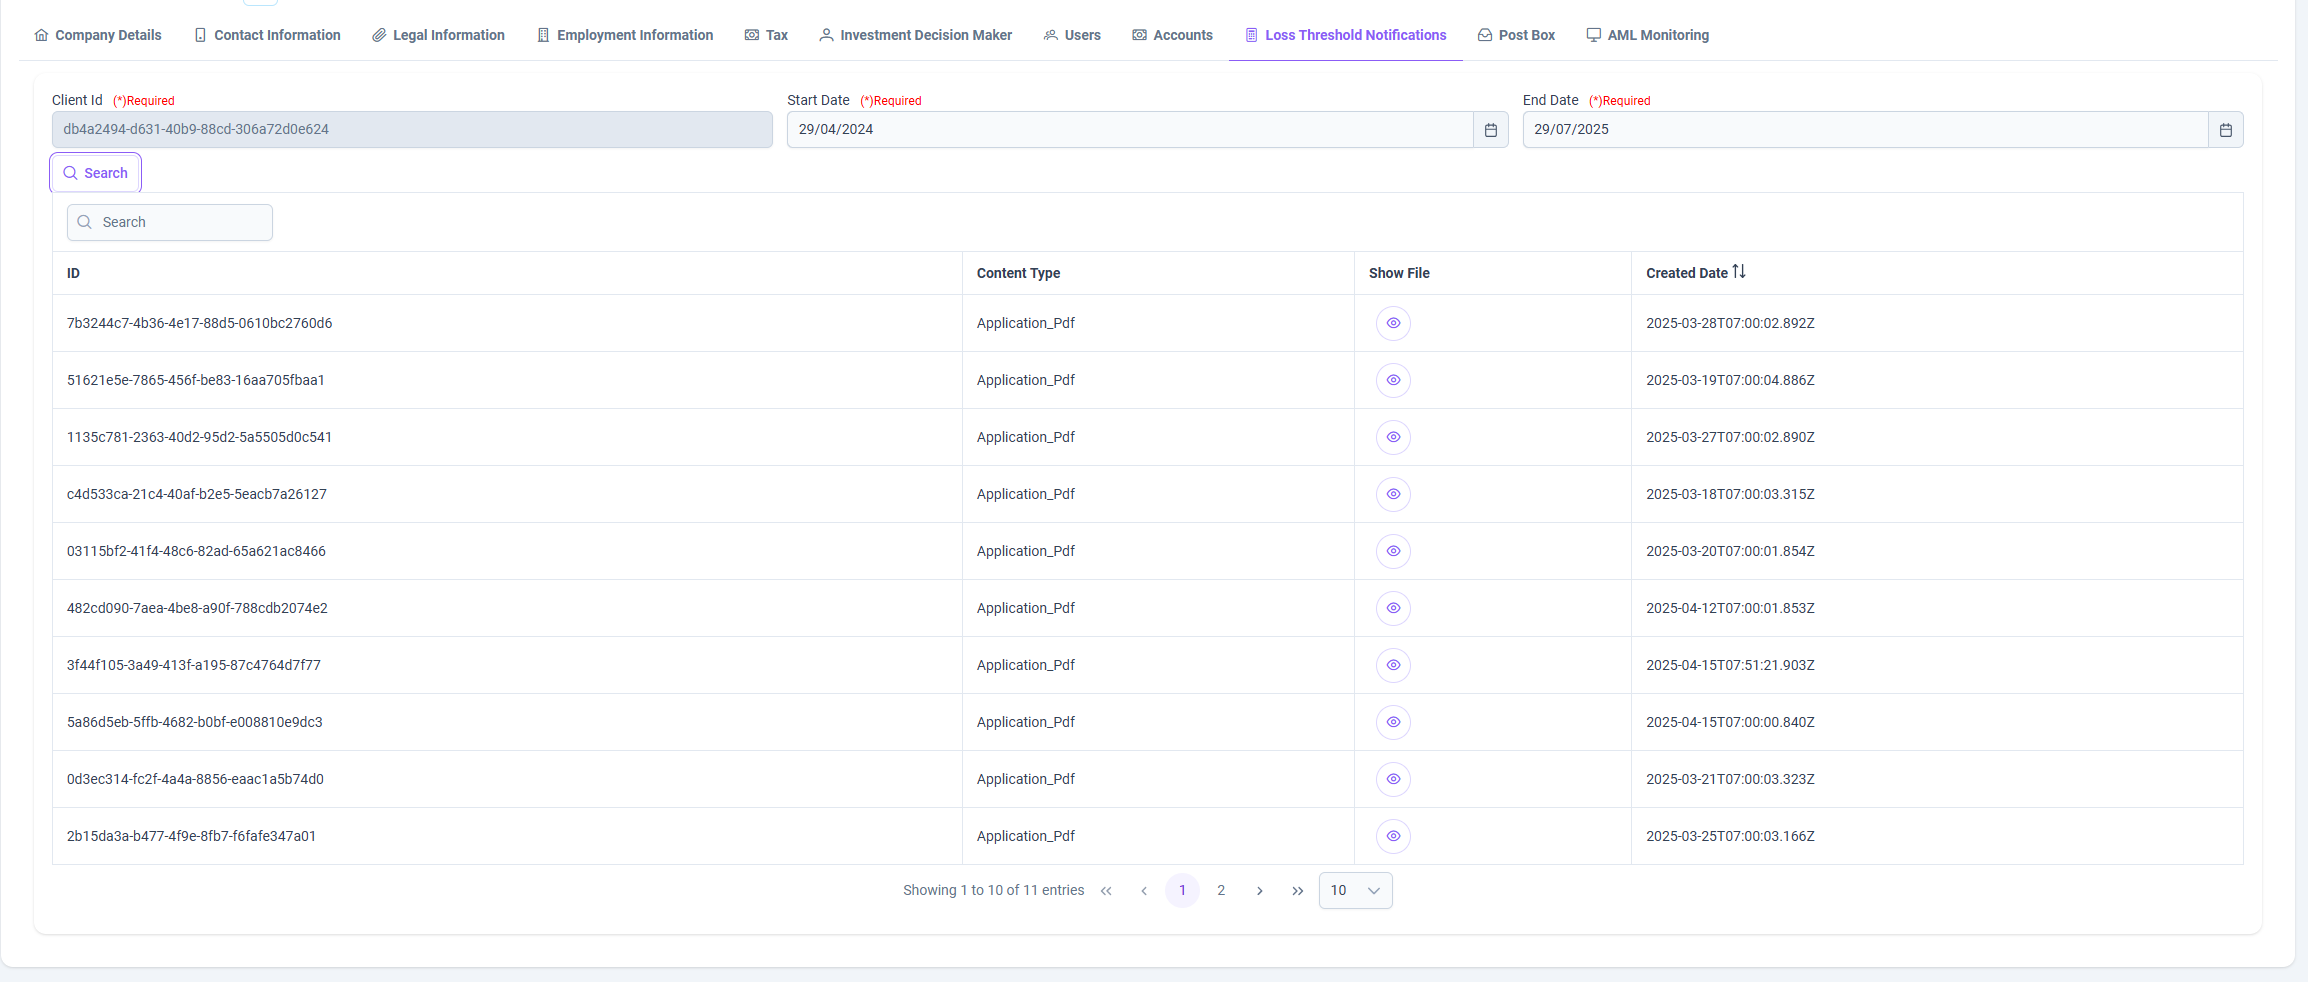
The Loss Threshold Notifications page displays records of loss notification documents generated for clients when a portfolio value drops beyond a predefined threshold.
This feature is implemented in accordance with Article 62 of the MiFID II Delegated Regulation, which obligates investment firms to notify clients if their portfolio depreciates by 10% or more since the last valuation or since the beginning of the reporting period.
📌 This tab is shared between both retail and business clients, and provides a unified view for loss notifications regardless of client type.
🔍 Page Overview
This page allows users to search and view client-specific loss threshold notification files within a selected date range.
❓ What is a Loss Threshold?
A Loss Threshold is a predefined percentage (commonly 10%) set by regulations such as MiFID II, which dictates when investment firms must inform clients that the value of their portfolio has significantly dropped.
Regulatory Context
According to MiFID II Article 62:
"Investment firms that hold a portfolio on behalf of a retail client shall inform the client when the overall value of the portfolio depreciates by 10% and thereafter at multiples of 10%."
This ensures transparency and allows investors to take timely action if necessary.
💼 Accounts
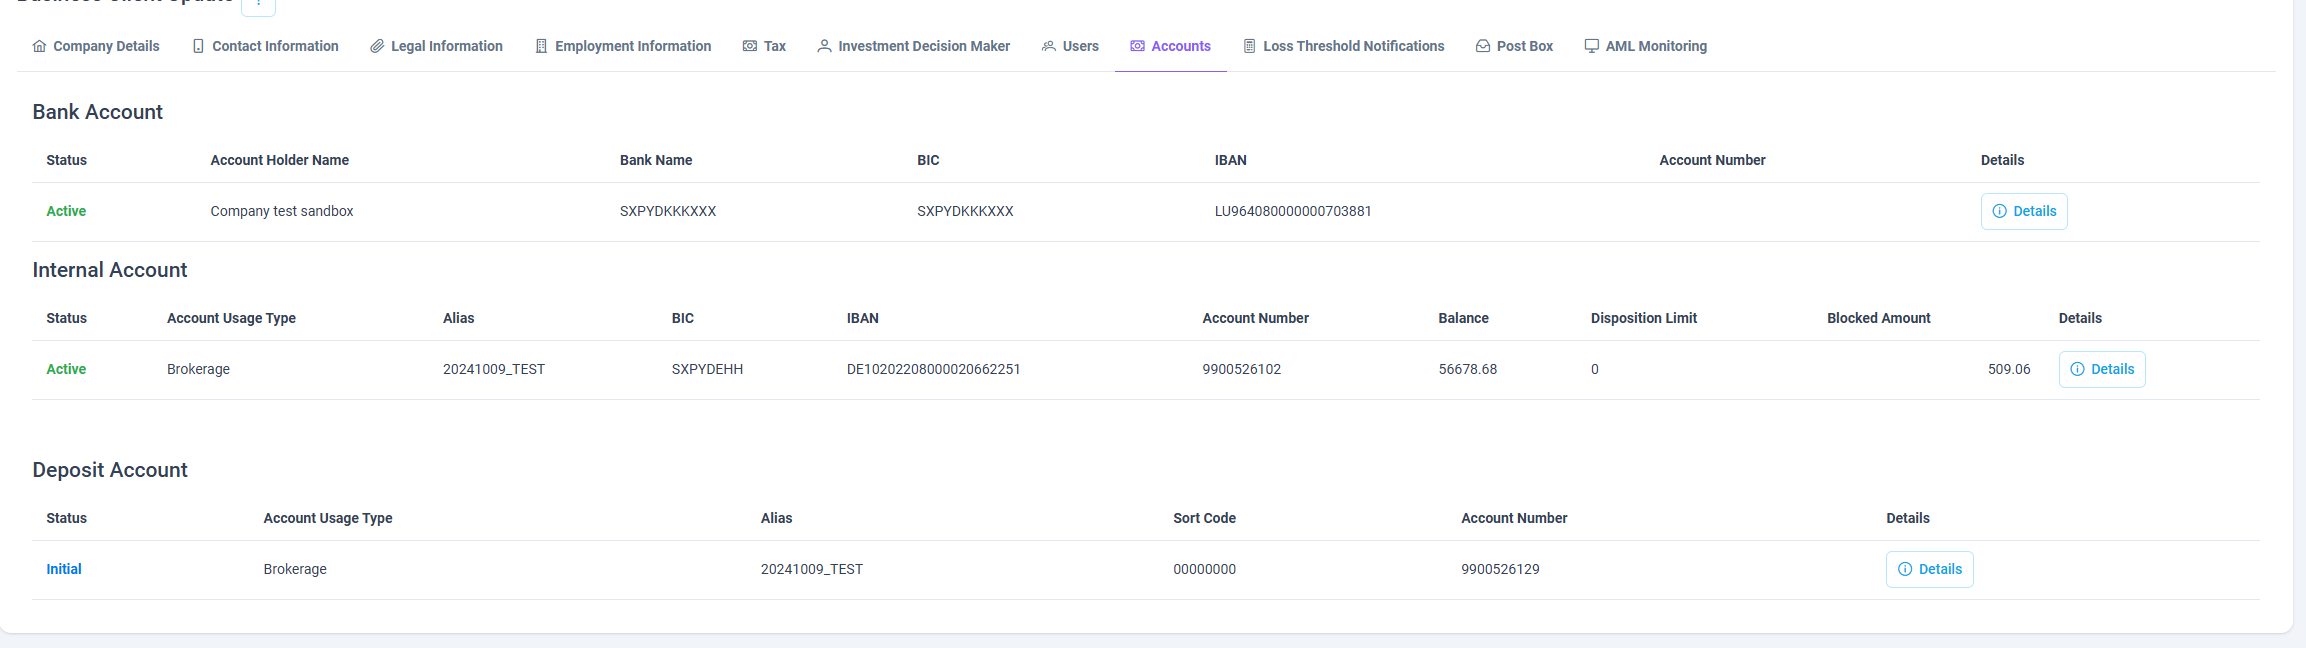
The Accounts tab provides a consolidated view of the client’s account information. This includes bank accounts, internal accounts, and deposit accounts, all categorized in structured sections.
📌 This tab is common to both retail and business clients, offering visibility into various account types linked to the client profile.
🏦 Bank Account
Displays details of external bank accounts associated with the client.
🏛️ Internal Account
Shows brokerage or internal accounts held within the firm’s system.
💰 Deposit Account
Covers deposit accounts used for funding or holding client assets.
🔎 Navigating to Account Details
Clicking the Details button in any section will redirect users to the account’s full detail view, where additional information and transaction history may be available.
📬 Post Box
The Post Box tab provides a centralized area where users can view all official communications, notifications, and statements delivered to their profile. This includes legal notices, internal account statements, corporate action statements, loss threshold results, and other system-generated messages.
📌 This tab is shared by both retail and business clients, ensuring all types of users have access to the same message center functionality.
🔎 Features
-
Detailed Search Filters
Users can filter documents by comment, category, validity period, and creation date to quickly find specific messages. -
Document Access
Each row in the message list includes a view icon to access the original PDF document directly from the interface.
The Post Box functions as a secure digital inbox, ensuring transparency and easy access to regulatory, financial, and operational communications.
👤 Users
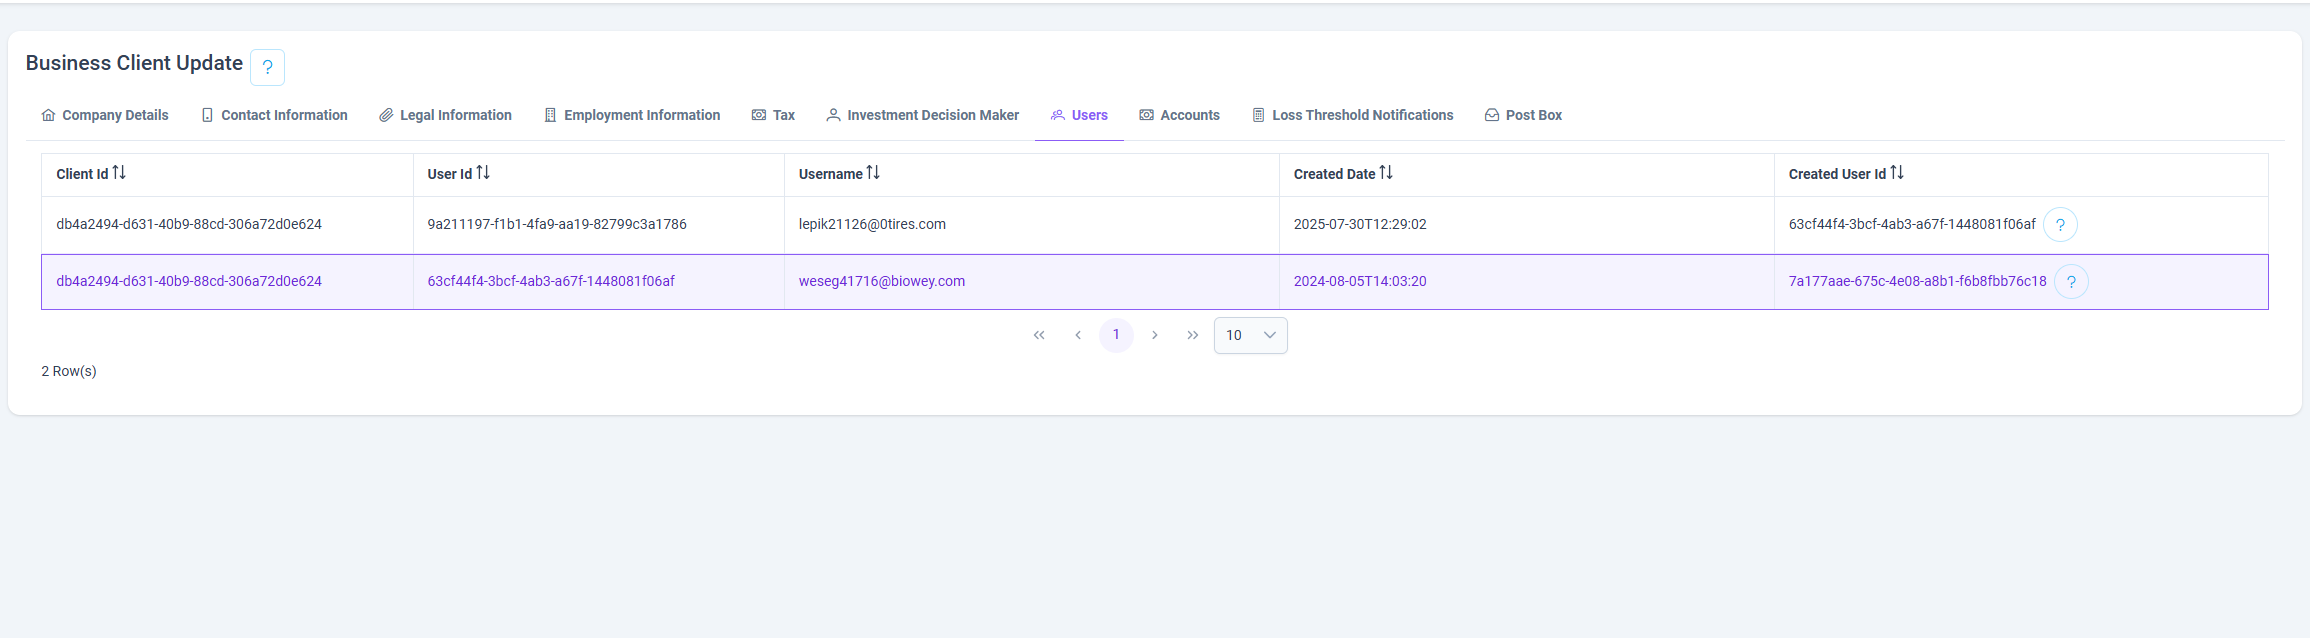
The Users tab under the Business Client module displays a list of users associated with each business client in the system. This section provides detailed information about users who are either linked to or created by a specific business client.
📌 Purpose
This tab is designed to list all users connected to a selected Business Client. It helps administrators view, track, and audit which users are linked to each client and who created them.
- The table lists all users linked to a specific client.
- Clients may have multiple users associated with them.
- Each row represents a unique user and their relationship to a business client.
- Data can be sorted by Client Id, User Id, Username, Created Date, or Created User Id for better navigation.
🛡️ AML Monitoring
The AML Monitoring tab provides a comprehensive overview of Anti-Money Laundering (AML) data associated with a client. It helps identify and track potential money laundering risks through records retrieved from integrated AML service providers.
This tab is only available to users with the following roles: tenant_admin, tenant_api, or tenant_compliance_role.
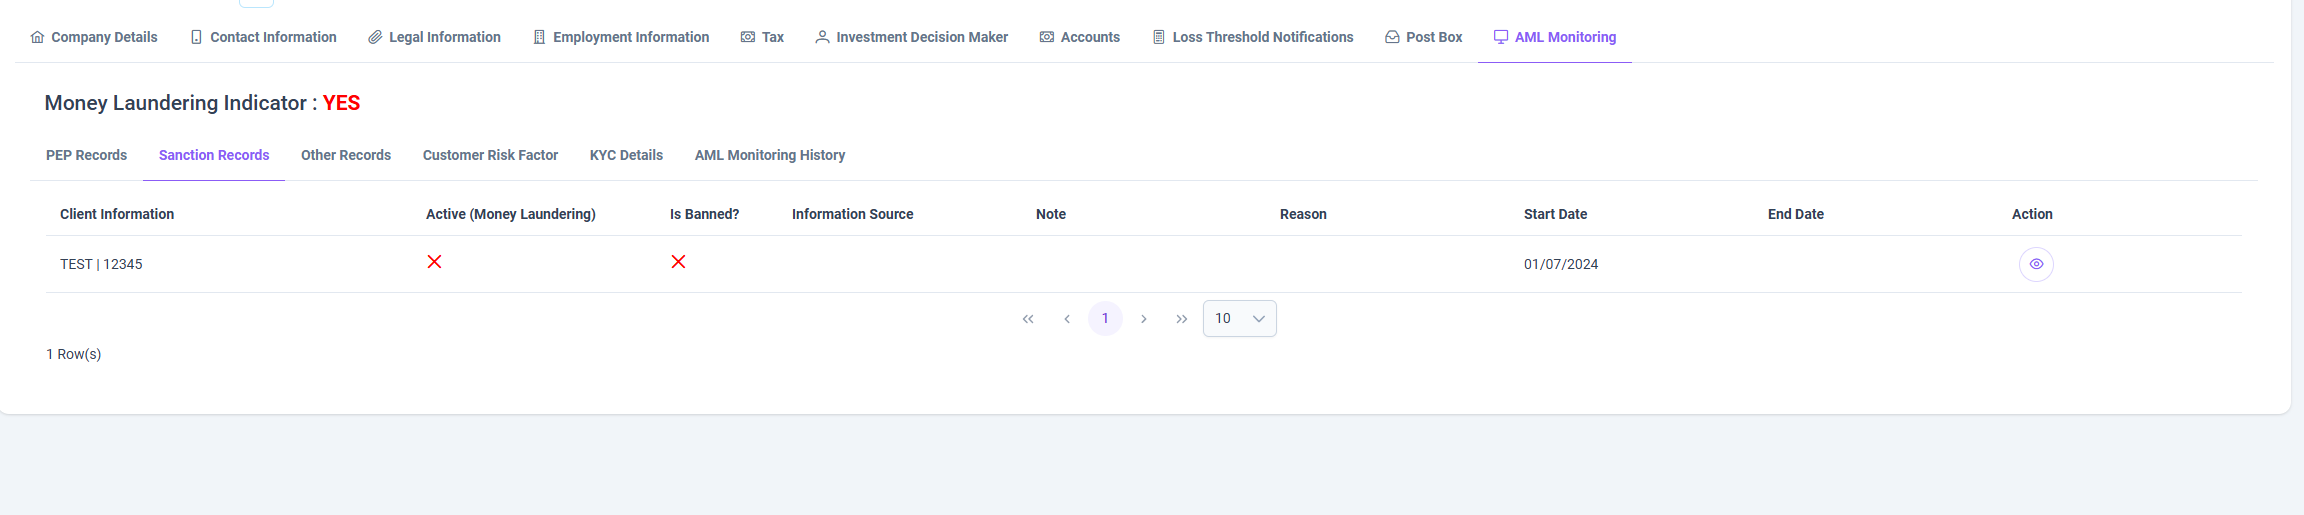
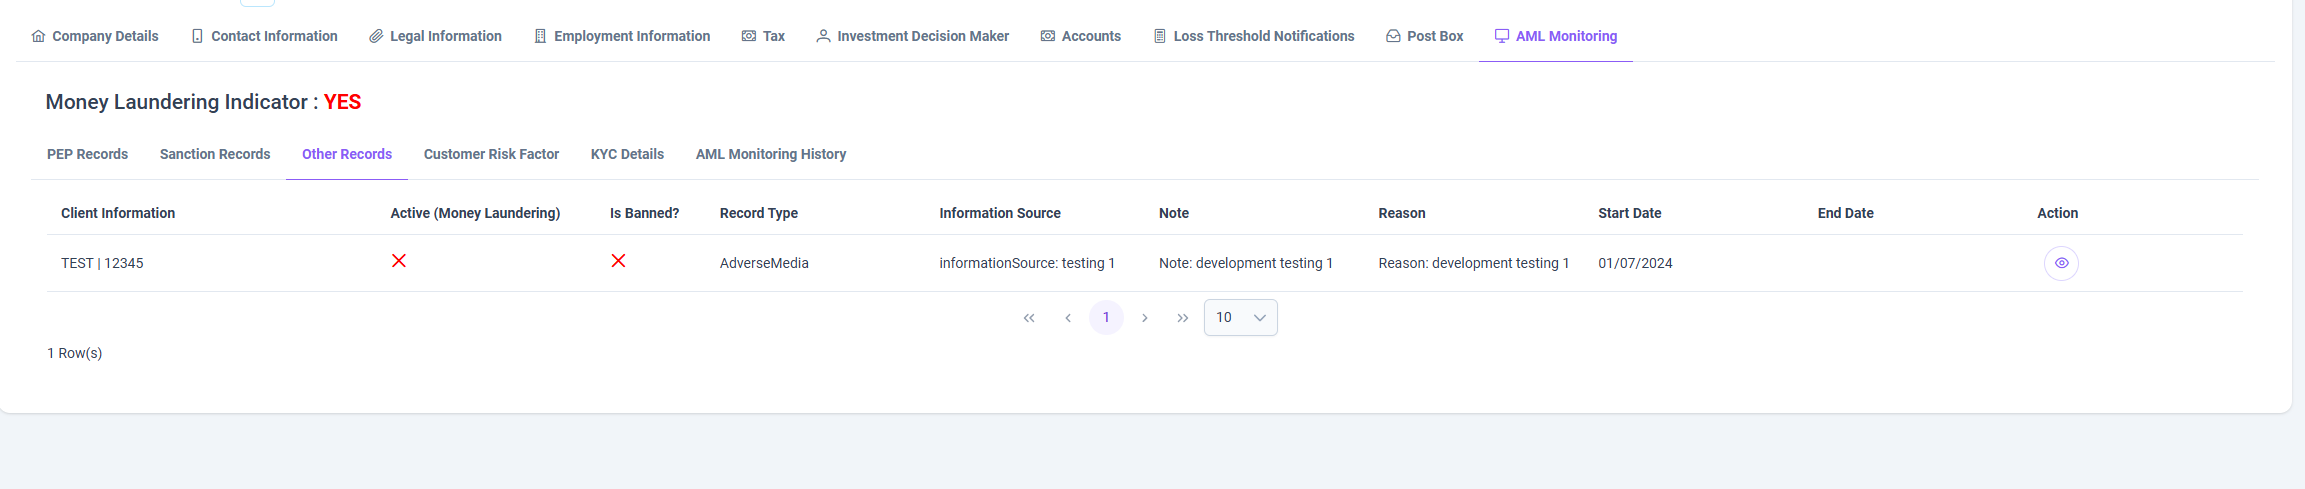
🚨 Money Laundering Indicator
- Indicator Status: Displays whether there is a positive AML match. If YES, it indicates a potential risk that requires further investigation.
📂 Sub-Tabs Overview
🔹 PEP Records
Lists Politically Exposed Person (PEP) matches. Clicking the 👁️ icon navigates to the AML Customer Monitoring page for the specific client.

🔹 Sanction Records
Displays matches found in international sanctions lists. The 👁️ icon also redirects to the client's AML monitoring detail page.
🔹 Other Records
Shows additional relevant records such as adverse media or enforcement data. Clicking 👁️ provides a deeper view via the AML Customer Monitoring screen.
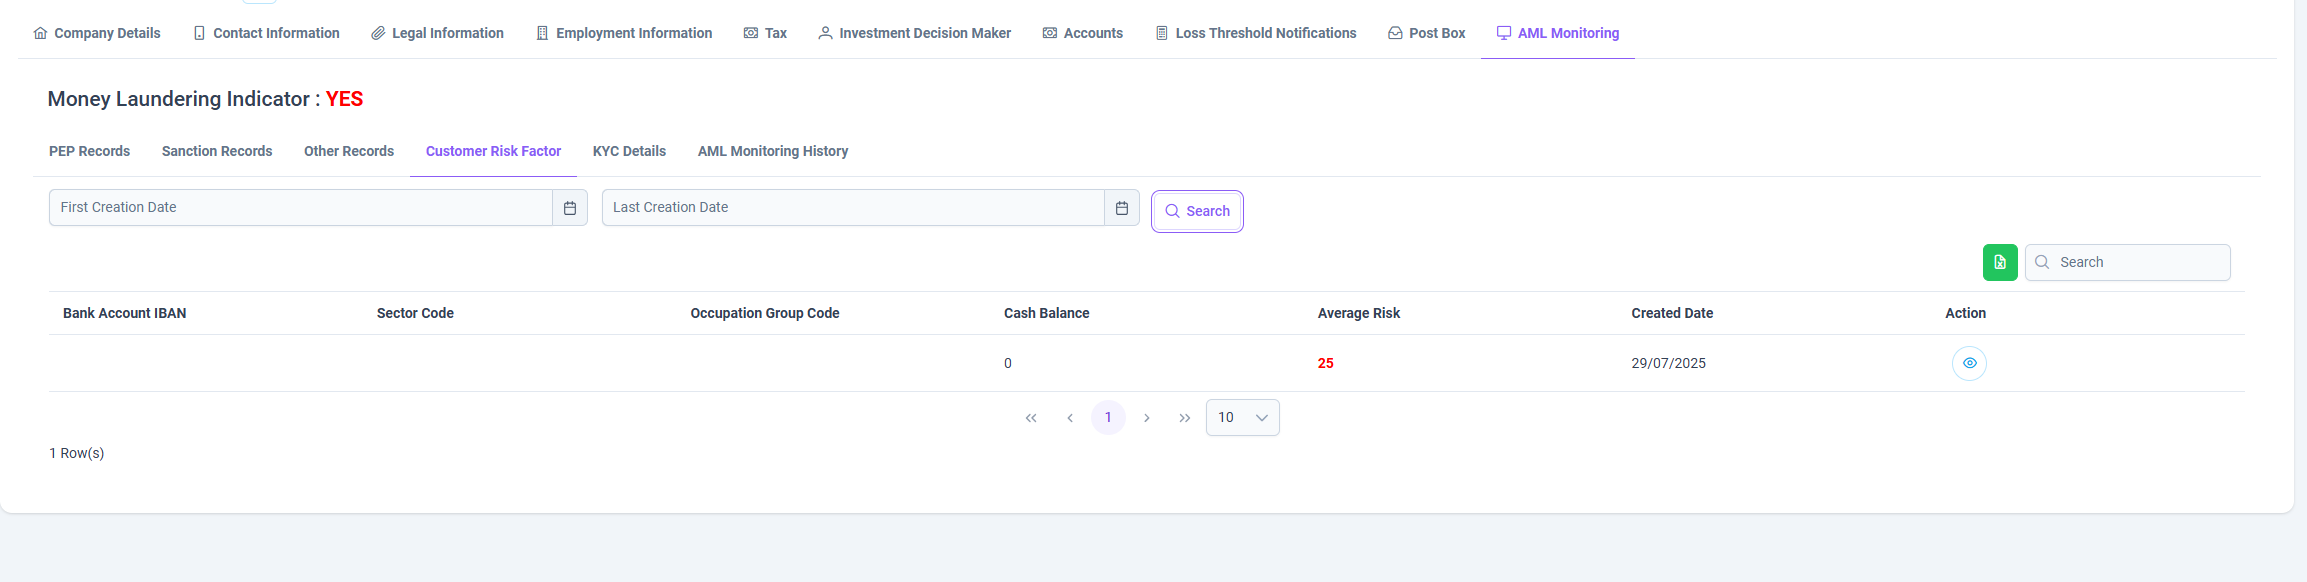
🔹 Customer Risk Factor
Summarizes risk elements used to assess the client's AML profile. Clicking the 👁️ icon opens a detailed breakdown of these risk factors.
🔹 KYC Details
Displays Know Your Customer (KYC) data pulled from AML providers to support client verification and risk evaluation.

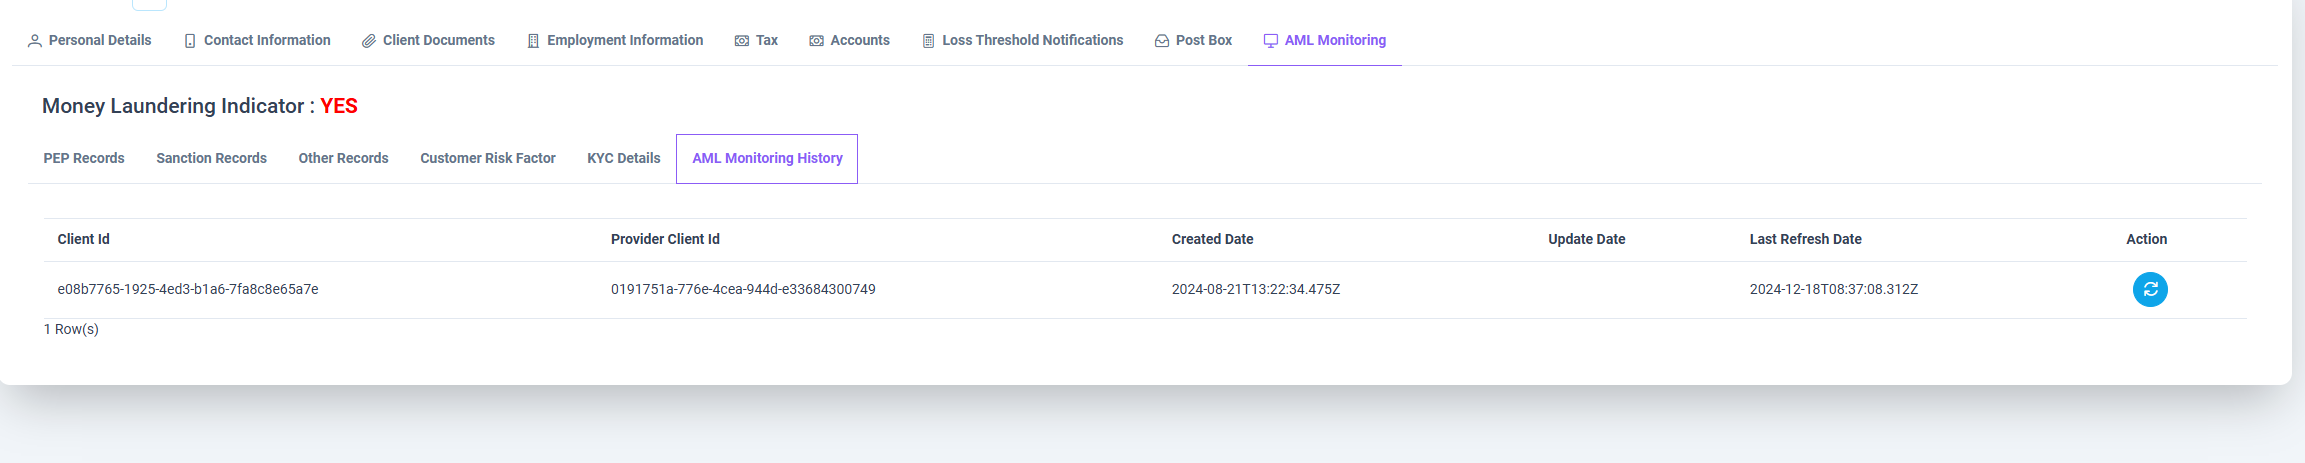
🔹 AML Monitoring History
Tracks historical monitoring interactions with AML service providers.
-
The 🔄 Action button triggers a new request to refresh data from the provider, updating the monitoring history.
-
The Last Refresh Date column shows when the data was last updated.
-
Clicking the refresh icon in the AML Monitoring History tab sends a new request to the AML provider and updates the historical log accordingly.
-